Page 2 of 3
Re: Resin print keyboard parts factory
Posted: 04 Sep 2020, 19:44
by SneakyRobb
gianni wrote: 03 Sep 2020, 09:59
About the flipper, could it be that it doesn't work perfectly because the spring is not seated correctly on the little stem? When the spring buckles, it applies a "moment" (not sure if the translation is correct), and if it is not seated firmly, the buckling doesn't translate in a "moment" acting on the flipper.
Hi, yes that is correct. The main problem is getting it just right so that it sits upright when the spring is on. This pulls the front of the flipper up, then pressing makes the click.
The last one I printed does click, I should make a video of it later. I will print the newest one this weekend. Resin printing requires many extra clean steps so I only do on weekend.
Re: Resin print keyboard parts factory
Posted: 05 Sep 2020, 01:45
by SneakyRobb
Hi,
So I printed a model f at/122 plug and it seems to fit and work fine. Super duper. It's a bit tall, but I can fix later.
- plug bottom.jpg (2.25 MiB) Viewed 7369 times
- plug 1.jpg (2.33 MiB) Viewed 7369 times
When I was modelling the model f I realized I didn't know how to represent the curvature of the model f. I found that ellipse and manisteinn gave values of about 300m from the backplate.
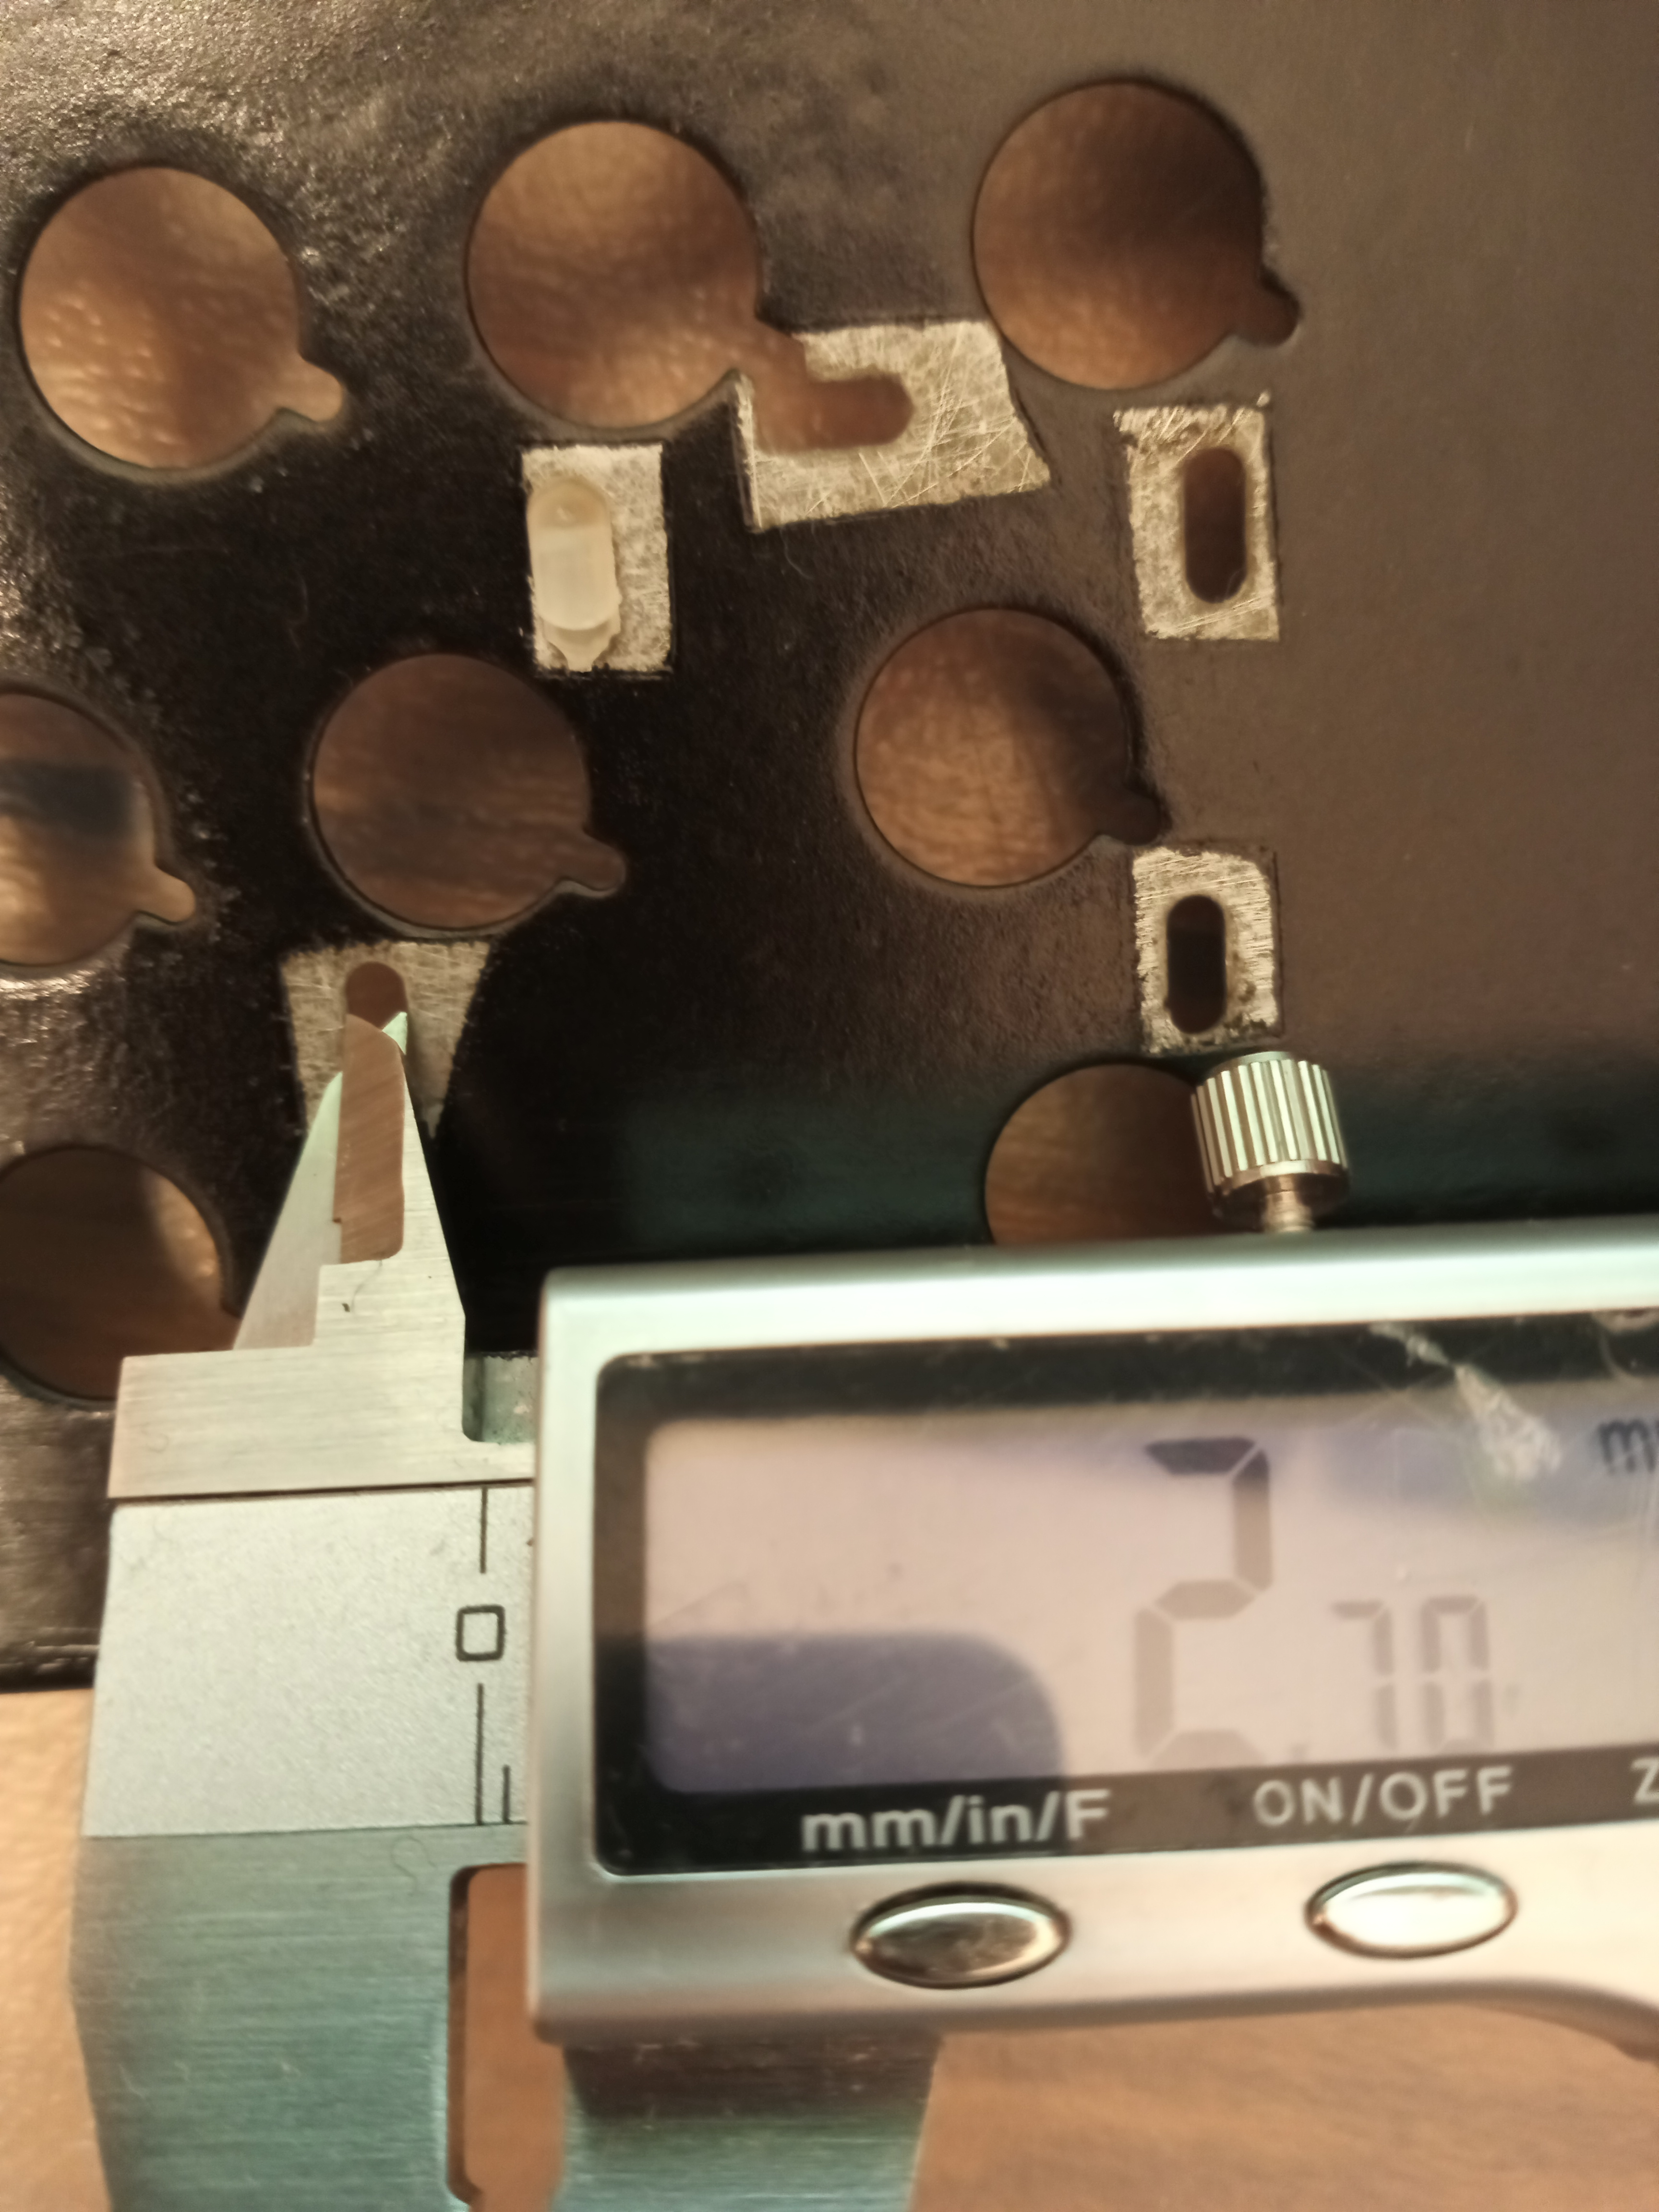
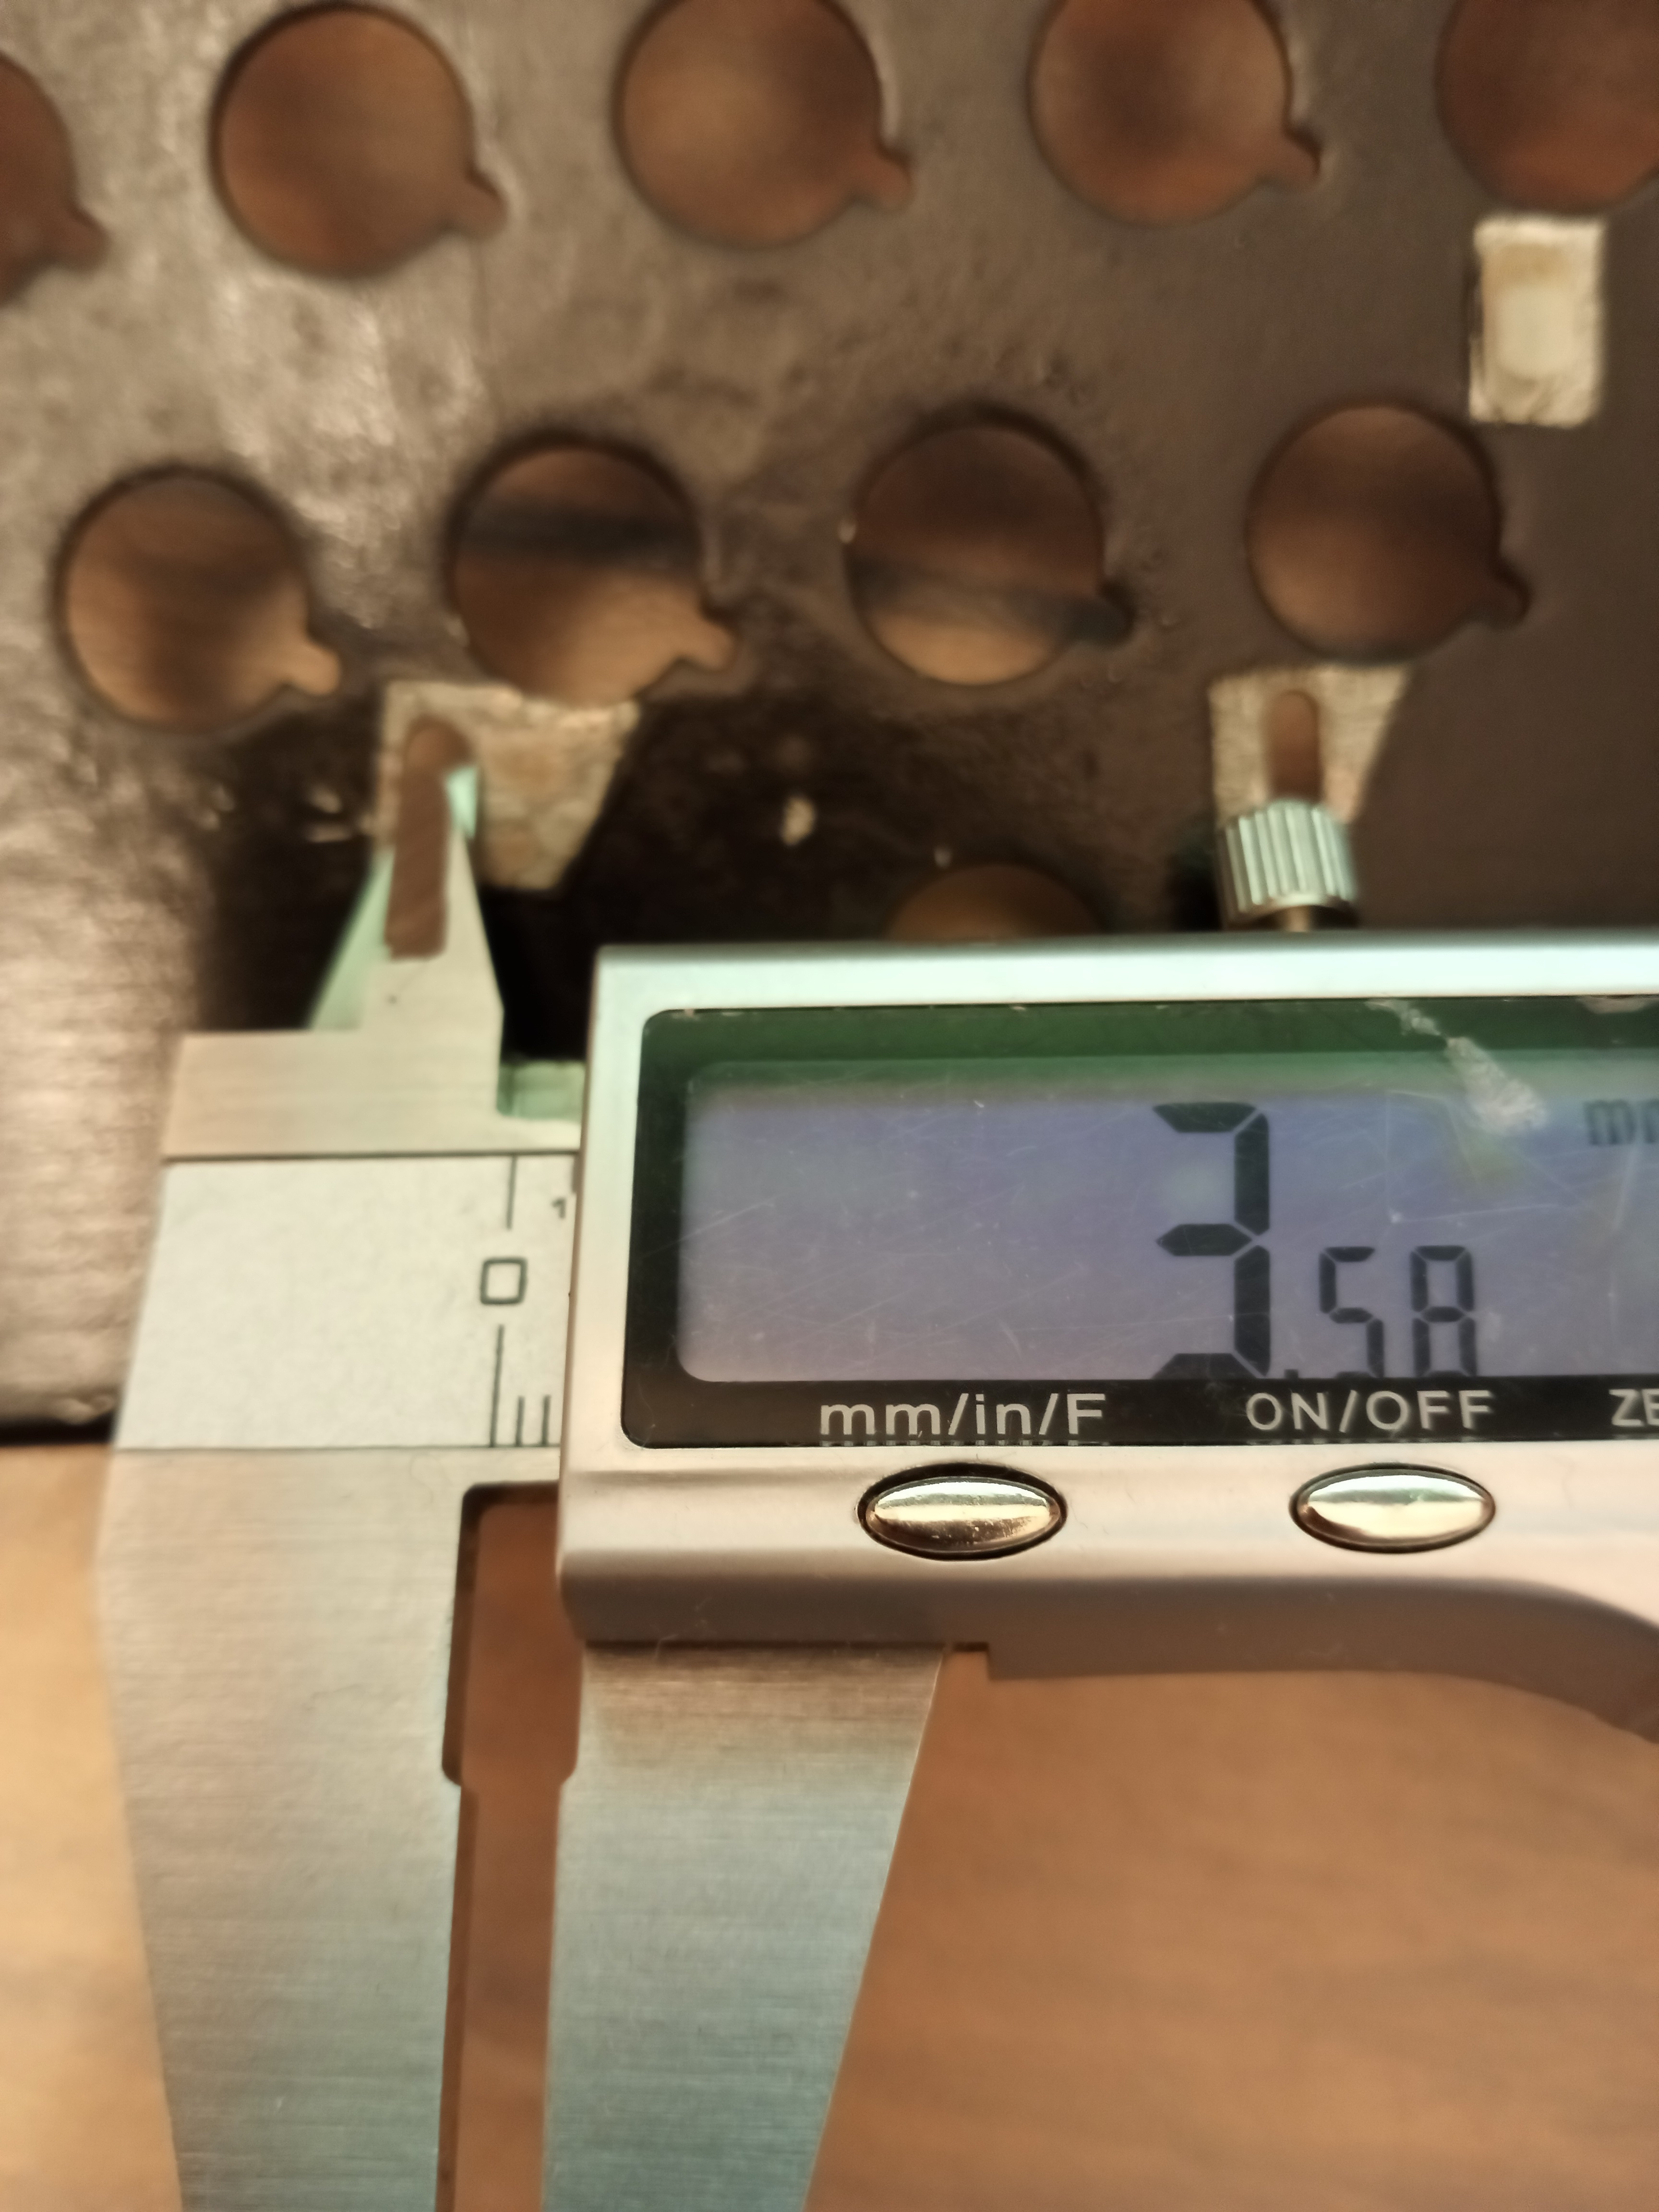
I wanted to verify this for myself. I printed this attachment thing for a caliper.
https://www.thingiverse.com/thing:2746027
I got a value of about 2.5mm on the tool on the back of the F122 plate. This calculated out to a radius of 301.5625mm.
To me this is close enough and the FDM printing has some variance. So I am happy with the 300mm model f back plate curvature value of 300mm
Re: Resin print keyboard parts factory
Posted: 05 Sep 2020, 09:05
by gianni
I thought that you were putting it on top of the plate, to fill the voids between two adjacent keycaps, making it level with the case. Now I see that you put it inside, between the plates, that obviously makes sense because it prevents any kind of dust from entering the assembly. Anyway the opposite could be possible too (top mount I mean), by adding maybe some clips on the stem that goes inside the plate, to prevent it from dislodging.
Re: Resin print keyboard parts factory
Posted: 05 Sep 2020, 09:28
by JBert
gianni wrote: 03 Sep 2020, 09:59
About the flipper, could it be that it doesn't work perfectly because the spring is not seated correctly on the little stem? When the spring buckles, it applies a "moment" (not sure if the translation is correct), and if it is not seated firmly, the buckling doesn't translate in a "moment" acting on the flipper.
I think it's more often called "torque" in English.
Re: Resin print keyboard parts factory
Posted: 06 Sep 2020, 23:33
by SneakyRobb
gianni wrote: 05 Sep 2020, 09:05
I thought that you were putting it on top of the plate, to fill the voids between two adjacent keycaps, making it level with the case. Now I see that you put it inside, between the plates, that obviously makes sense because it prevents any kind of dust from entering the assembly. Anyway the opposite could be possible too (top mount I mean), by adding maybe some clips on the stem that goes inside the plate, to prevent it from dislodging.
Hi that is true. I think the blanks are good so the top and bottom plates are held in a similar tension vs the original. Vs leaving them empty or taped over.
Also I needed some stabilizers for the F AT space bar conversion and didn't want to glue metal. Ill use a drill. So I made some model f stabilizer inserts that can be printed then glued together. I saw as similar design on another website so I basically copied that one. The glue makes it so you can remove the stabilizer with a quick side chisel hit just like a model m rivet and no glue gets on the plate.
I will test print these later today. I made the Space bar one wider just like the wider ones on the F122 spacebar vs the other keys.
https://grabcad.com/library/model-f-key ... ng-piece-1
Re: Resin print keyboard parts factory
Posted: 07 Sep 2020, 00:38
by gianni
SneakyRobb wrote: 06 Sep 2020, 23:33
gianni wrote: 05 Sep 2020, 09:05
I thought that you were putting it on top of the plate, to fill the voids between two adjacent keycaps, making it level with the case. Now I see that you put it inside, between the plates, that obviously makes sense because it prevents any kind of dust from entering the assembly. Anyway the opposite could be possible too (top mount I mean), by adding maybe some clips on the stem that goes inside the plate, to prevent it from dislodging.
Hi that is true. I think the blanks are good so the top and bottom plates are held in a similar tension vs the original. Vs leaving them empty or taped over.
Also I needed some stabilizers for the F AT space bar conversion and didn't want to glue metal. Ill use a drill. So I made some model f stabilizer inserts that can be printed then glued together. I saw as similar design on another website so I basically copied that one. The glue makes it so you can remove the stabilizer with a quick side chisel hit just like a model m rivet and no glue gets on the plate.
I will test print these later today. I made the Space bar one wider just like the wider ones on the F122 spacebar vs the other keys.
https://grabcad.com/library/model-f-key ... ng-piece-1
The space-bar stabilizer is a super useful idea. I've seen many horrible hacks, this instead seems really nice. I have no idea if the glue is a good idea or not, I'll think about it.
Re: Resin print keyboard parts factory
Posted: 07 Sep 2020, 23:15
by SneakyRobb
gianni wrote: 07 Sep 2020, 00:38
SneakyRobb wrote: 06 Sep 2020, 23:33
gianni wrote: 05 Sep 2020, 09:05
I thought that you were putting it on top of the plate, to fill the voids between two adjacent keycaps, making it level with the case. Now I see that you put it inside, between the plates, that obviously makes sense because it prevents any kind of dust from entering the assembly. Anyway the opposite could be possible too (top mount I mean), by adding maybe some clips on the stem that goes inside the plate, to prevent it from dislodging.
Hi that is true. I think the blanks are good so the top and bottom plates are held in a similar tension vs the original. Vs leaving them empty or taped over.
Also I needed some stabilizers for the F AT space bar conversion and didn't want to glue metal. Ill use a drill. So I made some model f stabilizer inserts that can be printed then glued together. I saw as similar design on another website so I basically copied that one. The glue makes it so you can remove the stabilizer with a quick side chisel hit just like a model m rivet and no glue gets on the plate.
I will test print these later today. I made the Space bar one wider just like the wider ones on the F122 spacebar vs the other keys.
https://grabcad.com/library/model-f-key ... ng-piece-1
The space-bar stabilizer is a super useful idea. I've seen many horrible hacks, this instead seems really nice. I have no idea if the glue is a good idea or not, I'll think about it.
Hi agree. The glue is good because it won't touch the metal. The first one came out pretty good.
Needs some adjustments but it seems to work and fit. Used f122 spacebar to compare.
Not sure long term durability but the file is out there.
For something like F AT you would still need holes so epoxy ones might still be best.
Re: Resin print keyboard parts factory
Posted: 08 Sep 2020, 00:53
by SneakyRobb
Hi,
I will print some more stabs now. Trying to get them to fit a bit better. Previously my prints kept peeling off or not sticking to the plate. I have increased the UV exposure time of the lower levels of the print. I hope this helps.
I am still having issues making the model f flippers click properly. The dimensions and accuracy required a trickey!
Here are the items I am printing today.
The black resin kept failing while the clear one was very success. I think the UV goes through the clear more easily and the bottom layer adhesion was just better.
I thought it would be fun to print a model m keycap so I added one as well.
I have angled the model f flippers more so that they will not have flat areas where resin drips.
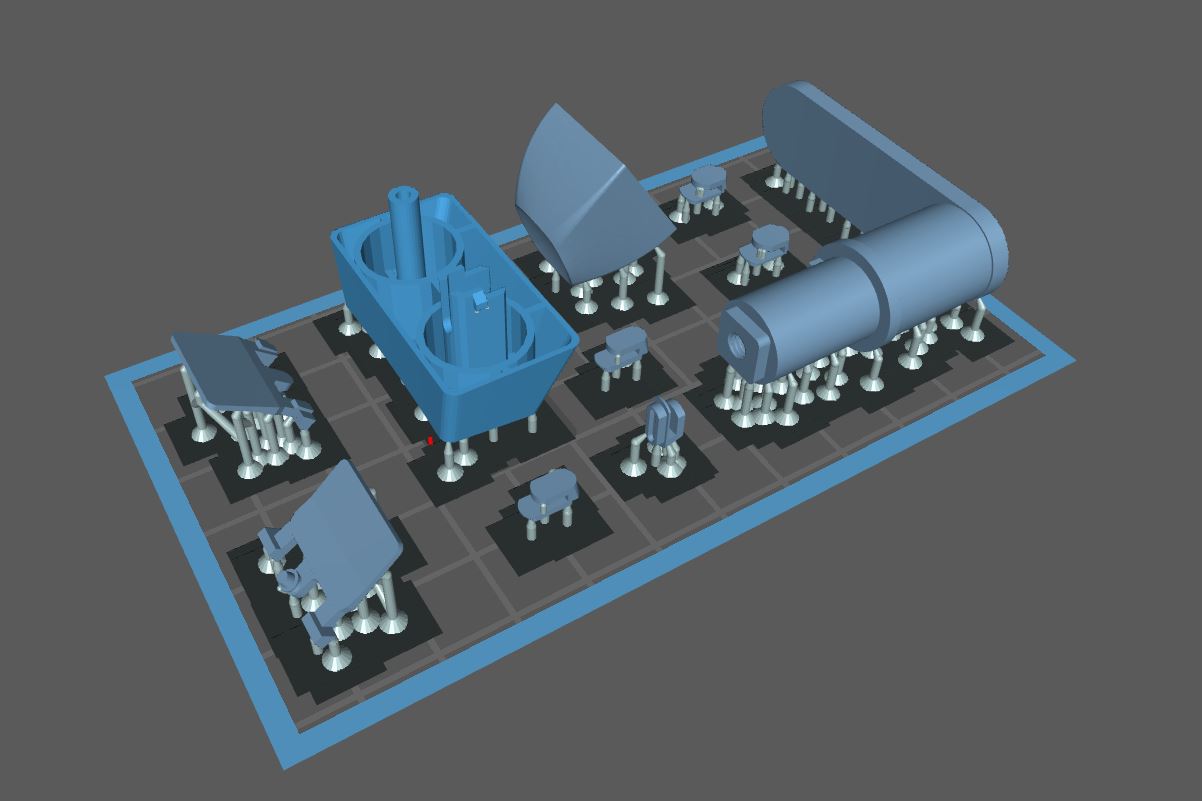
- prints.JPG (66.89 KiB) Viewed 7172 times
Here is yesterday prints with the stabs
- 20200907_002159.jpg (3.47 MiB) Viewed 7172 times
Re: Resin print keyboard parts factory
Posted: 08 Sep 2020, 03:07
by SneakyRobb
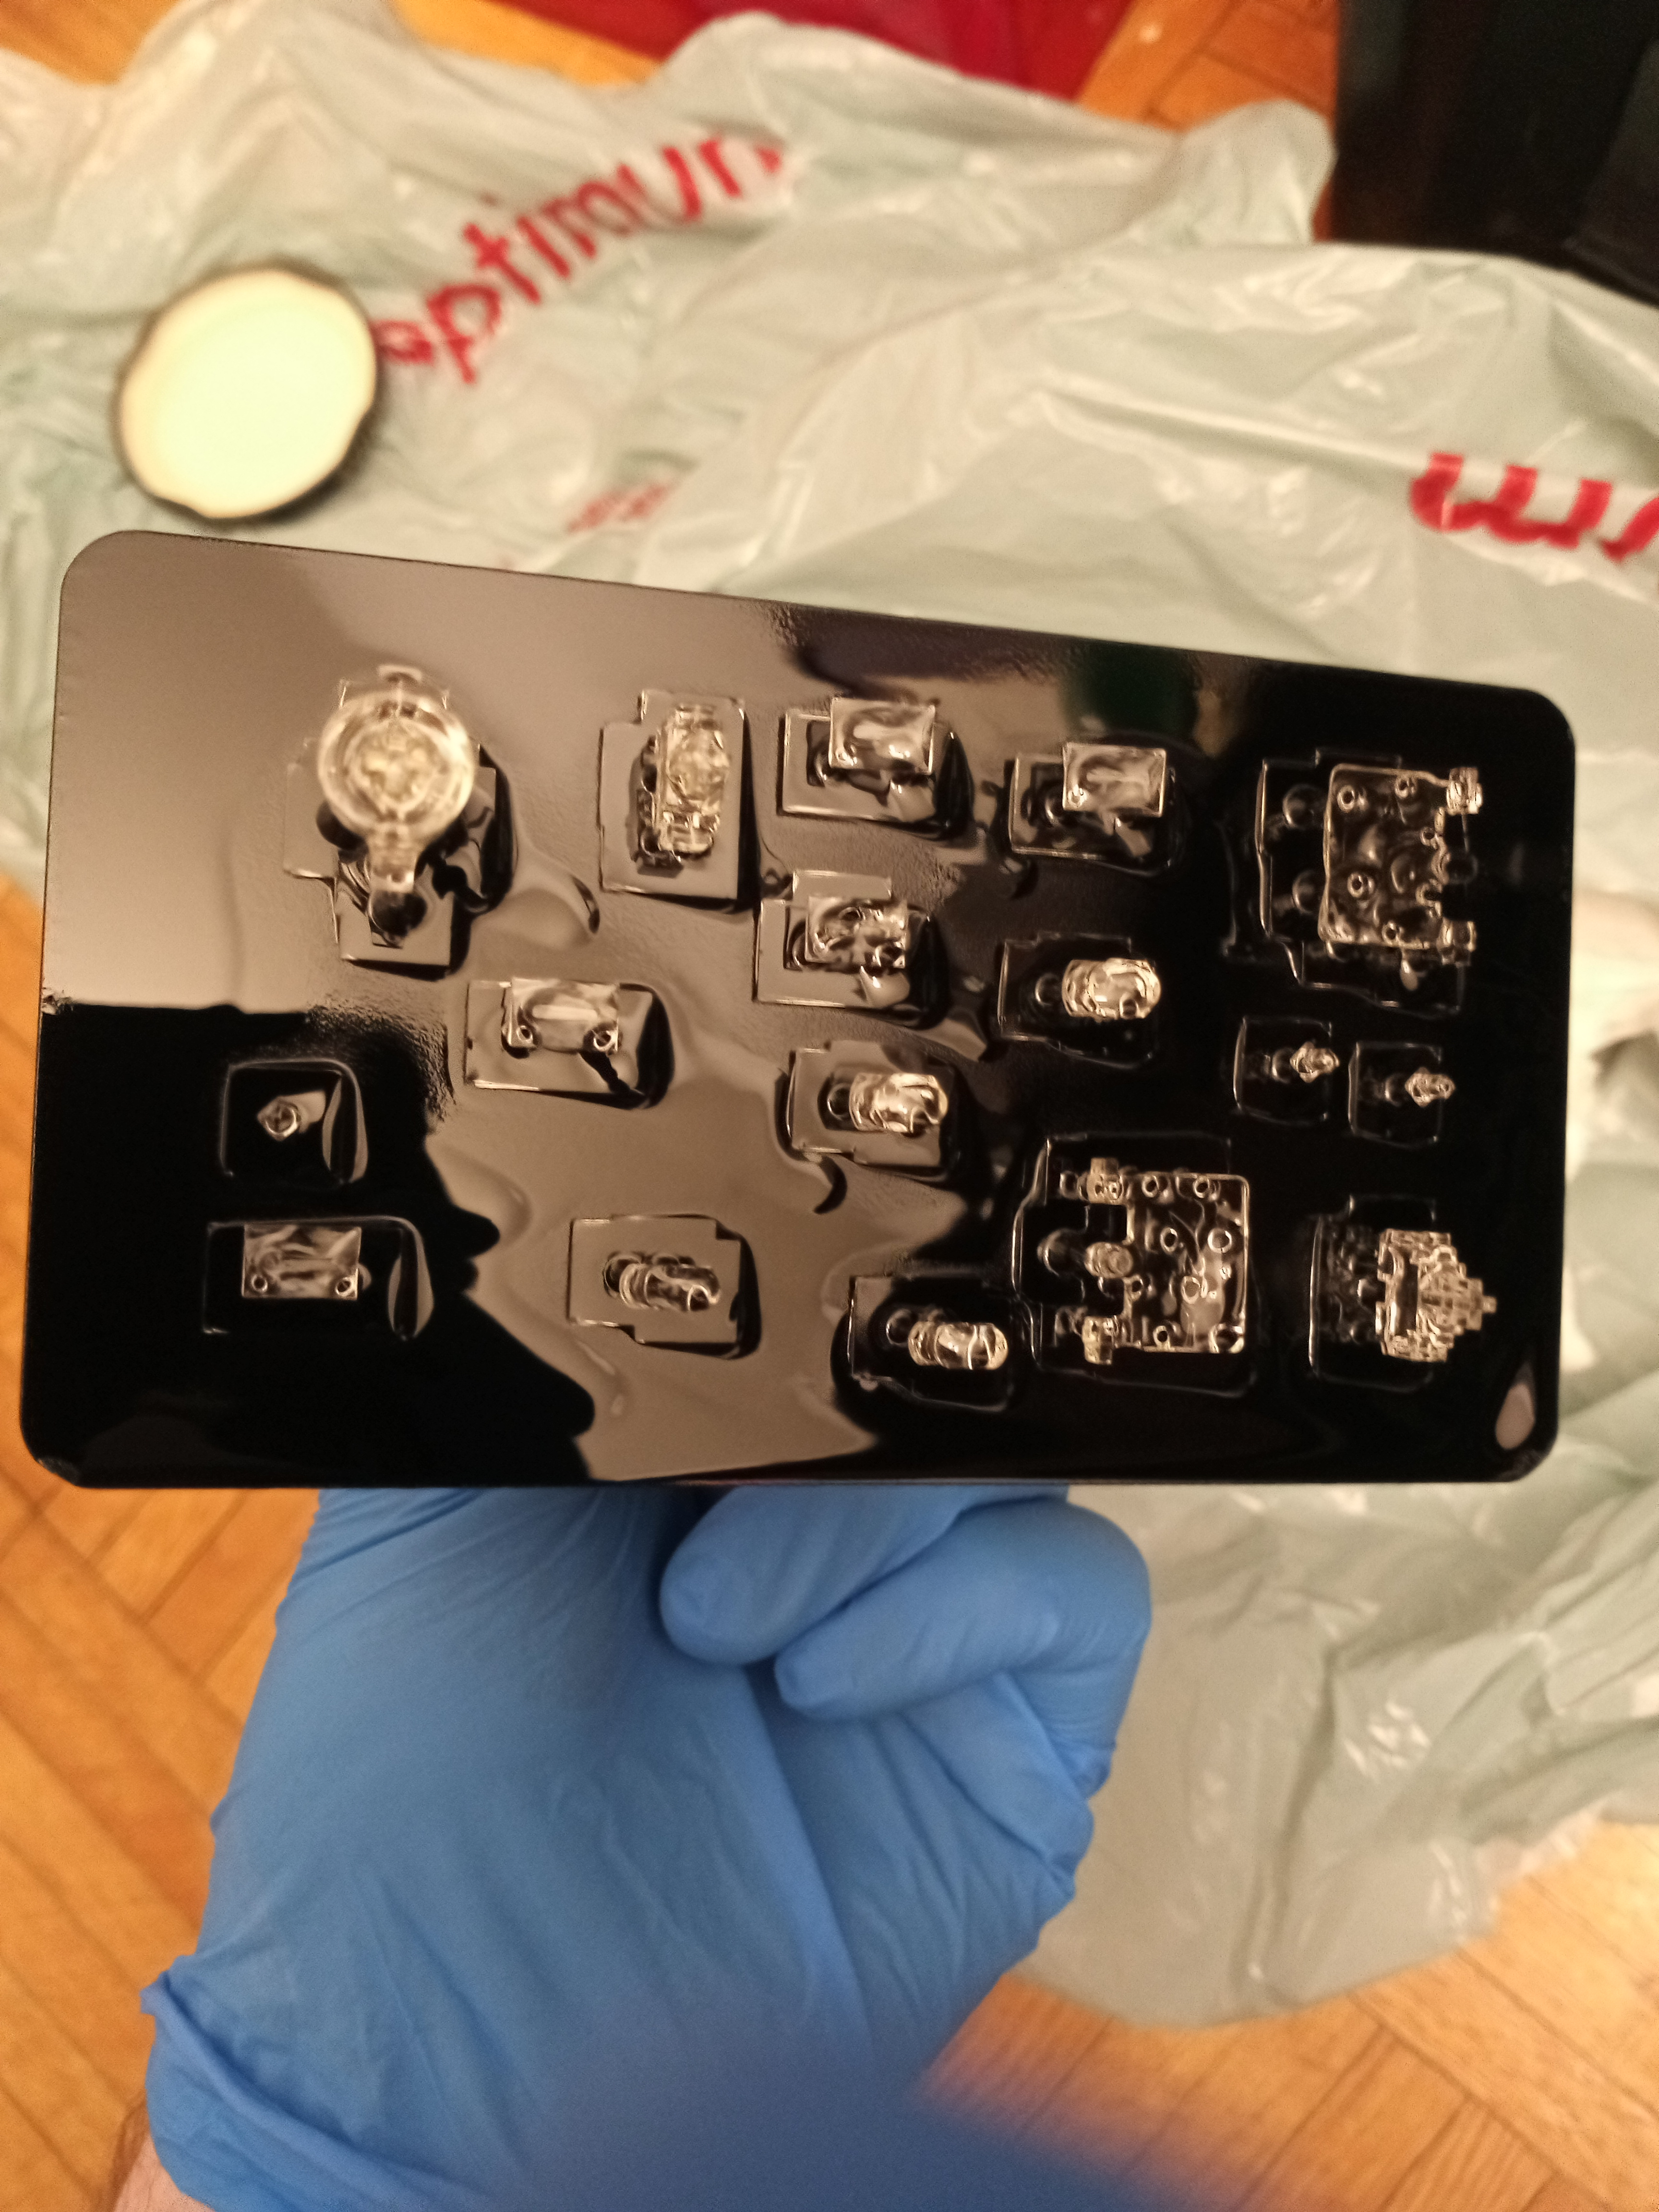
Hi, and here is the print before cleaning. You can see the model m backspace key clearly. Increasing the lower level cure time has worked great.
The print is inside the box currently.
Looks like every item printed correctly. Yes.
Re: Resin print keyboard parts factory
Posted: 08 Sep 2020, 04:02
by SneakyRobb
Hi,
And here.
- IMG_20200907_215132.jpg (3.05 MiB) Viewed 7153 times
You can see how the handle part peeled a bit. Still learning.
Happy with 2u backspace keycap
They all cure now.
1 stabilizer failed and the handle peeled but otherwise happy with results.
The beamspring and model m keycap look great.
Re: Resin print keyboard parts factory
Posted: 08 Sep 2020, 06:05
by SneakyRobb
Hi,
I must bed now but here are the parts in the UV curing thing.
You can see how the model m backspace has some stuff from where the supports were.
Robb
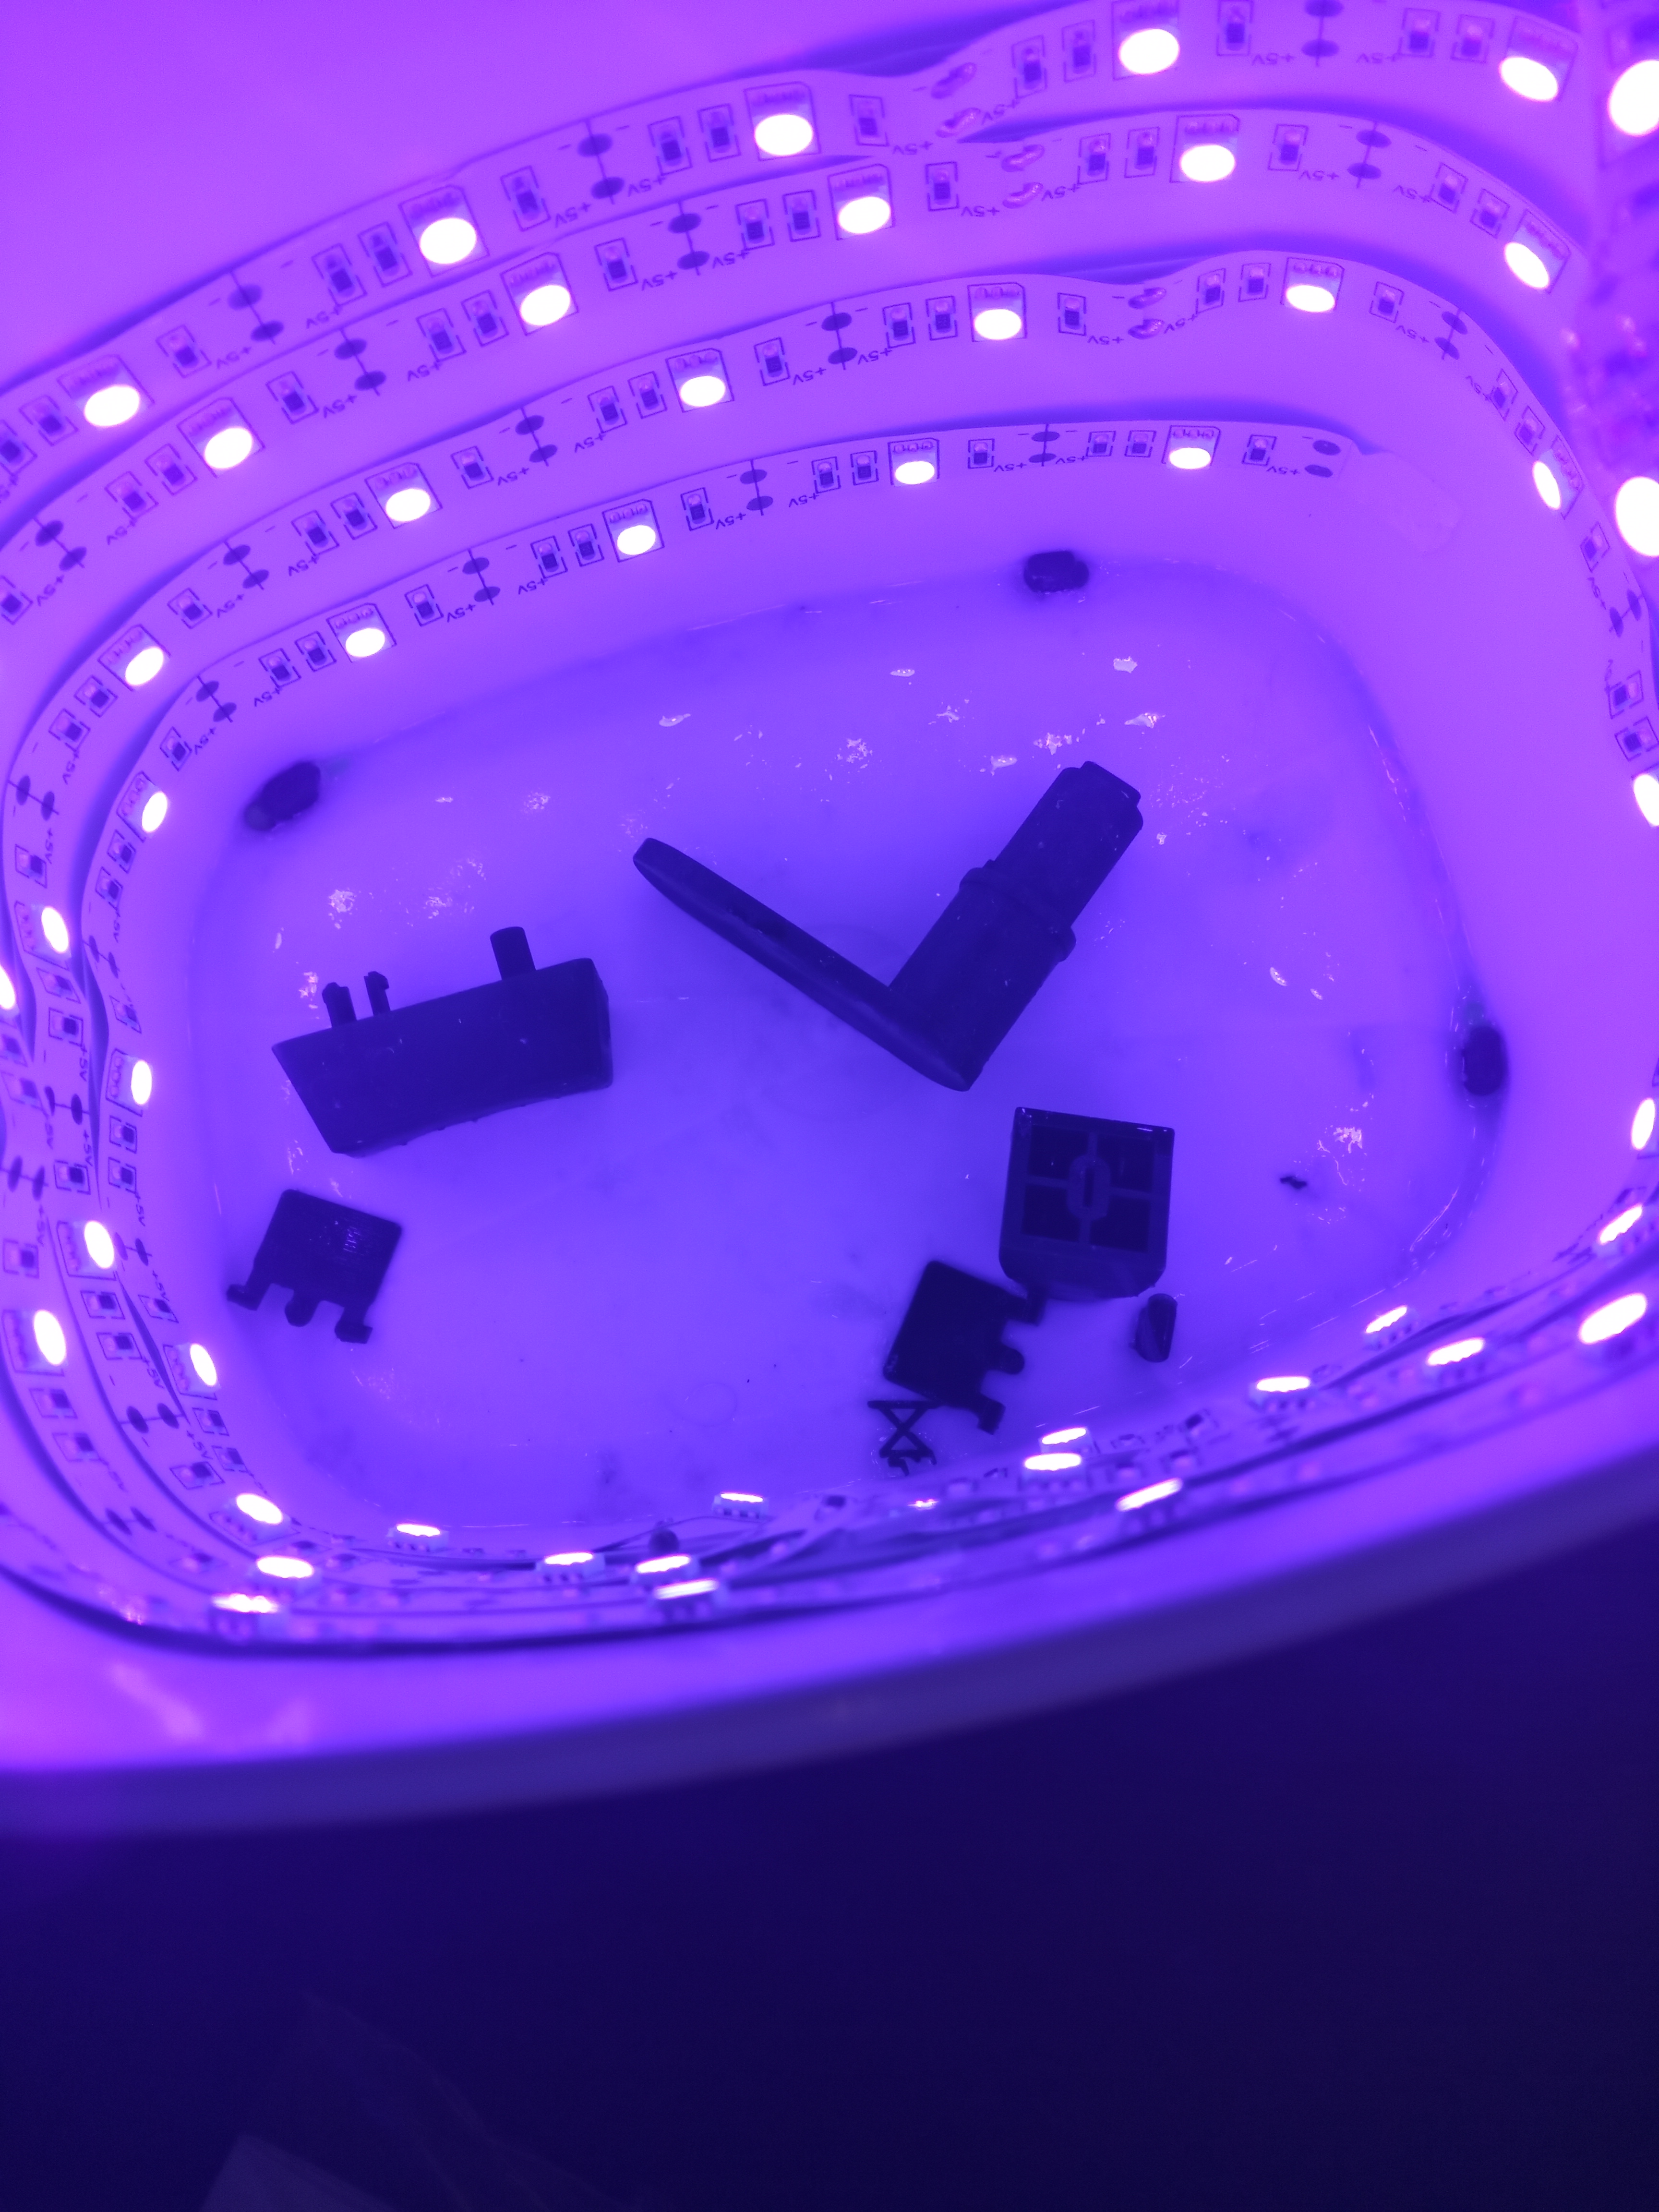
- IMG_20200907_224344.jpg (3.12 MiB) Viewed 7131 times
Re: Resin print keyboard parts factory
Posted: 08 Sep 2020, 11:14
by gianni
The hole in which the stabilizer must be inserted is very small, so placing a screw to hold it (like I was thinking when I say this problem), seems quite difficult...
You can go the costar way, with a stabilizer simply inserted into the hole without any clip, I don't know if resin is flexible enough to have those little protrusion bend a little to allow the insertion and secure placement, I fear not. And the hole it's too small also for cherry style clips.
Or you could design the stabilizer with a hole in the middle, to allow some flexibility when you insert it (green arrow).
Then you leave an open side where I put the yellow arrow to allow the wire to be inserted.
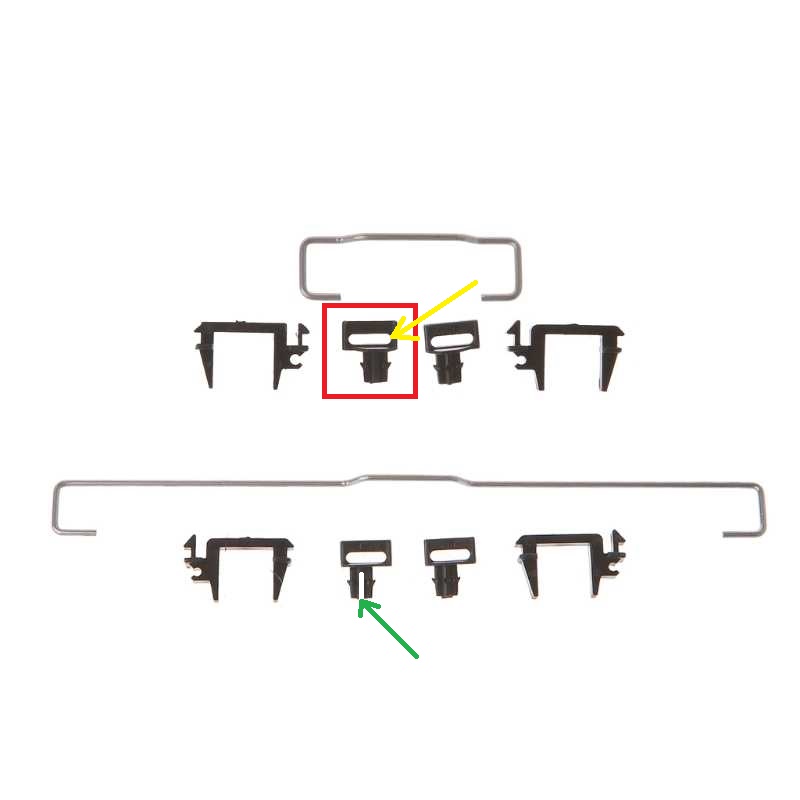
- $$$Plate-mounted-Costar-Stabilizers-Balancing-Pole-6-25u-2u-For-Keyboard-Big-Key-X6HA.jpg_q50.jpg (33.99 KiB) Viewed 7093 times
Re: Resin print keyboard parts factory
Posted: 08 Sep 2020, 11:25
by gianni
Or the alternative could be to make a "base plate", with a thickness of 3mm or so (if it doesn't interfere with the bottoming out), with a hole (around the barrel), and a pin (that goes inside the existing hole in thenplate).
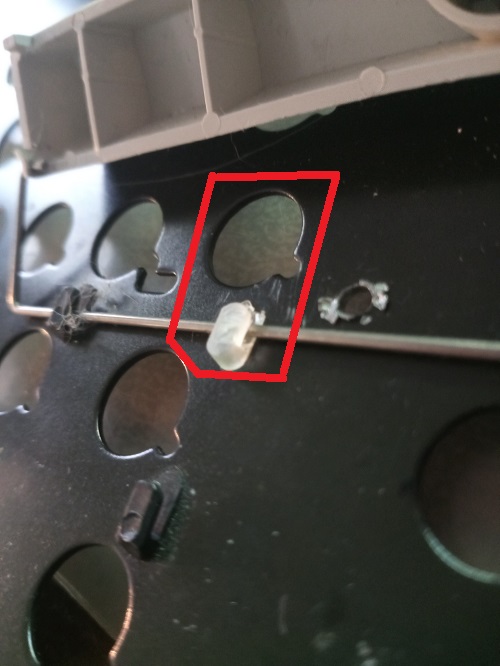
- $$IMG_20200907_123638 - Copia.jpg (73.25 KiB) Viewed 7086 times
Re: Resin print keyboard parts factory
Posted: 09 Sep 2020, 19:00
by SneakyRobb
gianni wrote: 08 Sep 2020, 11:25
Or the alternative could be to make a "base plate", with a thickness of 3mm or so (if it doesn't interfere with the bottoming out), with a hole (around the barrel), and a pin (that goes inside the existing hole in thenplate).
$$IMG_20200907_123638 - Copia.jpg
Hi, I actually like this baseplate idea!!
Could use the oval hole to orient it and stabilize it, put it in the bottom like any of the other barrels and it wouldn't need to clip in to the barrel plate at all!
Very good idea! INNOVATION
It could even have a very thin baseplate that sits between the barrel plate and foam, no foam hole cut necessary, then the oval orients it, the foam and barrel pressure secures it, no clipping into place. The only downside would be it wouldnt click in from above
The base could even be foam thickness so it doesnt interfere with barrels.
Re: Resin print keyboard parts factory
Posted: 09 Sep 2020, 23:34
by gianni
SneakyRobb wrote: 09 Sep 2020, 19:00
gianni wrote: 08 Sep 2020, 11:25
Or the alternative could be to make a "base plate", with a thickness of 3mm or so (if it doesn't interfere with the bottoming out), with a hole (around the barrel), and a pin (that goes inside the existing hole in thenplate).
$$IMG_20200907_123638 - Copia.jpg
Hi, I actually like this baseplate idea!!
Could use the oval hole to orient it and stabilize it, put it in the bottom like any of the other barrels and it wouldn't need to clip in to the barrel plate at all!
Very good idea! INNOVATION
It could even have a very thin baseplate that sits between the barrel plate and foam, no foam hole cut necessary, then the oval orients it, the foam and barrel pressure secures it, no clipping into place. The only downside would be it wouldnt click in from above
The base could even be foam thickness so it doesnt interfere with barrels.
Thanks for your appreciation.
The "plate" doesn't need to be square obiously, it just needs to go around the barrel, like a ring, and the go to the stabilizer's position, with two pins (one near the barrel, and one where there is the stabilizer.
Sorry for the horrible cad, but at home I have only linux, and the pain is real.
- $$$Screenshot from 2020-09-09 23-50-46.png (9.29 KiB) Viewed 6977 times
____________________________________________________________
Talking here about something different, this regards stabilizers on a modef at converted to a different bottom row, so it didn't have any hole for the stabilizers.
https://geekhack.org/index.php?topic=79362.0
There was a thread on GH with an idea about stabilizers, nothing to do with mine, but it can be adapted anyhow to be printed. You can apply my plate to the spacebar's barrels, or to the barrels beside it.
- $$$$Screenshot from 2020-09-09 23-54-51.jpg (233.62 KiB) Viewed 6977 times
Re: Resin print keyboard parts factory
Posted: 10 Sep 2020, 00:03
by gianni
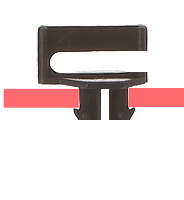
Anyway, going back to the costars, I think that they're not too bad. They can be installed without decoupling the plates, and when you need to remove them, you just cut (first you remove the top piece, and then you cut between the legs).
Please notice that the bridge stands above the plate (colored in red) so it can be cut very easily, and note that the two legs are decoupled so after cutting they become lose and you can extract them without trouble. Furthermore, after the cut they can't fall inside the hole, because the top is larger than the bottom, so the design is foolproof.
- $costar.jpg (3.73 KiB) Viewed 6975 times
Re: Resin print keyboard parts factory
Posted: 19 Sep 2020, 01:29
by SneakyRobb
Will respond to messages tomorrow. Sorry for delay.
Printing has gone well.
The black resin legit smells like death. Many science is required. The beamspring keycap in black does not fit on stem. No matter.
The model F stabs are almost ready.
Keyboards.
Re: Resin print keyboard parts factory
Posted: 19 Sep 2020, 11:29
by gianni
3d printing is 1% talent and 99% percent hard work...
Albert Einstein
Re: Resin print keyboard parts factory
Posted: 21 Sep 2020, 04:03
by fricked
Update on the flippers:
Today SneakyRobb printed for me his latest flipper model, as well as my model that I sent him. His spring holder needs a revision but with some destructive modification (jammed the spring on) it works very well. Here is a sound test comparing both of our flippers to IBM flippers:
Re: Resin print keyboard parts factory
Posted: 23 Sep 2020, 22:13
by zzxx53
Very nice!
Any chance you'd be interested in making spherical caps for Model M/F? There was a previous project but OP vanished.
viewtopic.php?f=7&t=11186
Re: Resin print keyboard parts factory
Posted: 24 Sep 2020, 04:36
by SneakyRobb
fricked wrote: 21 Sep 2020, 04:03
Update on the flippers:
Today SneakyRobb printed for me his latest flipper model, as well as my model that I sent him. His spring holder needs a revision but with some destructive modification (jammed the spring on) it works very well. Here is a sound test comparing both of our flippers to IBM flippers:
Hi,
Glad they worked out! Very promising and indeed interesting sounds. Hopefully we can get these models working 100% and out
Re: Resin print keyboard parts factory
Posted: 24 Sep 2020, 04:37
by SneakyRobb
zzxx53 wrote: 23 Sep 2020, 22:13
Very nice!
Any chance you'd be interested in making spherical caps for Model M/F? There was a previous project but OP vanished.
viewtopic.php?f=7&t=11186
Hi,
This could be possible. I will look through this thread to see if there are models. Interesting regardless. I like spherical caps
Re: Resin print keyboard parts factory
Posted: 28 Sep 2020, 01:47
by SneakyRobb
gianni wrote: 03 Sep 2020, 09:59
About the flipper, could it be that it doesn't work perfectly because the spring is not seated correctly on the little stem? When the spring buckles, it applies a "moment" (not sure if the translation is correct), and if it is not seated firmly, the buckling doesn't translate in a "moment" acting on the flipper.
Hi, Yes this is the major issue. Getting it correctly seated is major.
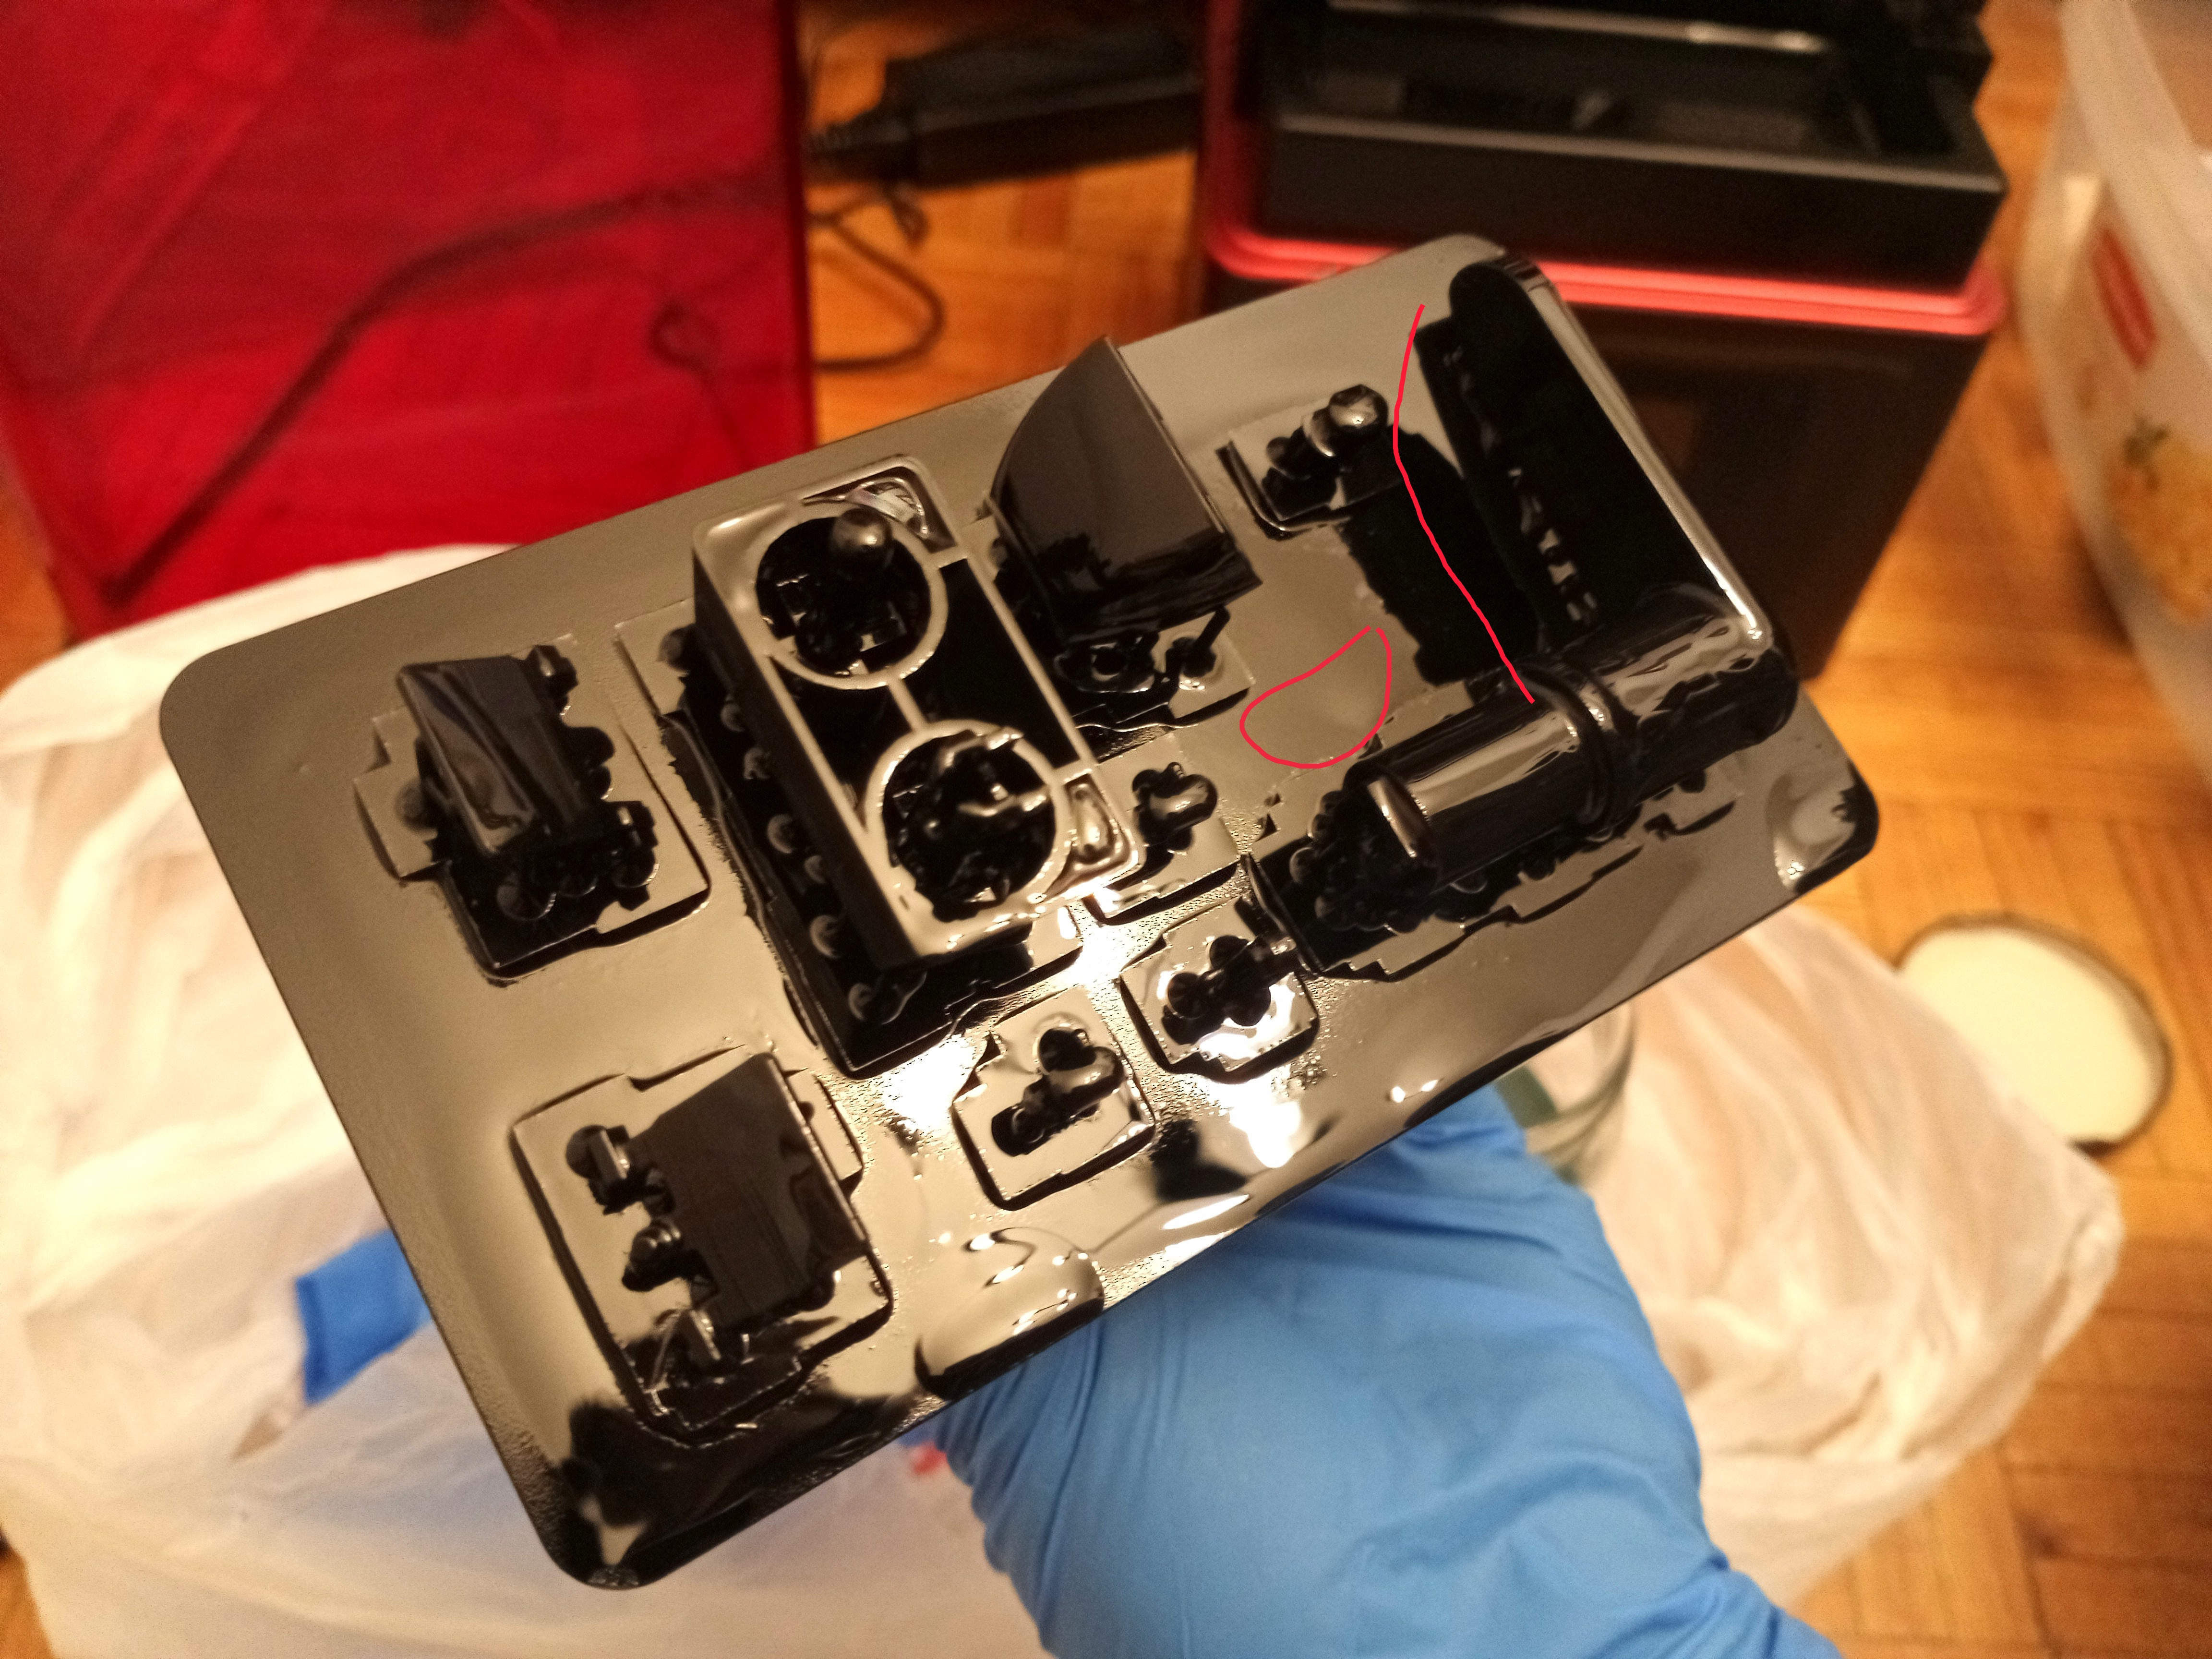
Otherwise. I was trying to help with stabs. User Sturmtiger provided their F122 plate. The reason is that I have not actually seen the F122 spacebar stab hole. All my F122 stabs are intact. The hole.... is actually bigger. Not surprise as the stab is wider!
Regardless. need to adjust model to fit.
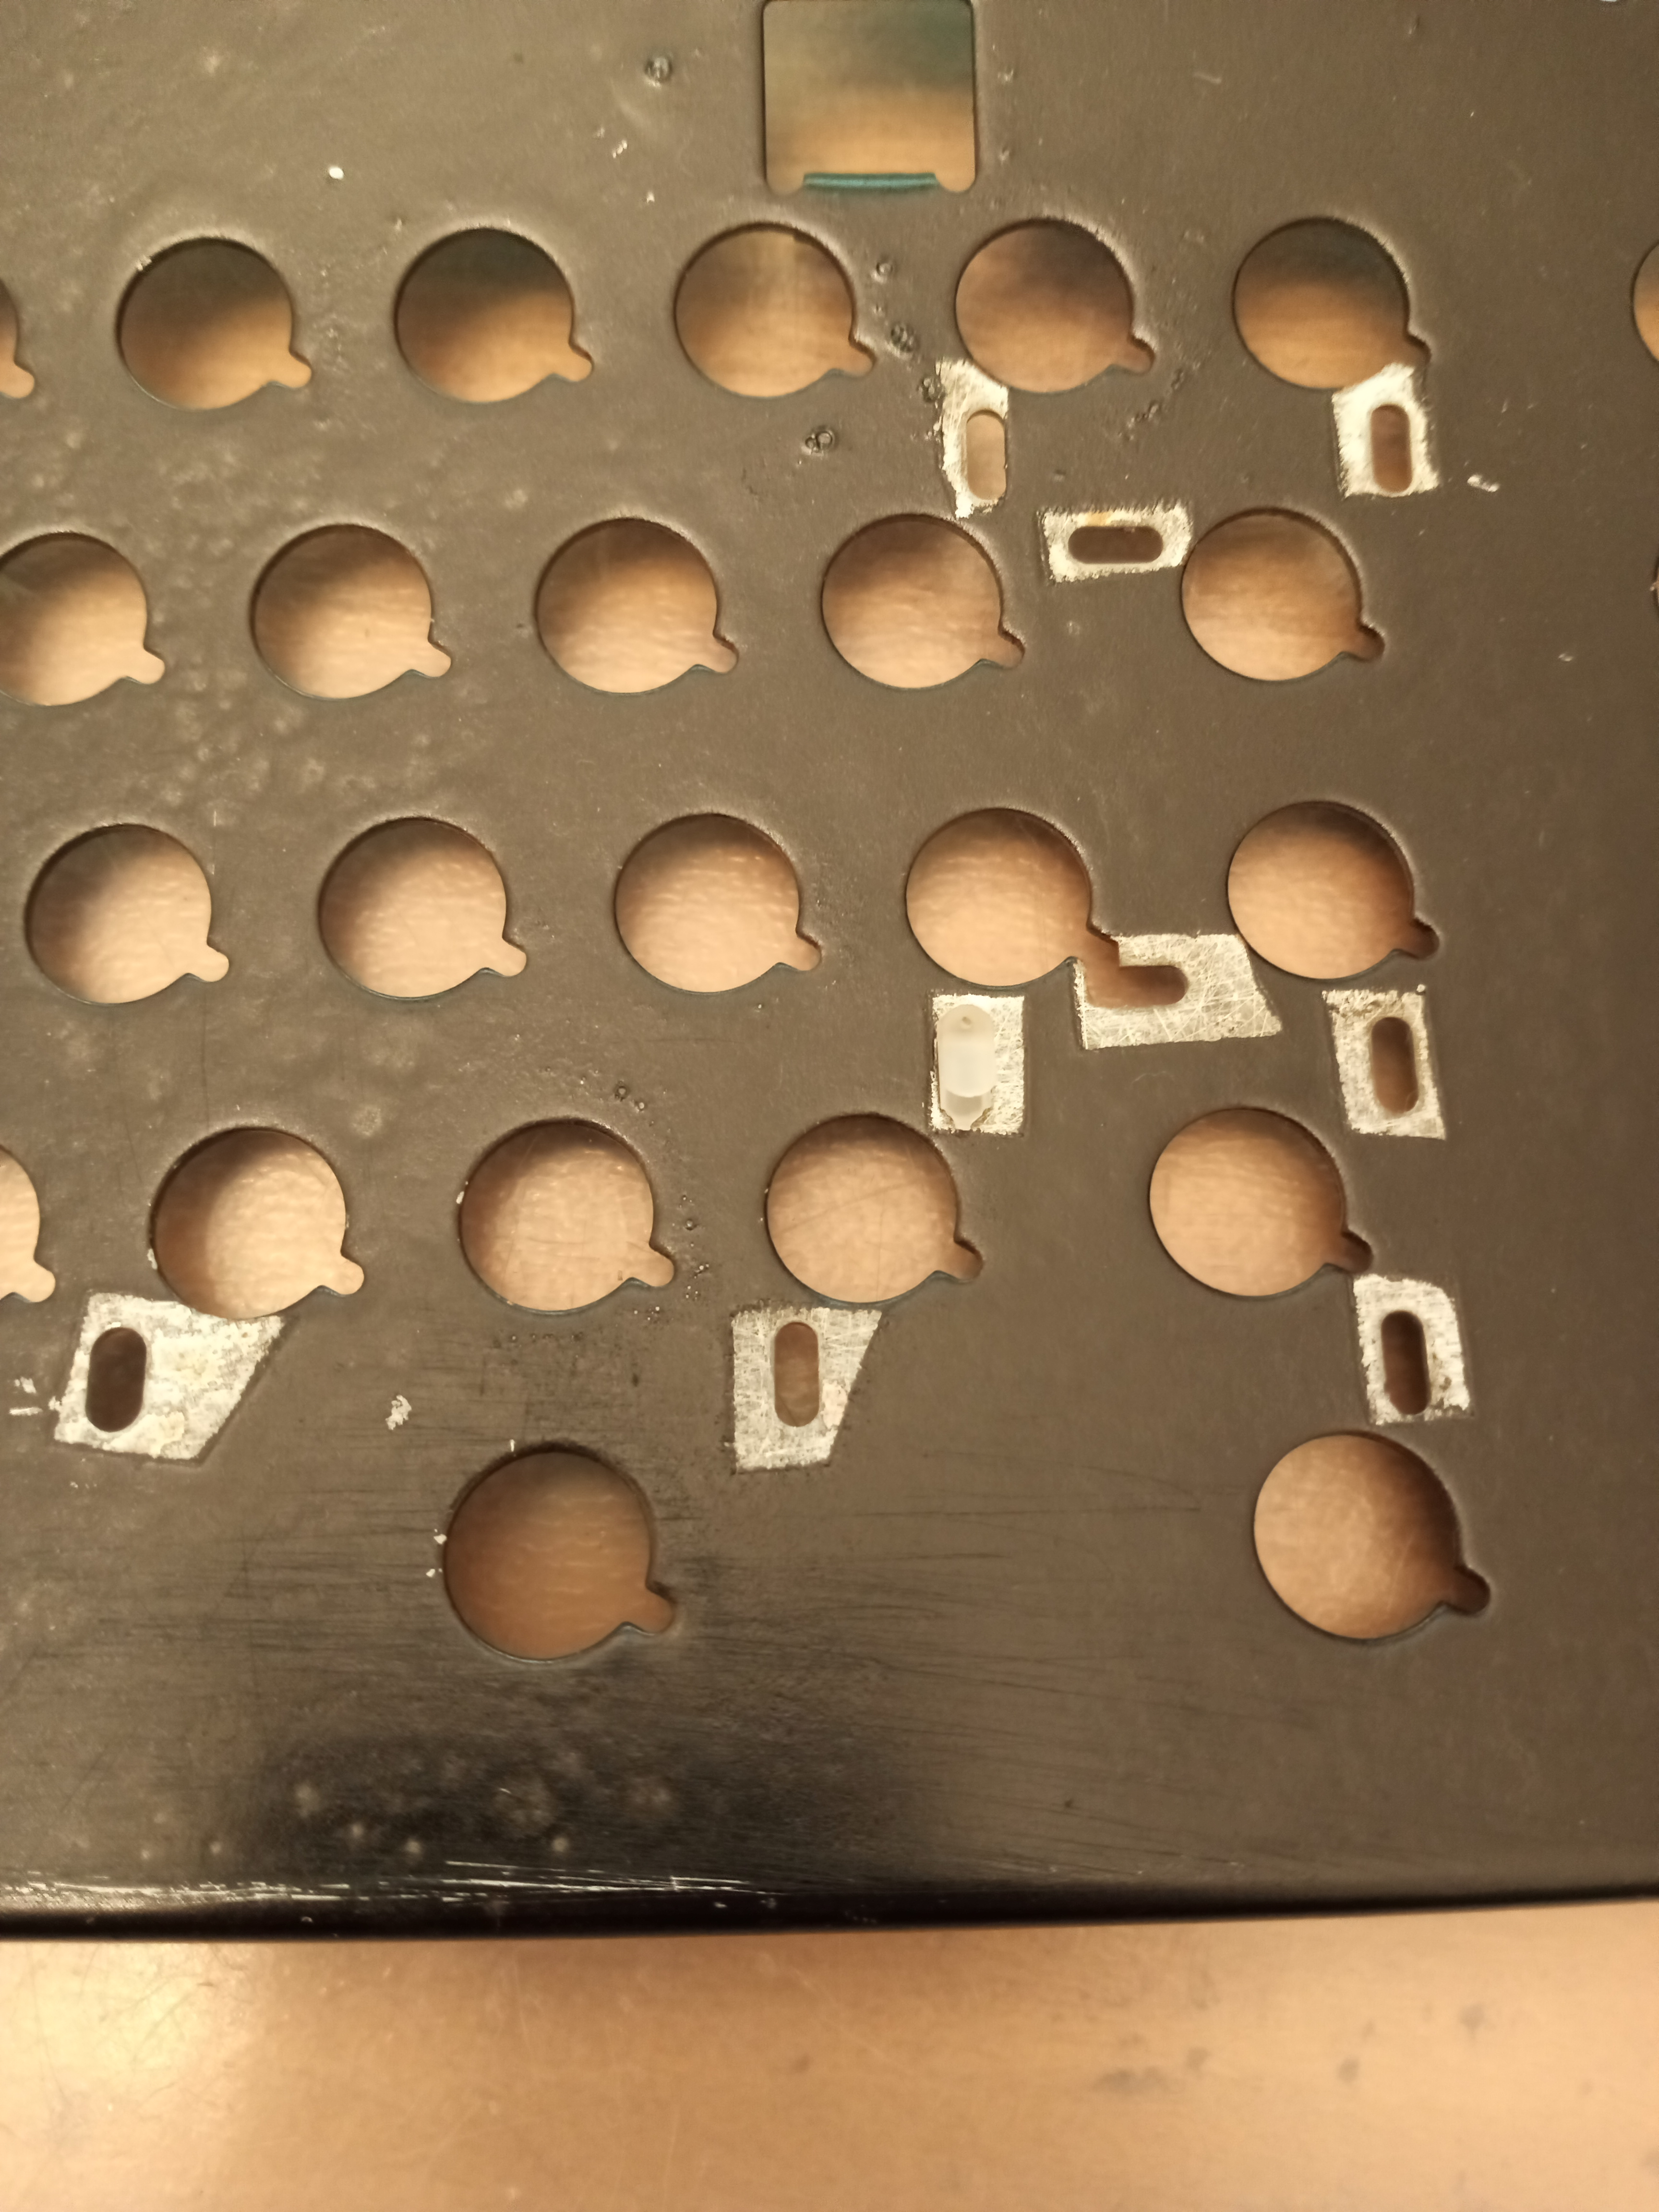
- F122 stabs all.jpg (2.66 MiB) Viewed 6575 times
- norm stab width.jpg (2.45 MiB) Viewed 6575 times
- space stab width.jpg (2.18 MiB) Viewed 6575 times
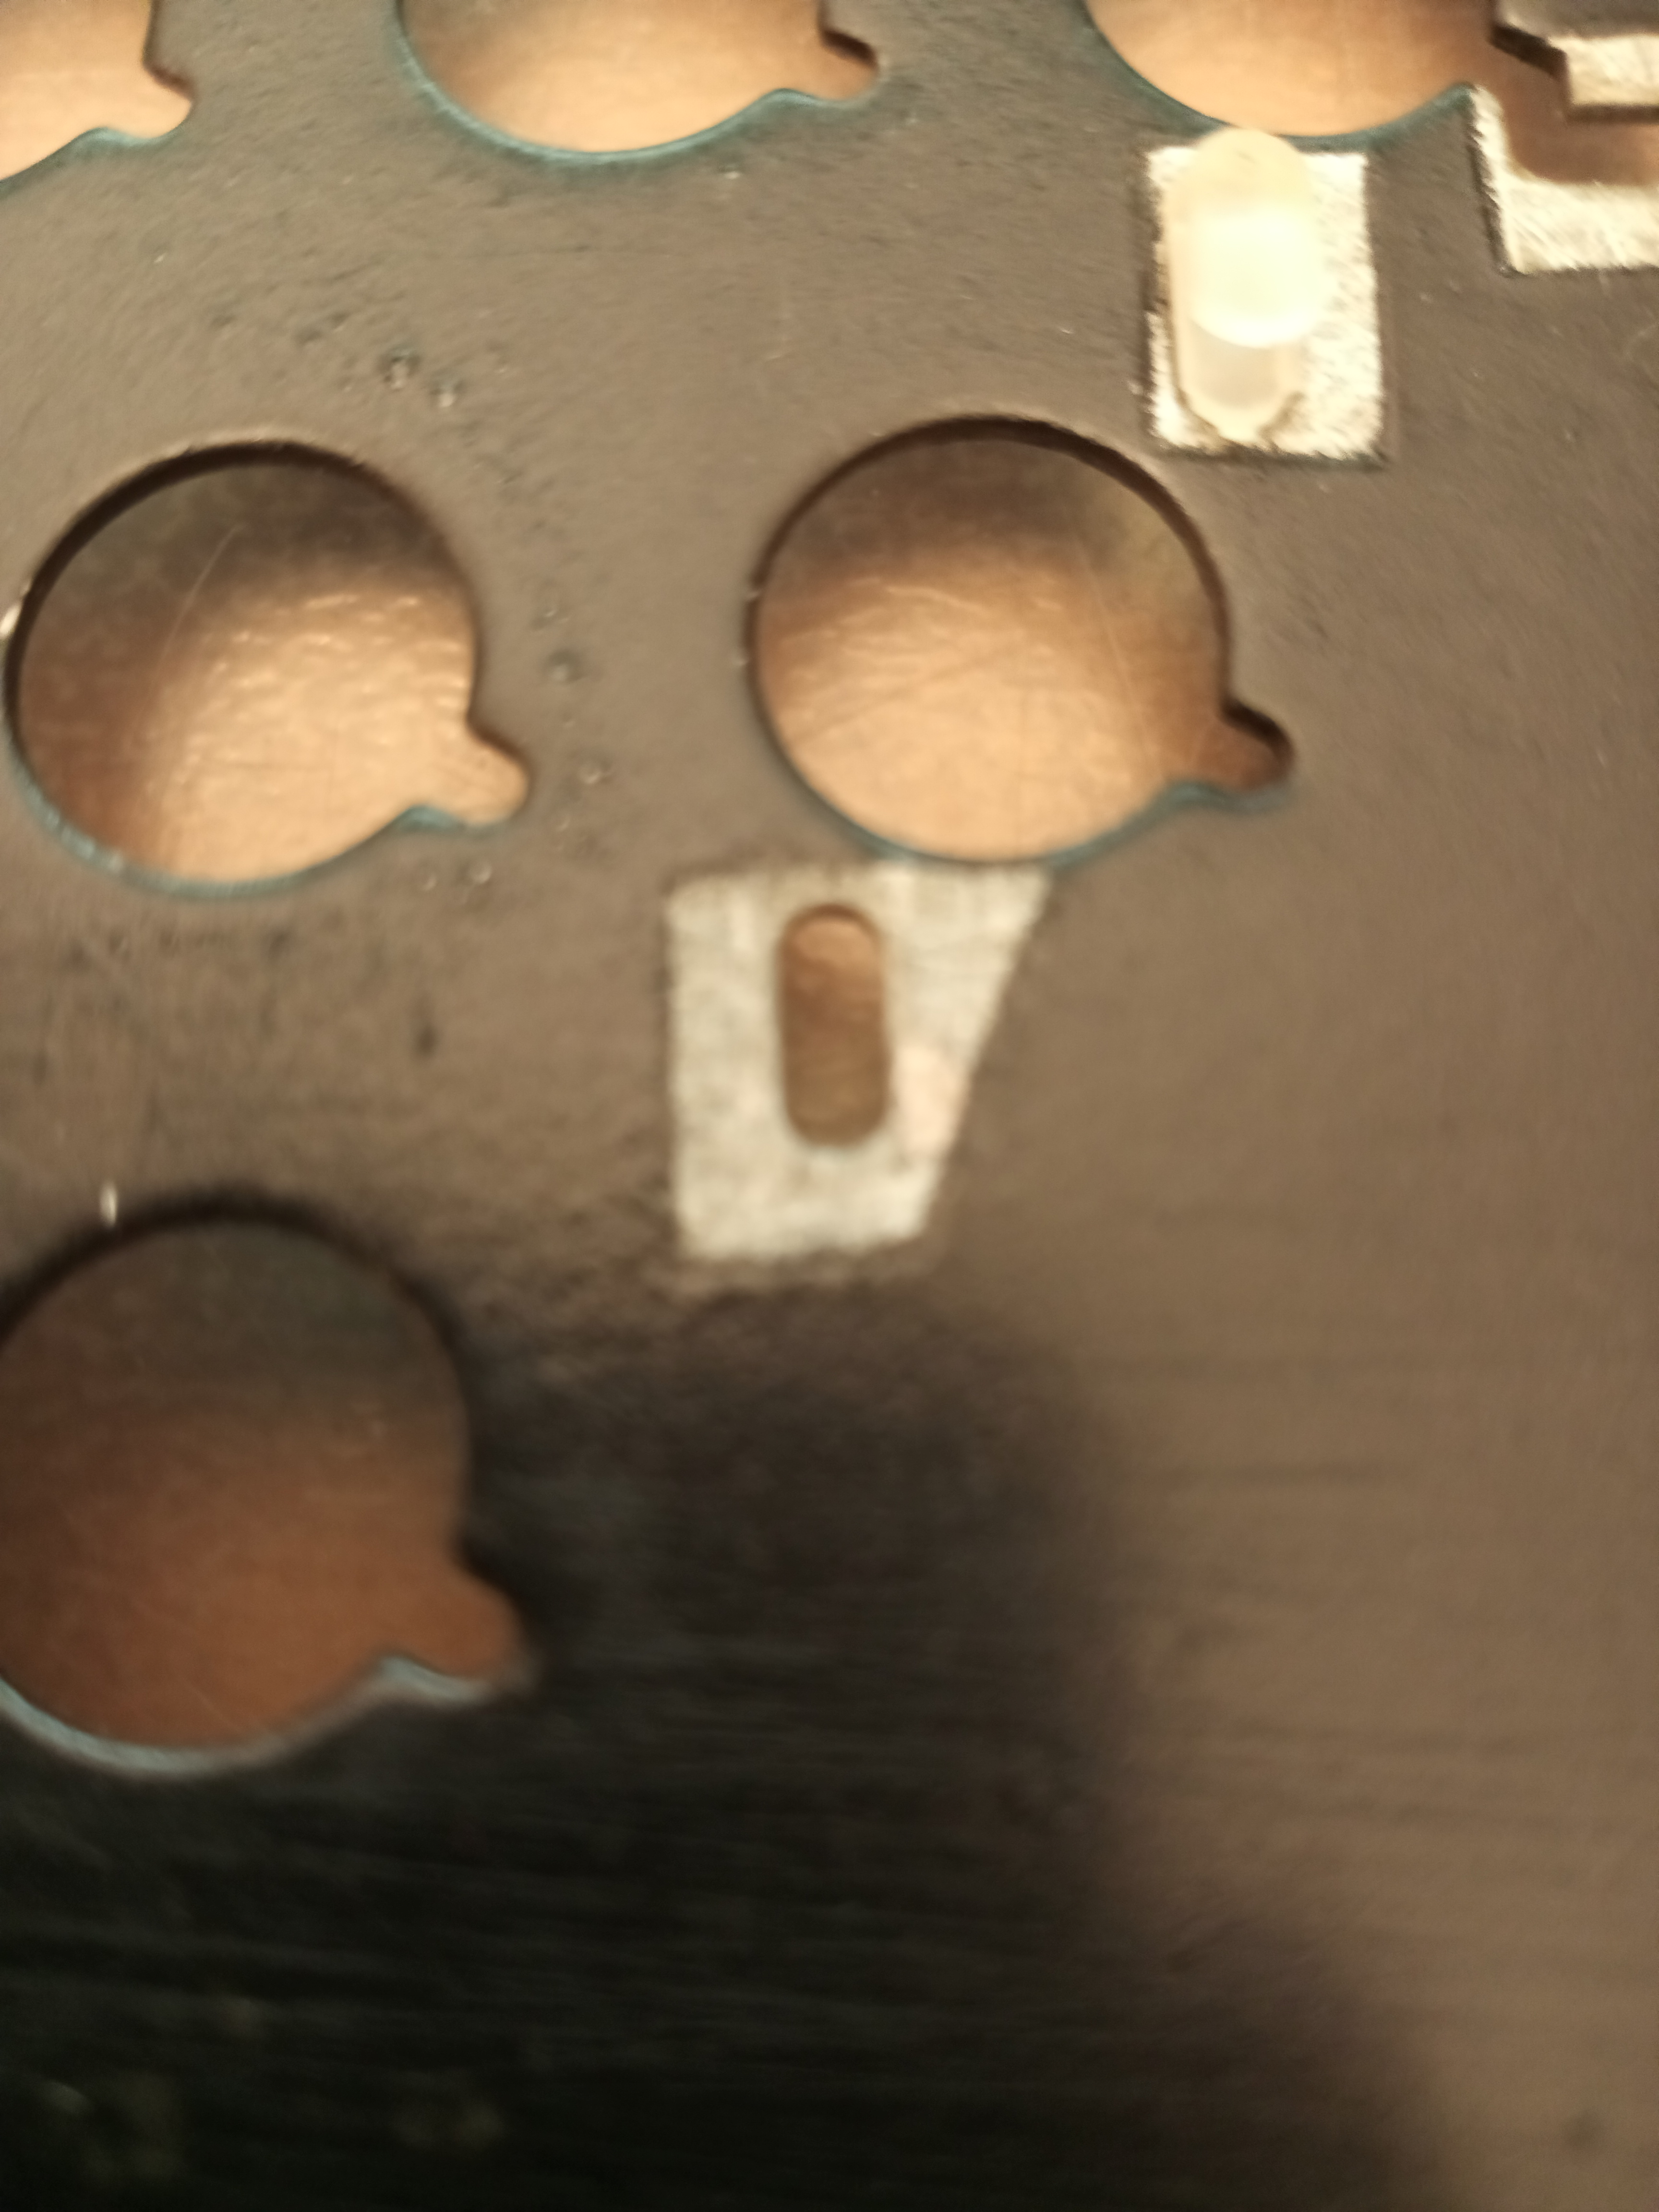
- Normal Stab.jpg (2.36 MiB) Viewed 6575 times
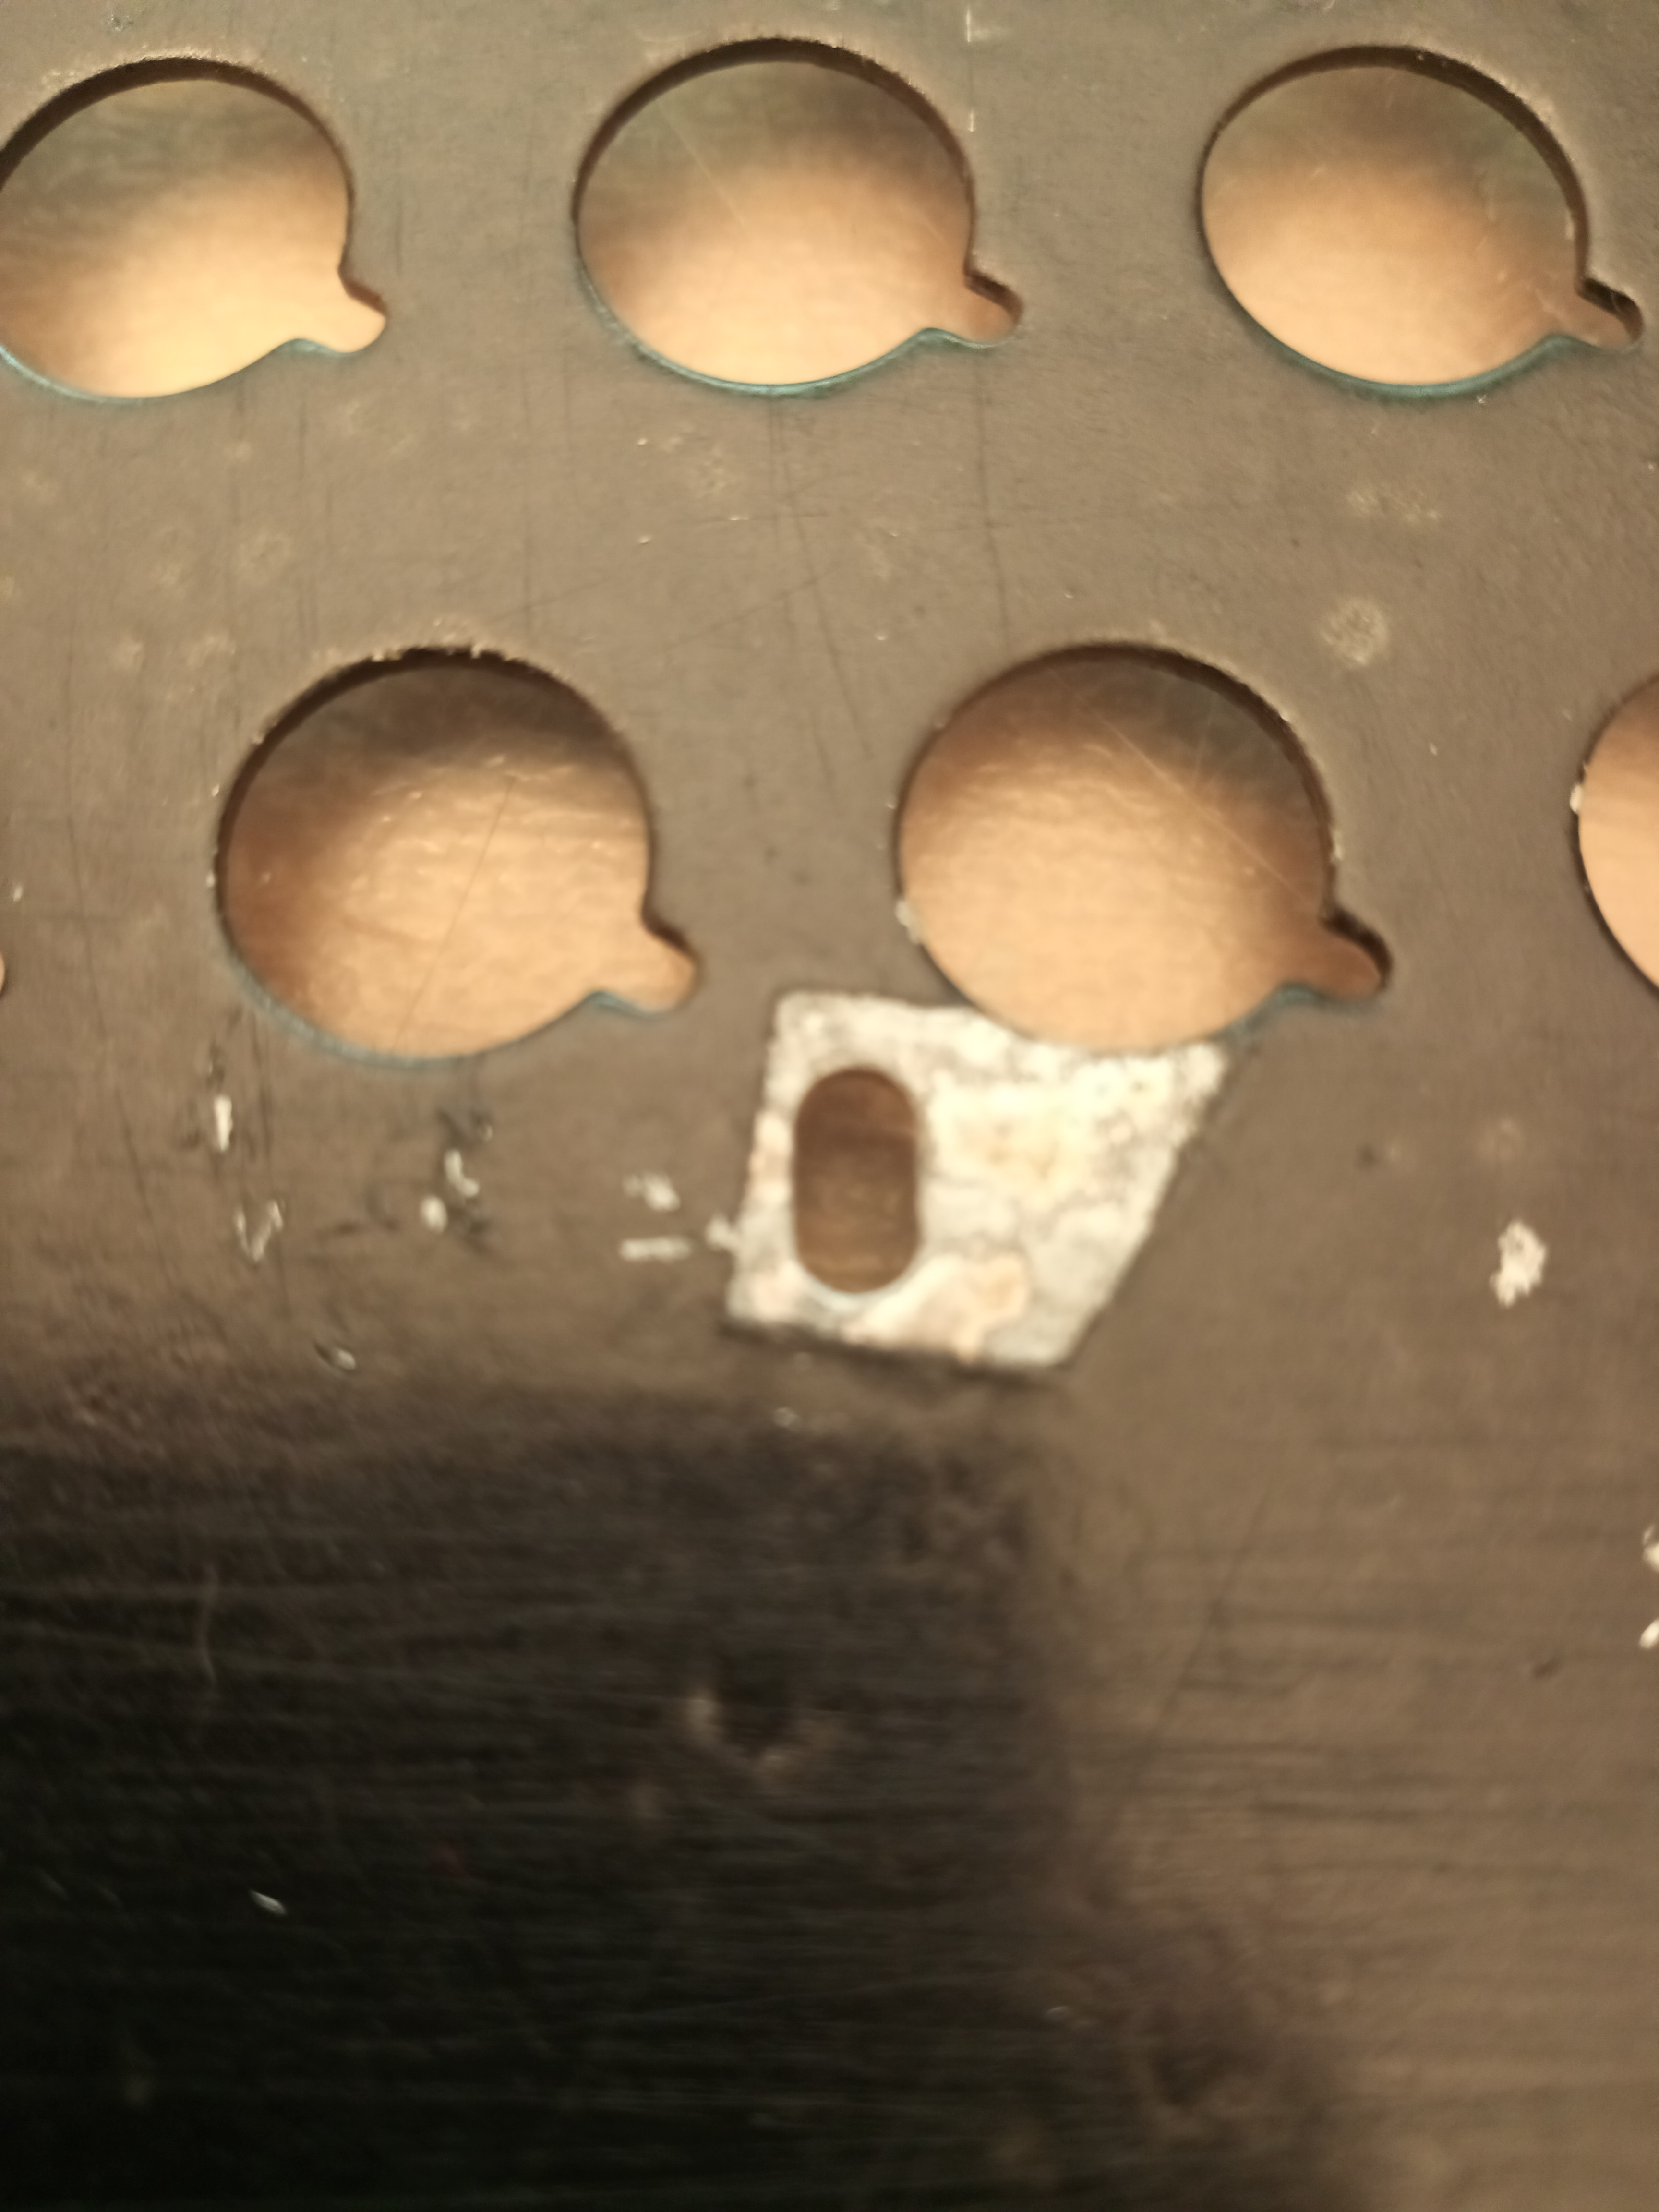
- Space stab.jpg (2.32 MiB) Viewed 6575 times
Re: Resin print keyboard parts factory
Posted: 11 Jan 2021, 05:55
by SneakyRobb
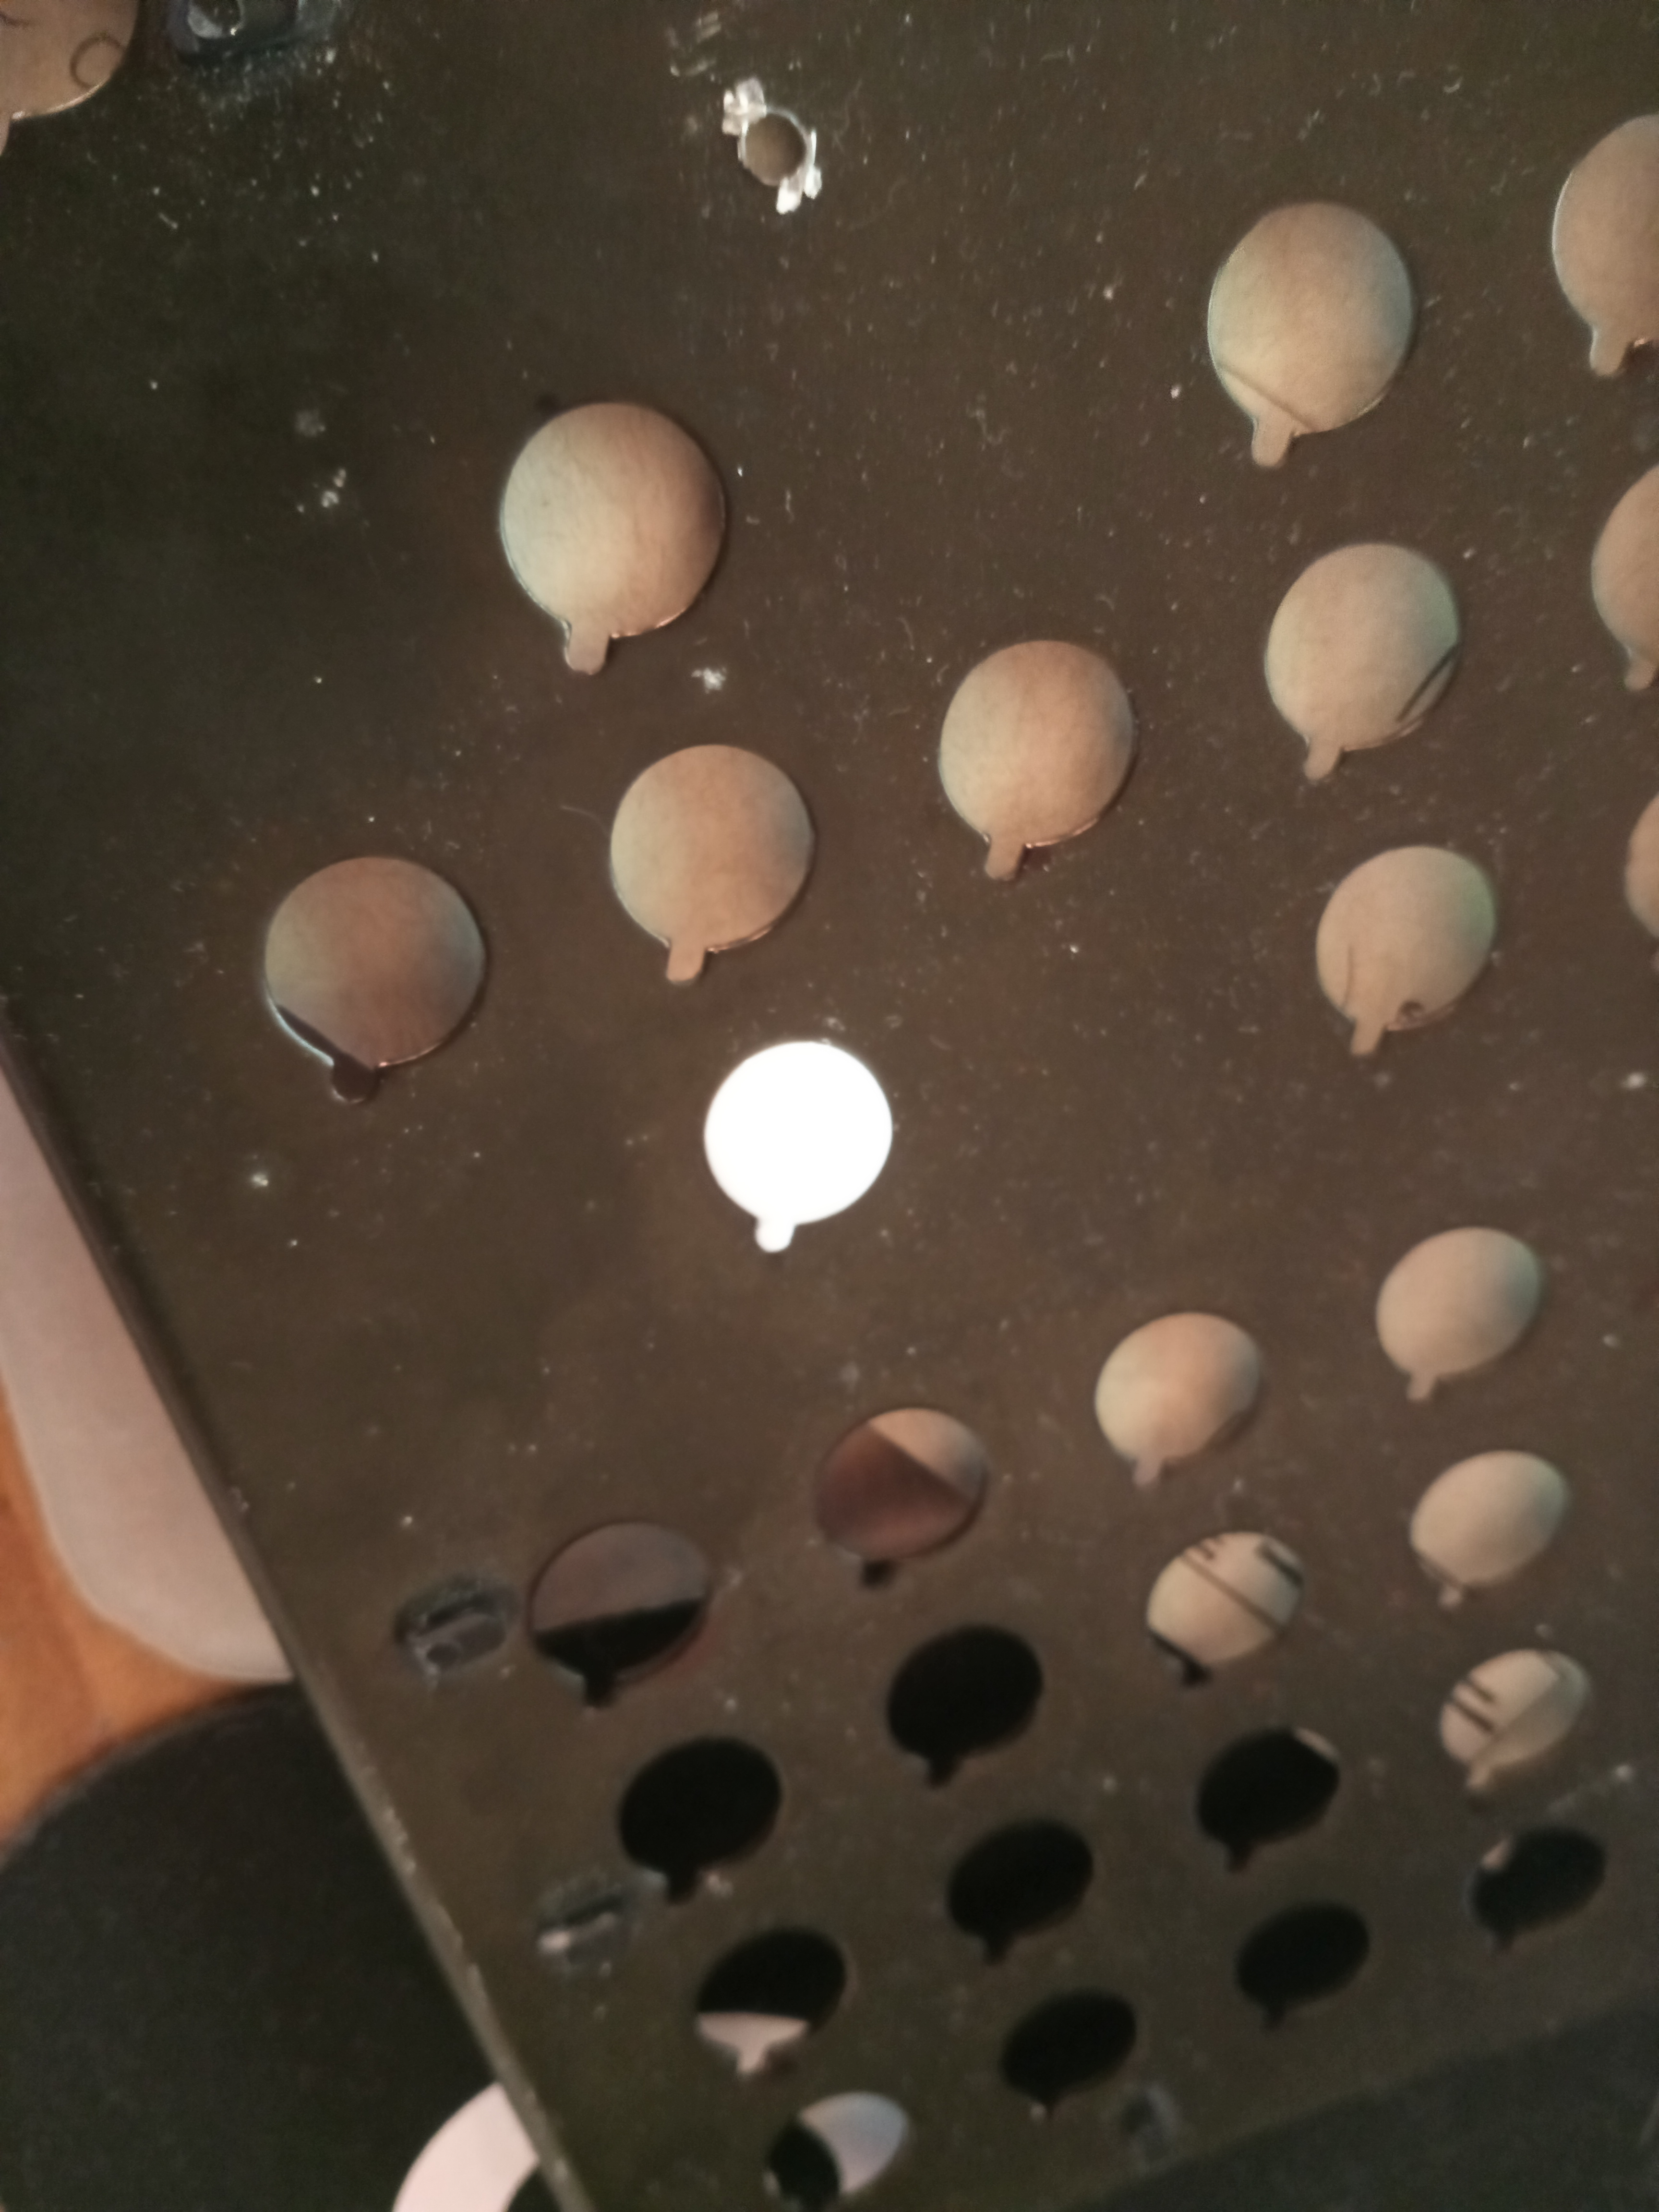
Have started to print/test resin switch plates.
Resolution pretty good

- resin switchplate.jpg (2.87 MiB) Viewed 6171 times
.
Re: Resin print keyboard parts factory
Posted: 12 Jan 2021, 01:12
by shine
hey! do you have a 3D model of beamspring keycaps? i just got an elegoo mars 2 pro and want to print some
Re: Resin print keyboard parts factory
Posted: 15 Jan 2021, 23:12
by SneakyRobb
Hi,
I was using the one from the low profile beamspring thread but I have been trying to make my own from the ground up.
viewtopic.php?t=21925
This is the top row version I am with currently trying below. I am still trying to understand the curvature profiles in 3d modelling. 90 deg and circles easier! Grabcad has issue with model, but you should still be able to download.
But it looks like this.
https://grabcad.com/library/beamspring- ... periment-1

- beamcap robb 2.JPG (34.85 KiB) Viewed 6045 times
- beamcap robb 1.JPG (39.85 KiB) Viewed 6045 times
Re: Resin print keyboard parts factory
Posted: 16 Jan 2021, 00:13
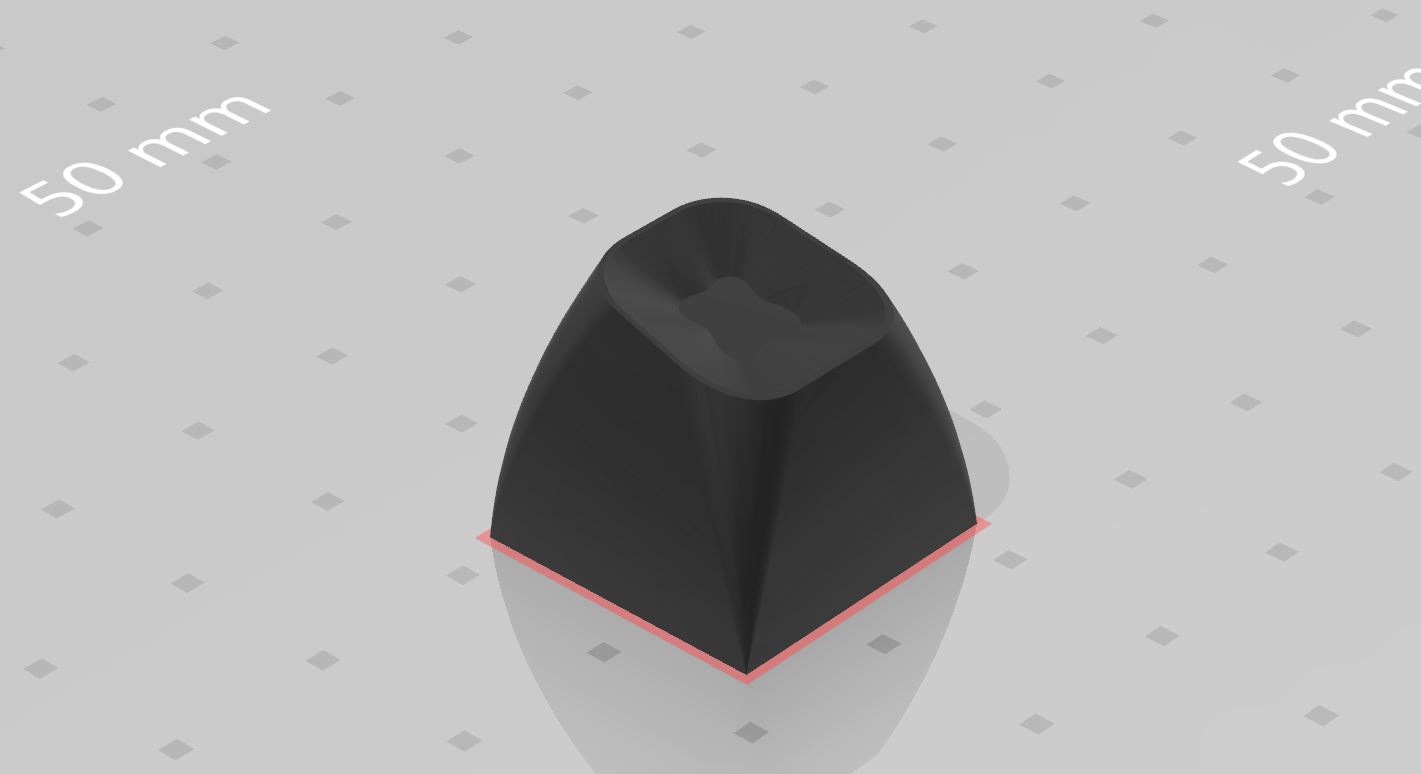
by SneakyRobb
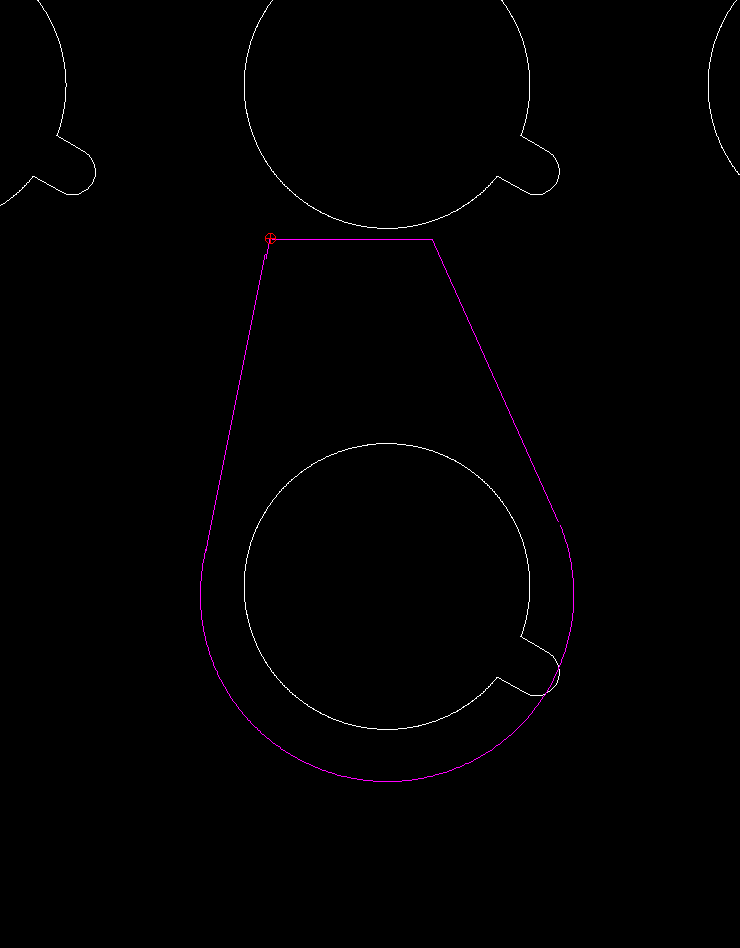
This was the thought process for this key. I think the indent will be adjusted but I am happy with shape to a degree otherwise.
I notice the original one has a more cross pattern and a shallower indent, but I will try this first regardless. I have reduced the filet here and made it more square vs the one above.
The top flat part will be reduced to have a shaper edge like the original
Re: Resin print keyboard parts factory
Posted: 22 Jan 2021, 03:02
by SneakyRobb
Hi,
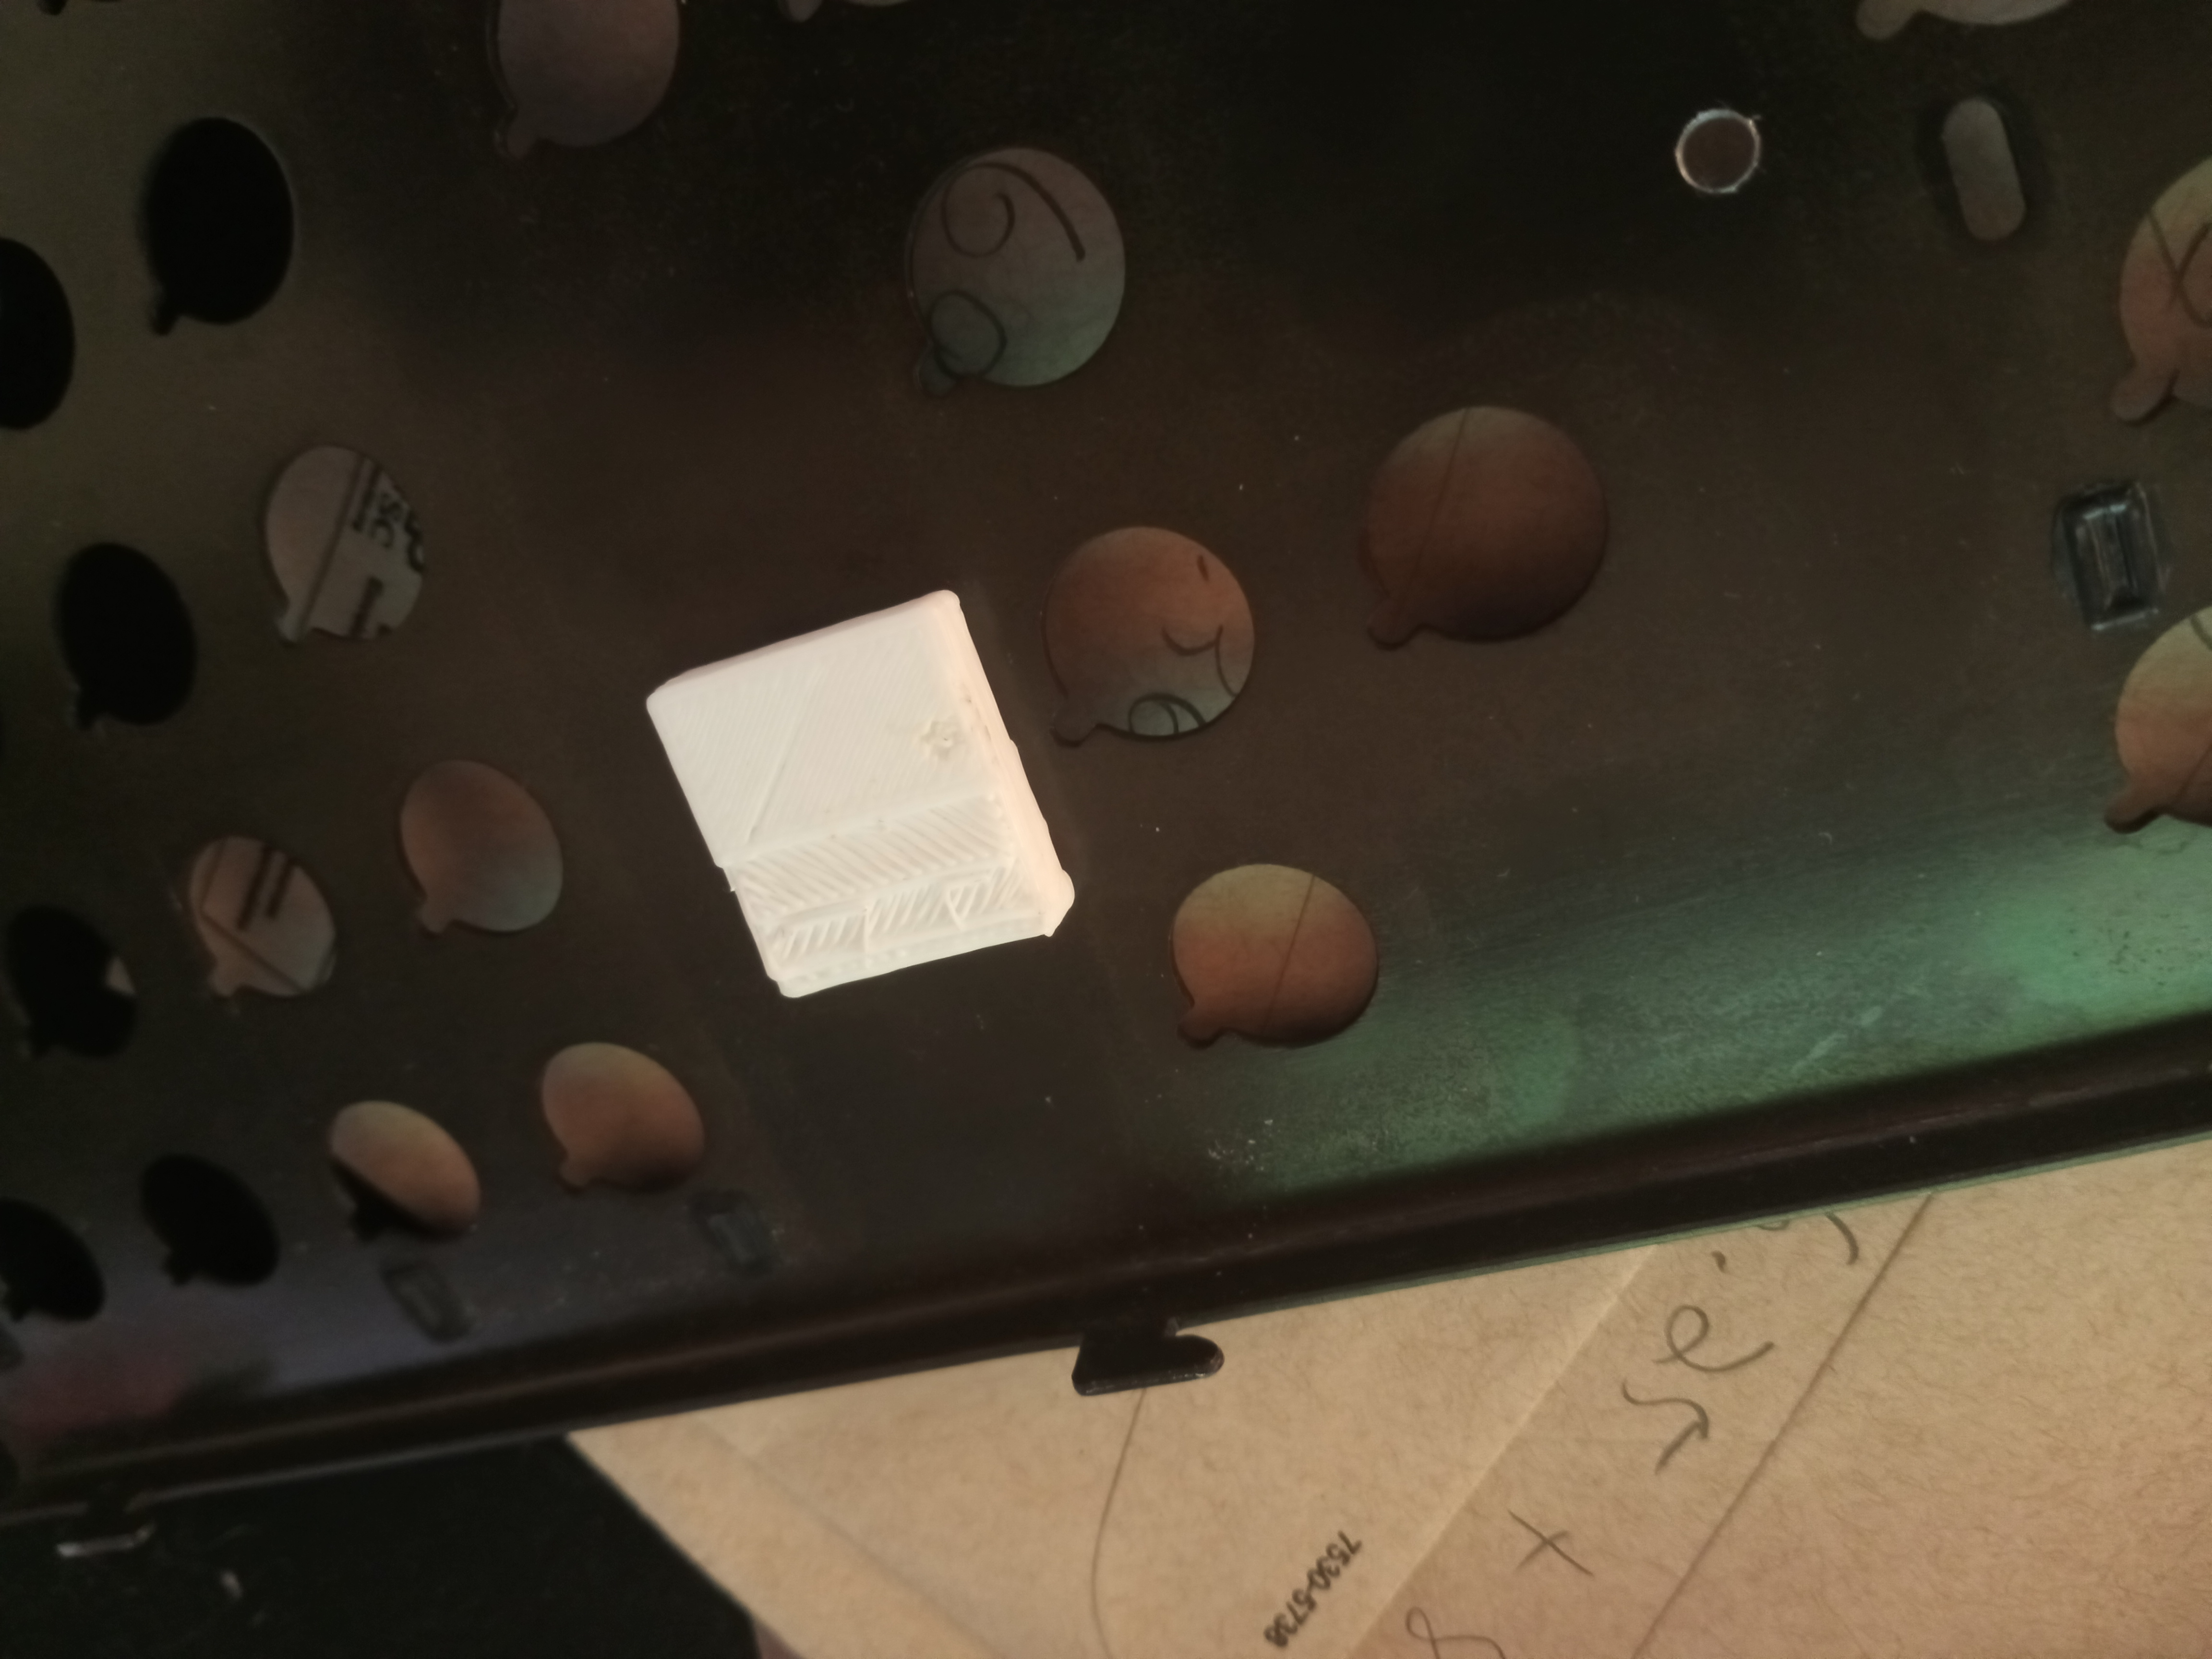
Transparent resin is okay but too much UV makes it turn a weird colour. Functionally it's fine.
I will get gray next time.
Functionally the caps work. The orientation of print made some distort of the top, but I think it's pretty good.
I will change the orientation later.
The skcm plate is good and well formed.
Re: Resin print keyboard parts factory
Posted: 31 Jan 2021, 01:03
by SneakyRobb
Re: Resin print keyboard parts factory
Posted: 31 Jan 2021, 01:42
by SneakyRobb
This is images of the previous beamcap model to above. Getting better at the scallop indent.
White is a bit hard to make out though.