Page 2 of 9
Posted: 14 May 2013, 12:42
by Muirium
ماء wrote:good mat33o

but how to connect a cable to each switch

Do you have a picture
Welcome to the matrix. Matteo's latest hand wired one.

Instead of separate wires for every key, you make an X-Y grid out of them. Then you only need enough pins on your controller for Rows + Columns instead of Rows * Columns. Makes a lot of difference when dealing with around a hundred switches.
What your controller then sees is something like this.

That's the one Alfa147x is working on for his Filco Minila mod. Filco was lazy and used more columns than necessary, so he's taking the opportunity to optimise his matrix properly!
The only downside to a matrix is that you need diodes to protect against ghosting and masking. You've heard of N key rollover? Diodes are how you achieve that.
Fortunately diodes are cheap and you can use them as some of the wires in the matrix.
Posted: 14 May 2013, 19:25
by Zifle
I also found
this page to explain matrices nicely.
Posted: 14 May 2013, 19:27
by Muirium
Poker based, but with the two extra keys of the HHKB.

Oh, and arrows right on the main layer.
Whether there's a need for that left side function key in practice, is an
open question.
Every choice in any design is a compromise. This one trades most of the right hand set of modifiers for those arrow keys. Could be a trade too far, but the permutations I've been playing with are so numerous, even in the Poker's tight confines, that I'm fair convinced the physical format will make a fine programmable keyboard.
Posted: 14 May 2013, 20:00
by matt3o
my humble opinion is that arrows have to be 1u and all on the same size to be of any use... but in such a small layout you have to compromise for sure. That's why I stick with 65% layouts for now.
Posted: 15 May 2013, 02:04
by hasu
Another way of compromise at arrow keys on 60% is dual role modifier. I don't use this currently but it worked well for me ,though my type is slow 60wpm and hardly use right mods.
http://geekhack.org/index.php?topic=41685.msg846152
BTW, I've used happily hjkl for arrow and mouse keys with pinky Fn keys(; for mouse and / for arrow) for this 2yrs.
Yes, I know that no general 60% layout for everyone exists and everything is nothing but a personal preference

Posted: 15 May 2013, 08:57
by matt3o
mmh this is interesting, don't know how it feels on a daily basis. have to try it sooner or later.
my experience is that any 60% is good of standard usage (browser/word processing/email/...) but when it comes to coding I really find myself way slower on those small layouts. It's probably just a matter of getting used to them, but still...
Posted: 19 May 2013, 12:29
by matt3o
Okay I'm preparing the second episode in the series and I'm trying to find the right layout for the Brownfox (on which will be based the tutorial)
These are some experiments:
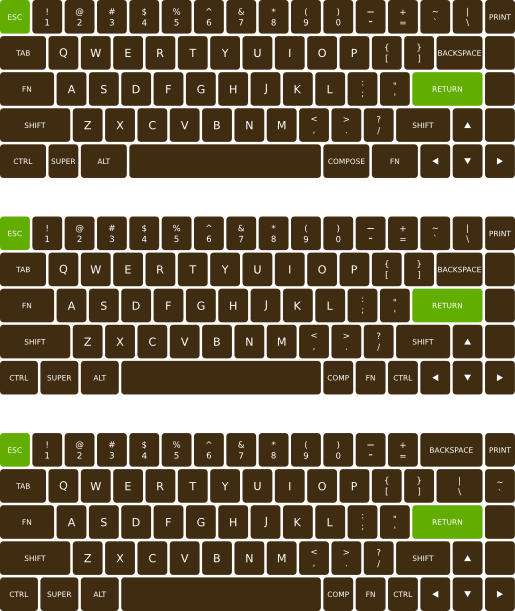
- brownfox.png (62.29 KiB) Viewed 14270 times
I'm really torn between the three (or various combinations of the three). In the last one I could place FN on \| key for example.
Ergonomically speaking the one I like the most is the first one. Aesthetically the third is probably better, but I prefer an usable keyboard to a pretty keyboard.
The three blanks to the right are TBD.
Ideas? Suggestions?
PS: before you ask, yes I need Print, Compose, Super and 2 FN keys (one left one right)
Posted: 19 May 2013, 12:52
by dirge
Needs ISO enter and short left shift

Posted: 19 May 2013, 13:01
by matt3o
dirge wrote:Needs ISO enter and short left shift
miss appropriate caps for that :/
Posted: 19 May 2013, 15:34
by vivalarevolución
The first layout. Without a doubt. Maybe move right FN to above the right arrow, like HHKB.
Looks like a 6-unit spacebar. Can you buy those standard, or do you have to harvest from an old board?
Also, what's the use of a "compose" key?
Posted: 19 May 2013, 15:48
by matt3o
prdlm2009 wrote:The first layout. Without a doubt. Maybe move right FN to above the right arrow, like HHKB.
Looks like a 6-unit spacebar. Can you buy those standard, or do you have to harvest from an old board?
Also, what's the use of a "compose" key?
I have 6u spacebars aplenty
from DSA Retro group buy.
"compose key" is used on linux to make special characters (°ŭĸə¡♯×…), it's a kinda "alt gr"
Posted: 19 May 2013, 16:46
by Findecanor
Posted: 19 May 2013, 17:10
by ماء
I want to see the keyboard you've ever made before with cable matteo
 My Layout
or
Posted: 19 May 2013, 17:59
by matt3o
Images seem broken....
Posted: 20 May 2013, 02:03
by ماء
matt3o wrote:Images seem broken....
I was in hurry to editing

I will edit later
Posted: 21 May 2013, 00:21
by matt3o
I'm now working on the case design. I have mainly 4 options here.
1) acrylic sandwich + aluminum plate
good compromise. the plate is solid, the acrylic case would be relatively cheap to produce. Also it can be done with not-visible screws
2) 100% acrylic sandwich
the cheapest of all. No visible screws as well, but I'm a bit concerned about keys sound and overall feel.
3) 100% aluminum sandwich
the simplest to build and the most solid too. screws will be visible.
4) 3D printed prototype
the most expensive all, I'd like to try this route but I have to make the 3d model and if something goes wrong I have spent a lot in a useless piece of plastic.
I still have a couple of weeks to decide
Posted: 21 May 2013, 07:14
by ماء
enough aluminum
Posted: 21 May 2013, 08:33
by dirge
Yeah, do Acrylic - Wood - Acrylic.
Posted: 21 May 2013, 08:37
by matt3o
wood is another option, but I've heard very bad things about wood and strokes sound
Posted: 21 May 2013, 13:41
by Paranoid
Isn't the aluminum sandwich going to be pretty expensive as well? Or how would you cut it? Same question if you would just make the aluminum plate.
I'm planning on laser cutting some plexi as well in the near future and that would indeed be the cheapest option. I'll be designing something for 3D printing as well in the far future, but as you said it has to fit with one print or else you'll have a serious setback. And the design should be special of course. I wouldn't print a basic case
Regarding wood, you could only do the top plate for example, or apply a vynil wrap or sticker on top of it.
http://geekhack.org/index.php?topic=33155.3660
With lasercutting you could also etch a picture on the top plate, or engrave stuff. I think you can get real creative there, especially with layering
I'm curious what you're going to pick and what the result is going to be
Posted: 21 May 2013, 14:52
by matt3o
Paranoid wrote:Isn't the aluminum sandwich going to be pretty expensive as well? Or how would you cut it? Same question if you would just make the aluminum plate.
I've found a local service that can laser cut steel and recently alu for a pretty low fee. So the alu-sandwich-case would actually be the easiest to build and just slightly more expensive than acrylic.
Paranoid wrote:I'm planning on laser cutting some plexi as well in the near future and that would indeed be the cheapest option. I'll be designing something for 3D printing as well in the far future, but as you said it has to fit with one print or else you'll have a serious setback. And the design should be special of course. I wouldn't print a basic case
100% acrylic doesn't appeal to me. too toyish, the keyboard ends up being too light, and the overall sound is boring (unless you have a PCB, which I haven't)
Paranoid wrote:Regarding wood, you could only do the top plate for example, or apply a vynil wrap or sticker on top of it.
http://geekhack.org/index.php?topic=33155.3660
With lasercutting you could also etch a picture on the top plate, or engrave stuff. I think you can get real creative there, especially with layering
Wood is tempting and it's very easy to work with. I've been discouraged by others who tried it, though, they say it makes a lot of noise.
Posted: 21 May 2013, 14:55
by Muirium
Clear, glass-like acrylic, with aluminium plate and caps. Real glass on the outside edges. The way the 80s thought the 90s would be!
You're right that the sonic characteristics of material matters too. How do you find the Steely, sound-wise?
Posted: 21 May 2013, 14:59
by matt3o
Muirium wrote:Clear, glass-like acrylic, with aluminium plate and caps. Real glass on the outside edges. The way the 80s thought the 90s would be!
clear acrylic doesn't look that well with custom keyboards without a printed PCB, imho.
Muirium wrote:You're right that the sonic characteristics of material matters too. How do you find the Steely, sound-wise?
Steely is rock solid. The case makes no sound at all by itself, you only hear the click of the keys. Very very nice to listen to. The problem is that it's "too solid". It's like typing on marble
That should be solved with aluminum that is a bit flexy.
Posted: 21 May 2013, 15:07
by Muirium
Funny you should mention marble. Stone is the next step up from glass and steel in executive chic.
Steely may be just about my perfect Cherry keyboard, materials wise. I'd want to make it a touch smaller and with Bluetooth. But the bit about it being as hard as steel? I want!
Posted: 21 May 2013, 15:16
by matt3o
Muirium wrote:Funny you should mention marble. Stone is the next step up from glass and steel in executive chic.
they can actually laser cut stone as well (well, water cut to say the truth).
Muirium wrote:Steely may be just about my perfect Cherry keyboard, materials wise. I'd want to make it a touch smaller and with Bluetooth. But the bit about it being as hard as steel? I want!
hard to make a wireless keyboard 100% out of steel. It would interfere with bluetooth
Posted: 21 May 2013, 15:49
by Muirium
Yup. I'd have to put an RF window in the back, like Apple does on my current aluminium Bluetooth keyboard. Fortunately, the back is just the right place to put it, orientation-wise.
Posted: 21 May 2013, 15:57
by matt3o
steely sound
I'm having a laser cut job soon, I can add your design if you want.
Posted: 21 May 2013, 16:21
by Muirium
Sounds terrific, in both cases!
So, the design stage of this tutorial of yours?
Posted: 21 May 2013, 19:10
by matt3o
Muirium wrote:So, the design stage of this tutorial of yours?
I'm taking one week off to work starting next Sat... 7 days full of custom keyboards
Posted: 21 May 2013, 19:19
by Muirium
That's the stuff!
I'm thinking about playing it safe and easy. Since Steely looks and sounds fantastic to me (and I dare say feels great too, if it's too stern I'd use O-rings), something similar is appealing. I'm definitely open to suggestions. My main distinction is wanting to go with blank caps all round, as I like the look and it lets me try whatever I want with the controller. Extra useful with a 60%.

