Page 3 of 6
Posted: 05 Dec 2012, 11:57
by philpirj
Want to share my findings on trackpoints:
https://www.sparkfun.com/products/10063 5dir (x,y,click), smd, $2. no rubber nub, probably one of lenovo wil fit, not sure.
https://www.sparkfun.com/products/11187 same with board, $6
https://www.sparkfun.com/products/9032 thumb stick with rubber dome, $4, arduino code example given
https://www.sparkfun.com/products/10835 hall effect joystick with click, relatively cheap for hall effect ones ($20)
I've also ordered c&k components TSW and JS1300AQ 'joysticks', ($10 and $2), but pretty sure they are not 'analog', and can only provide direction, not pressure force. first one comes with jog wheel though.
So probably if any case you run out of used thinkpads, you can go for one of these options.
Posted: 05 Dec 2012, 12:16
by suka
philpirj wrote:Want to share my findings on trackpoints:
.... So probably if any case you run out of used thinkpads, you can go for one of these options.
Thanks for the links - but only the last one seems usable as a trackpoint ( the first to are merely switches arranged in a square, the analog one is too hard to use - I already tried in one of my earliest designs )
If it wasn't for the price I would just order one immediately

But definately something I'll keep my eyes on, especially with its small footprint and I2C protocol.
Posted: 05 Dec 2012, 15:57
by uberben
I'm working with the mini hall effect joysticks in my current mod. I designed my own, smaller breakout board and got the joysticks on sample from the manufacturer (only had to pay duty). My original plan was to put this thing next to the keys on my Kinesis, but i think I could probably fit it between the switched, either sitting on the switch casings or under the panel with an extension stick, though I feel an extension might not work well with a sliding joystick. Either way, I'm thinking of 3D printing an adapter, long or short, that will allow TrackPoint nubs to fit on it.
I haven't hooked them up or started coding yet, (first step is to get the keyboard working) but will post back here once I have something working.
Posted: 06 Dec 2012, 19:42
by tlt
It would be really interesting to know if the hall effect joystick makes a good trackpoint replacement with an extension stick. No one has found a source for new good trackpoints and we need something for custom keyboard builds.
Posted: 07 Dec 2012, 15:41
by philpirj
tlt: Comments page to the joystick says that that one was used in dell laptops, so PH102 caps (track stick cover) will fit. Ebay shows some results for around $5. Good thing is that sparkfun have discount up to $15 for 100+ qty, it's cheaper than an average mouse.
Posted: 07 Dec 2012, 17:13
by uberben
philpirj wrote:tlt: Comments page to the joystick says that that one was used in dell laptops, so PH102 caps (track stick cover) will fit. Ebay shows some results for around $5.
I think you misread. Someone was asking if they were the same as in Dell laptops, and the answer was no. I have a laptop with TrackPoint and some of these hall effect joysticks and I can assure you the caps will not fit without some form of adapter (which I plan to make, eventually). Caps can be found on AliExpress for < $3 (free shipping) for 10 caps.
http://www.aliexpress.com/wholesale?Sea ... 0&manual=y
philpirj wrote:Good thing is that sparkfun have discount up to $15 for 100+ qty, it's cheaper than an average mouse.
The joysticks can be obtained directly from Austria Microsystems, the manufacturer, as samples (in small quantities). I designed a breakout board for them that is much smaller than the sparkfun one for < $1 each. I think it could be made even smaller (either by filing down this one or making a new, more condensed one) so that it can fit between the keys.
https://www.dropbox.com/s/8xsbzfmdwcjk4 ... .56.55.jpg
Posted: 07 Dec 2012, 20:14
by tlt
How much does it have to slide? That question is how well it will work to have a long adapter stick and how big the cutouts of the keycups need to be. A regular trackpoint doesn't slide and tilts very little. I guess this is by design so that it will work between keycaps with the point just a little smaller then the hole, just leaving minimum gaps.
Posted: 07 Dec 2012, 20:19
by uberben
It comes in three sizes and mine (and Sparkfun's) is the smallest. It has very little travel, just a bit more than a Trackpoint. I don't think the cap cutouts would have to be much bigger than for a TrackPoint, if at all.
Posted: 10 Feb 2013, 21:23
by suka
As mentioned in the
HyperMini thread, I took a break developing split keyboards and instead opted for an absolute minimal layout. It has already proven to be sufficient for me, but I'm interested to see how it will work out:
Firmware on github is updated, but nothing really important changed since my BlueCube development, apart from cleanup and restructuring of some code.
I'll post updates on how this layout works as soon as I have developed a feel for this board, but in the meantime I have a few leftover plastic frames - nothing fancy, more or less just mounting plates in slightly different arrangements and or dimensions. If there is serious interest, I'd be willing to give 'em away, in case somebody wants to experiments with this arrangement, too. PM me if you need more information.
Posted: 10 Feb 2013, 21:49
by Aleksander
that looks awesome!
Posted: 10 Feb 2013, 22:18
by jeff
From now on, I always thought that 3D printing was too expensive for my keyboard tests. I looked for a cheapest solution and, as I'm not really sure of what I'm looking for, the 3D printing creation cycle seems to long to me. I mostly tried to use metal sheet, my work is not graceful.
I must admit that your results are really impressive. Genuinely imaginative and very well finished.
Keep going on.
Posted: 10 Feb 2013, 22:35
by Jim66
Impressive as always. They look pretty light weight, don't they move around a lot on the desk?
Posted: 10 Feb 2013, 22:52
by suka
jeff wrote:... I always thought that 3D printing was too expensive for my keyboard tests. I looked for a cheapest solution and, as I'm not really sure of what I'm looking for, the 3D printing creation cycle seems to long to me.
I think the price is pretty reasonable once you down-size your designs so that only the minimal height is being 3D-printed - in this case the simple mounting plate with about 6mm would have been sufficient as I intend to put a wooden case around it anyway. And the time it takes to be build is definitely not bad once you have the necessary CAD sources and skills acquired.
Jim66 wrote:Impressive as always. They look pretty light weight, don't they move around a lot on the desk?
Thanks - you're right, I just measured a mere 220g or 7.5ounces, including the cable. But with the adhesive rubber foam patches I generously applied to the temporary bottom plate I noticed no issues with it sliding around so far.
Posted: 11 Feb 2013, 08:34
by tlt
Looks very nice! I'm planing something similar with the same staggering but without the gap around the track point and with a scroll wheel for the thumb. Is the profile a little curved? It's hard to see in this picture.
Posted: 11 Feb 2013, 16:35
by sordna
Has anyone gotten the
N35P112 hall effect joystick to work with a teensy? I'm looking for a firmware code sample that makes it work as a mouse.
Posted: 11 Feb 2013, 16:36
by Icarium
sordna: Just curious: Why don't you use a regular trackpoint?
Posted: 11 Feb 2013, 17:10
by tlt
Where do you get a new good track point? Everyone seems to be harvesting them from old boards.
Posted: 11 Feb 2013, 18:34
by Icarium
Fair point...
Posted: 11 Feb 2013, 18:45
by uberben
sordna wrote:Has anyone gotten the
N35P112 hall effect joystick to work with a teensy? I'm looking for a firmware code sample that makes it work as a mouse.
I got my custom EasyPoint joystick hooked up to an avr micro and working with some demo code, but I haven't had a chance to do the mapping from the joystick info to mouse commands. So far I've been using Hasu's tmk firmware, so I just need to figure out how to shoehorn my mouse driver code into it. Unfortunately I have way too many projects going on to make steady progress on them all.
My hackerspace is also getting a hobby 3D printer, so I'm hoping to print up some EasyPoint to TrackPoint cap adapters once that arrives. I'll be releasing the design files at that time.
Posted: 18 Feb 2013, 21:56
by suka
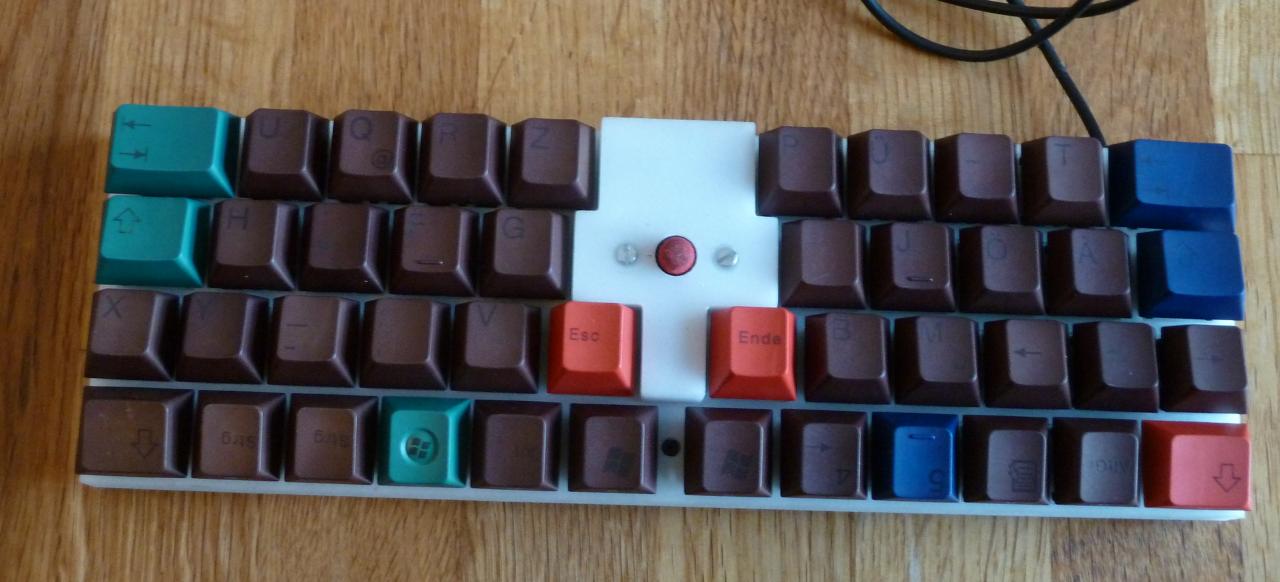
The wooden frame around my HyperNano took me longer than expected, but I'm kind of happy with it now and have colored a bunch of keycaps in the meantime to find a pleasant color scheme to go with it.

- Top
- _top_v1.JPG (173.27 KiB) Viewed 79626 times
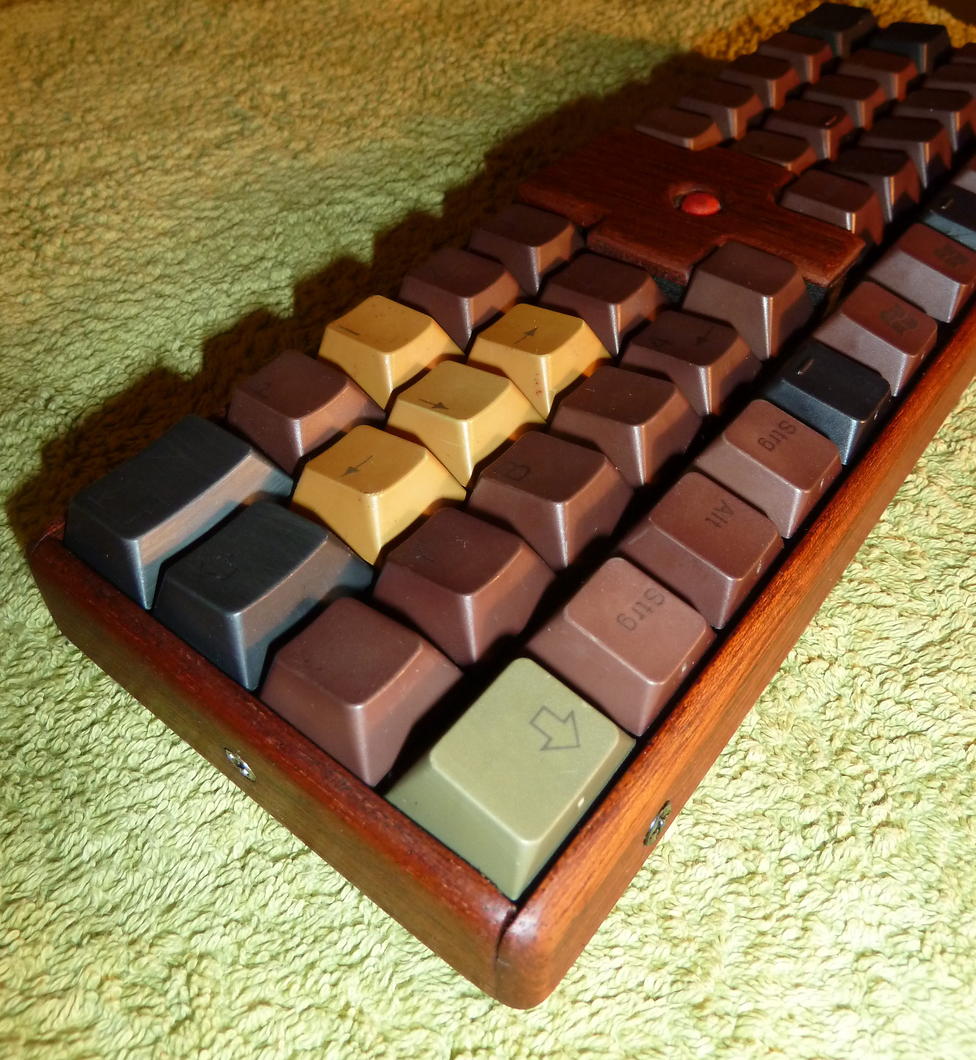
- Side
- _side_v1.JPG (207.07 KiB) Viewed 79626 times
I also I put an acrylic baseplate on and finally added a proper mini usb socket - no the most beautiful attachment, but it works.
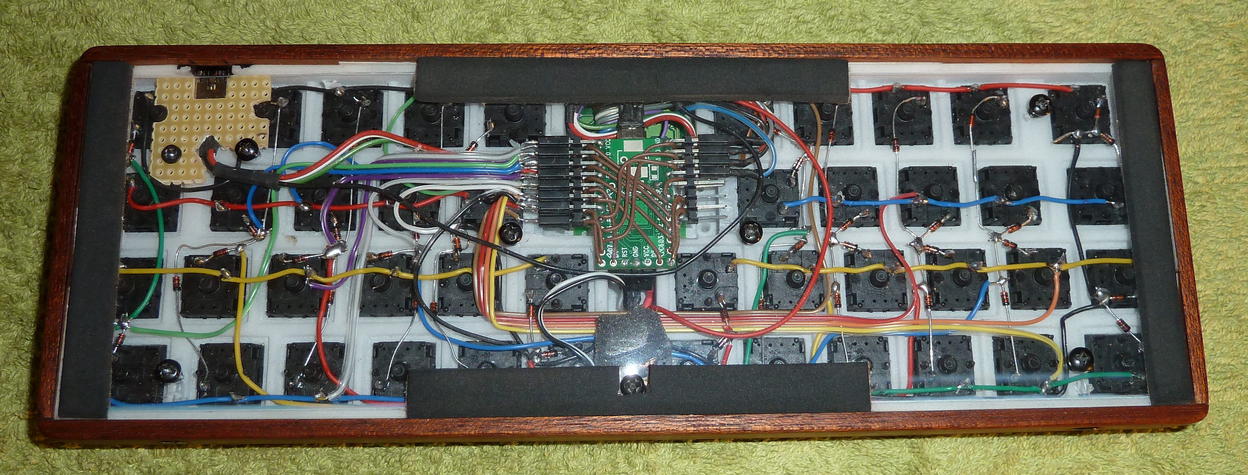
- Bottom
- _bottom_v1.JPG (173.67 KiB) Viewed 79626 times
On the software side of things, I ported the mousekey support from tmk_firmware and am quite surprised how well it works with the right settings - especially for emulating a scrollwheel as recently discussed on the HyperMini thread (if I didn't have that functionality with the trackpoint already I'd miss this sorely by now). By the way, I seriously consider switching to that amazing firmware altogether in the near future, seems to be a lot more advanced than my hackish attempts, with a bunch of nifty features I'll find hard to implement.
Other than that I've been typing for almost a week on this little beast and am impressed how pleasant the layout is: No comparison to a split and tented setup which I'd much prefer, but the symmetric 1/4 stagger together with larger than usual hand separation makes it more natural for me to type on than on a standard desktop keyboard.
Posted: 19 Feb 2013, 02:55
by metalliqaz
This is an amazing.
Posted: 19 Feb 2013, 23:18
by fydo
Wow, that looks amazing. Nice work!
Posted: 20 Feb 2013, 12:20
by philpirj
Looks like the best day-to-day DIY keyboard, perfect in every aspect.
Posted: 21 Feb 2013, 18:08
by bearcat
I registered with Deskthority just to post on this thread; these are amazing, and thank you very much for posting them!
I have a mill and i'm going to try cutting some grids this weekend. Thanks for the inspiration!

I'm a little concerned about the 14mm^2 holes; as i'm using a mill, it's tough to get sharp corners on inside pockets, and the cherry's have most of the "lip" on the corner. Did you have any trouble with the fit on any of the early prototypes? Or does the extra rigidity from the PCB below take up any slack or wobble?
Posted: 21 Feb 2013, 18:47
by suka
bearcat wrote:Did you have any trouble with the fit on any of the early prototypes? Or does the extra rigidity from the PCB below take up any slack or wobble?
Since it is 3D-printed, all corners of the cut-outs are rectangular - don't know what the tolerances of the switches are if you mill it.
There is no PCB in my designs! Just the plastic frame however is stable enough to support the whole keyboard, especially since it it enclosed in a frame.
Posted: 21 Feb 2013, 19:05
by uberben
Suka: I got your prototypes yesterday. Very interesting stuff. (Also, impressive packing job getting all that stuff into that tiny box). The curvature of the key well in the smoothly curved sample is a bit steeper than my Kinesis. I might have to try populating it (or a slightly modified version) to get a real feel for it.
Posted: 21 Feb 2013, 20:15
by calavera
OMG I WANT ONE!
Posted: 22 Feb 2013, 06:08
by yakitori
Great.
Posted: 24 Feb 2013, 02:50
by imp
bearcat wrote:
I have a mill and i'm going to try cutting some grids this weekend. Thanks for the inspiration!
I'm a little concerned about the 14mm^2 holes; as i'm using a mill, it's tough to get sharp corners on inside pockets, and the cherry's have most of the "lip" on the corner. Did you have any trouble with the fit on any of the early prototypes? Or does the extra rigidity from the PCB below take up any slack or wobble?
You don't need to overcut the corners if your bit is small enough.
I did this boards long time ago with a 2mm bit and had no problem with inserting the switches. If you take a close look at the corners in the image, they are not perfect
.
The plates are 2x 4mm wood glued together after cutting them. Oh, and don't do the wiring that way, it broke way to fast (it's better to use enamelled copper wire).
Posted: 25 Feb 2013, 19:52
by bearcat
Whoa, that's great! Definitely gonna have to give it a go. Didn't get to it this weekend but have been playing around in openscad getting the model ready.
imp wrote:
You don't need to overcut the corners if your bit is small enough.
I did this boards long time ago with a 2mm bit and had no problem with inserting the switches.
Mind if i ask: what is the separation you're using between holes? E.g., a 14mm^2 hole separated by 3mm? 4? what's normal?