Page 1 of 3
Another Model F refurbish project diary
Posted: 24 Feb 2017, 12:34
by just_add_coffee
The gameplan is to create a beautiful (though very non-stock) keyboard on the outside, something that looks like a cross between a hot rod and a 1950s space-age appliance (there will be CHROME! Or at least chrome paint); on the inside, as cleaned and as refurbished as I can possibly do it.
My motivation for doing this comes from a discussion that I had on /r/mechanicalkeyboards with other IBM "enthusiasts" a few weeks back. The long and short of that self-deleted thread was that some folks get downright hostile at the mere mention of a Model M or Model F that doesn't look like it just came out of the box in 1988. Differing opinions are awesome, but there was some real arrogance and jackassery displayed and I'm still a little pissed.
I'm 46 years old and even I don't believe everything started to suck somewhere during the 90s.
So yesterday, after accumulating most of what I would need, I began creating The
Model F Ultra
(The Model F.U. for short).
(to be kept updated)
Relevant threads of inspiration and education:
Exterior:
/r/mechanicalkeyboard's pyrelink's thorough sanding, priming, and painting diary
Interior:
Sigmoid's Model F XT refurbishing
fohat's IBM Model F Harry's "Naked 122" mod guide
lot_lizard's(Model MF) Remodeling the Model M
This will be where I keep the images:
http://imgur.com/a/ap9CK (descriptions eventually)
I would be extremely grateful for help along the way. I've never done anything like this before, don't have any electronics or soldering skills (yet) and, quite honestly, I'm more than a little bit nervous.
Rather than a bazillion different threads polluting this board, each with a particular question or a request for help in dealing with that current tribulation, I'd like to keep everything here and then readers can drop in and help if they can and want to. Perhaps down the road, this thread could be helpful to someone else!
Finally, I'd like to make some friends here. If you're in the Seattle area, message me and I'd love to meet up. I also know how to mail things and can help in other ways. Help me pull this project off and I will be your minion!

Posted: 24 Feb 2017, 13:04
by just_add_coffee
With that out of the way, yesterday was disassembly day. I also started wet sanding the case.
Interesting stuff:
1) The legs for this Model F AT had broken and, rather than have open holes, the previous owner had hot-glued the knobs into place. After a couple of hours of trying to carve the hot glue off, it (finally) occurred to me to look online for better ideas:

Plain-old rubbing alcohol somehow causes hot glue to lose adhesion and to become brittle. I poured it on, let it sit for 15 minutes, poured some more on, and then I could peel the hot glue off.
For this project, I'll leave the holes open. The Model F legs are designed well, but they're way too long for me to ever use them.
2) I want to change the LED colors and found these:
Replacement LEDs .
I ordered the 2x5x7 Diffused Blue-Blue and Water Clear Pink, 50pcs each. If anyone wants LEDs of these types, let me know. I should be able to send them in a small envelope, right?
My plan is to replace two of the LEDs and keep one the original Green.

3) I'm having a difficult time finding a 1/16" sheet of art foam large enough to replace the foam mat. Anyone have thoughts about using Neoprene?
1/16" thick Neoprene Rubber Roll 12" WIDE 36" FEET long
I haven't opened that sandwich yet, I'm planning on replacing the mat anyway since I'm there, as well as cleaning the PCB, barrels, and flippers.
Posted: 24 Feb 2017, 14:15
by fohat
Although lot_lizard has devised a high-tech foam replacement, I have had good luck with
http://www.michaels.com/creatology-adhe ... et&start=2 and the sheet is long enough to do an AT.
If you are using an F AT instead of a 122, you should also do this mod:
https://geekhack.org/index.php?topic=78 ... msg2002161
If you don't like the "ears" for the legs sticking out, just cut them off and sand the circles smooth.
Posted: 24 Feb 2017, 15:16
by just_add_coffee
Thanks for the links! I don't know why I was having trouble finding the foam.
And awesome idea about cutting the ears off and sanding flush. I still might find some replacement legs, neatly shorten them, and install them later. Or, I could go nuts, and install USB ports, which is something that I haven't the foggiest idea how to do right now.
Posted: 25 Feb 2017, 01:13
by just_add_coffee
Welp ... looks like I'm going to have to half-ass the sanding process. I tried being as careful as possible, knowing that the Model F cases are brittle, but still ...

Like a kid with a piñata ...

Currently, the barrels and flippers are soaking in a tub of warm water and dishwashing detergent.
I would sure like to find replacement springs rather than de-floss-mod and de-rust these things ...

Posted: 25 Feb 2017, 10:52
by just_add_coffee
White vinegar. Lidded jar. Shake vigorously. Let sit. Shake vigorously. Repeat.

Posted: 25 Feb 2017, 11:21
by Sigmoid
Nice, I'm glad my refurb log was useful.

Personally I'd refrain from using any adhesive foam, and prioritize chemical inertness (why I went with silicone foam - though note you'll NEED a bottle of spray-on static dissipative if you go that route).
Adhesives break down with time and turn into either a sticky, fine dust (bad for keyboards) or a thick, honey-like slime (even worse for keyboards). Also plastics that were rubberized / softened with an additive (eg. phtalates) are unstable, and completely break down with time.
Btw what the hell is that "foam mat"? Is that a piece of tablecloth?! XDDD
Do you have some sketch or rendering of the intended final product?
Posted: 25 Feb 2017, 12:08
by just_add_coffee
Sigmoid wrote: Nice, I'm glad my refurb log was useful.
Personally I'd refrain from using any adhesive foam, and prioritize chemical inertness (why I went with silicone foam - though note you'll NEED a bottle of spray-on static dissipative if you go that route).
That's a pretty good point. That's probably the direction I'll go.
Edit: Do you have a link for the foam and spray that you used?
Btw what the hell is that "foam mat"? Is that a piece of tablecloth?! XDDD
It appears to be kitchen shelf and drawer lining. What's interesting, besides that it's in pristine condition, is that there's one large layer encompassing all of the keys, a layer on top of that for the middle three rows, and one final strip for the middle row.
I'm not really a floral guy and I don't know what the creator had in mind, but some thought seems to have gone into it. Perhaps they were compensating for differences between the bends of the base plate and barrel plate?
Do you have some sketch or rendering of the intended final product?
No. I thought about it, but since the project was mostly a change of paint job, I didn't think it was worth it.
Posted: 25 Feb 2017, 15:22
by ohaimark
You might be able to buy some replacement stainless steel springs from lot_lizard, though they're much lighter than stock springs. Think MX Red-light model f switches. That sure would piss off those stodgy jerks.

Posted: 25 Feb 2017, 15:45
by just_add_coffee
ohaimark wrote: You might be able to buy some replacement stainless steel springs from lot_lizard, though they're much lighter than stock springs. Think MX Red-light model f switches. That sure would piss off those stodgy jerks.
Looks like I'm out of the replacement spring market. The white vinegar and shaking strategy exceeded my expectations.
And I'm not nearly a good enough typist for Red switches. Seriously, I'd be accidentally pressing keys all day long.
Posted: 25 Feb 2017, 16:10
by fohat
Sigmoid wrote:
what the hell is that "foam mat"? Is that a piece of tablecloth?
Foam sheets sold at art supply stores for use in scrap-booking. Supposedly they are acid-free and intended for long term stability. They are about 1/16" (1.5mm) thick and moderately firm but easily compressed.
In the US you can buy them at "Michael's Art Supply" stores for about $1 per sheet in various colors. You can easily get 2 pieces from 1 sheet if you are doing XT or AT plates. 122s and 107s are longer and you will need to splice on a piece at one end (perfect for that left side function set).
In my guides I go into this in detail.
Posted: 25 Feb 2017, 17:32
by Sigmoid
Lol, the question was aimed at the "boutique solution" visible in the photos. I have a pretty good idea of what foam mats are in general (I hope, lol.)
Posted: 25 Feb 2017, 23:41
by pr0ximity
Rad project! Looking forward to seeing what you come up with, creative IBM resto's are the best and we need more of them!
Posted: 26 Feb 2017, 11:20
by __red__
Welcome to the Party @just_add_coffee.
I used the exact same material as fohat did independently. I also cheated and used a cricut vinyl-cutter that they sell in the same store to cut all of the holes for me
Looking forward to you reaping the magic ;-D
Posted: 26 Feb 2017, 11:21
by __red__
__red__ wrote: Welcome to the Party @just_add_coffee.
I used the exact same material as fohat did independently. I also cheated and used a cricut vinyl-cutter that they sell in the same store to cut all of the holes for me
The stuff is bad-ass... as are the other recommendations you'll find in fohat's thread.
Looking forward to you reaping the magic ;-D
Posted: 26 Feb 2017, 15:51
by just_add_coffee
As someone who is completely new to this, it seems like Sigmoid makes a good argument regarding the superiority of silicone/no adhesive matting.
On that note, precisely cutting the individual holes barrels and tabs with an exacto knife seems preferable to using a cutter that makes one big hole for both the barrel and the tab.
My inclination is to over-engineer whenever I can, even if the gains to be had are relatively minor. But are there potential risks that I haven't considered?
Posted: 26 Feb 2017, 16:14
by tigpha
Using sharpened hole punches can give very neat results. Sharpening is necessary, stock cutters expect to be whacked with a sledgehammer, which is overkill for foam! The post shows me gently cutting polyethylene foam with a twist of the fingers only. I discarded polyethylene in favour of neoprene foam and that also cuts very neatly. Neoprene foam sheets so far have proven to be perfect.
Posted: 26 Feb 2017, 17:23
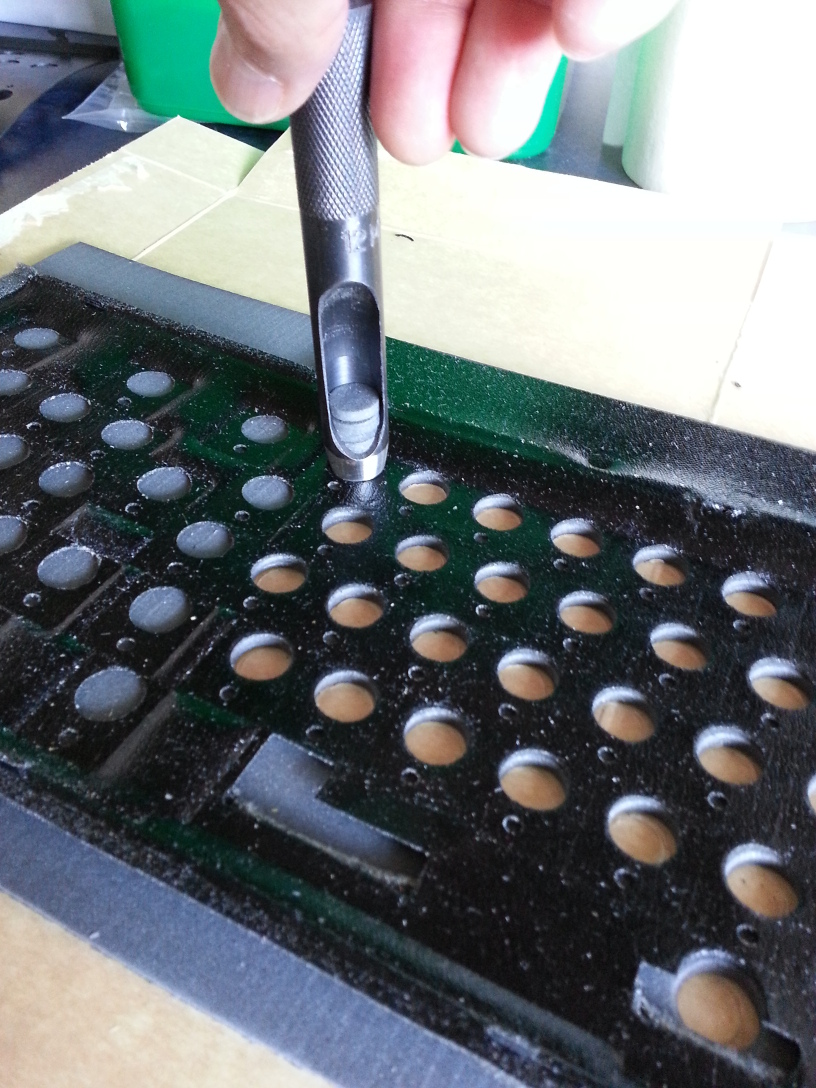
by just_add_coffee
tigpha wrote: Neoprene foam sheets so far have proven to be perfect.
How does this look?
1/8" Neoprene
2mm & 12mm hole punches
I just want to add that America's reluctance to adopt the metric system is pissing me off this morning.
Posted: 26 Feb 2017, 17:45
by Sigmoid
just_add_coffee wrote: As someone who is completely new to this, it seems like Sigmoid makes a good argument regarding the superiority of silicone/no adhesive matting.
On that note, precisely cutting the individual holes barrels and tabs with an exacto knife seems preferable to using a cutter that makes one big hole for both the barrel and the tab.
My inclination is to over-engineer whenever I can, even if the gains to be had are relatively minor. But are there potential risks that I haven't considered?
Indeed it would be superior, but not to punching a hole of the exactly correct diameter, and then making a smaller hole for the xt barrel pin with an awl. Also, it sounds like a lot of work, and a lot of potential errors. You have to be at least Mr. Bean to spectacularly mess up with a leather punch and an awl, not so with an exacto knife...
Posted: 26 Feb 2017, 18:03
by fohat
just_add_coffee wrote:
I just want to add that America's reluctance to adopt the metric system is pissing me off this morning.
Barrels are 1/2" diameter and a 5/8" diameter punch will get the side buttress. If you are using XT style barrels the center post is more problematic. I do it the easy way and it works quite well enough, but I am not OCD by any means.
Posted: 26 Feb 2017, 18:26
by just_add_coffee
Gotta side with the imperial system there!
Posted: 26 Feb 2017, 19:47
by tigpha
The hole punches are suitable. You need to search for neoprene foam (or sponge) sheet, 1/16th inch thick, without adhesive. I tried to search for it on eBay in America, but it seems the only available 1/16th inch thick sheets available are all covered in adhesive, which I suggest you avoid.
This is the type I bought in the UK, 1.5mm x 300mm x 500mm. The solid neoprene rubber sheet is too hard and will not compress near enough to be a suitable replacement.
Posted: 26 Feb 2017, 20:25
by fohat
McMaster-Carr is the go-to place for all your weird hardware needs.
Posted: 26 Feb 2017, 23:17
by micrex22
fohat wrote: McMaster-Carr is the go-to place for all your weird hardware needs.
Except the fact that they're too arrogant to ship to individuals outside of the States *on the same continent* let alone outside North America.
Posted: 27 Feb 2017, 02:45
by just_add_coffee
fohat wrote: McMaster-Carr is the go-to place for all your weird hardware needs.
If 1/8" will work, then I can do either
McMaster-Carr or
Ebay. I can't seem to find 1/16"
neoprene-foam-sheets from a US supplier.
Posted: 27 Feb 2017, 04:36
by __red__
- IMG_0482.JPG (796.57 KiB) Viewed 8732 times
My money would be on "No" unless neoprene will compress 50%.
Posted: 27 Feb 2017, 04:42
by __red__
How about this?
https://www.amazon.com/Neoprene-Duromet ... heet+0.062
(I'd still use the foam honestly)
PS: the foam I used wasn't adhesive either, and you can just buy it over the counter at a Michaels etc...
Posted: 27 Feb 2017, 05:24
by Parak
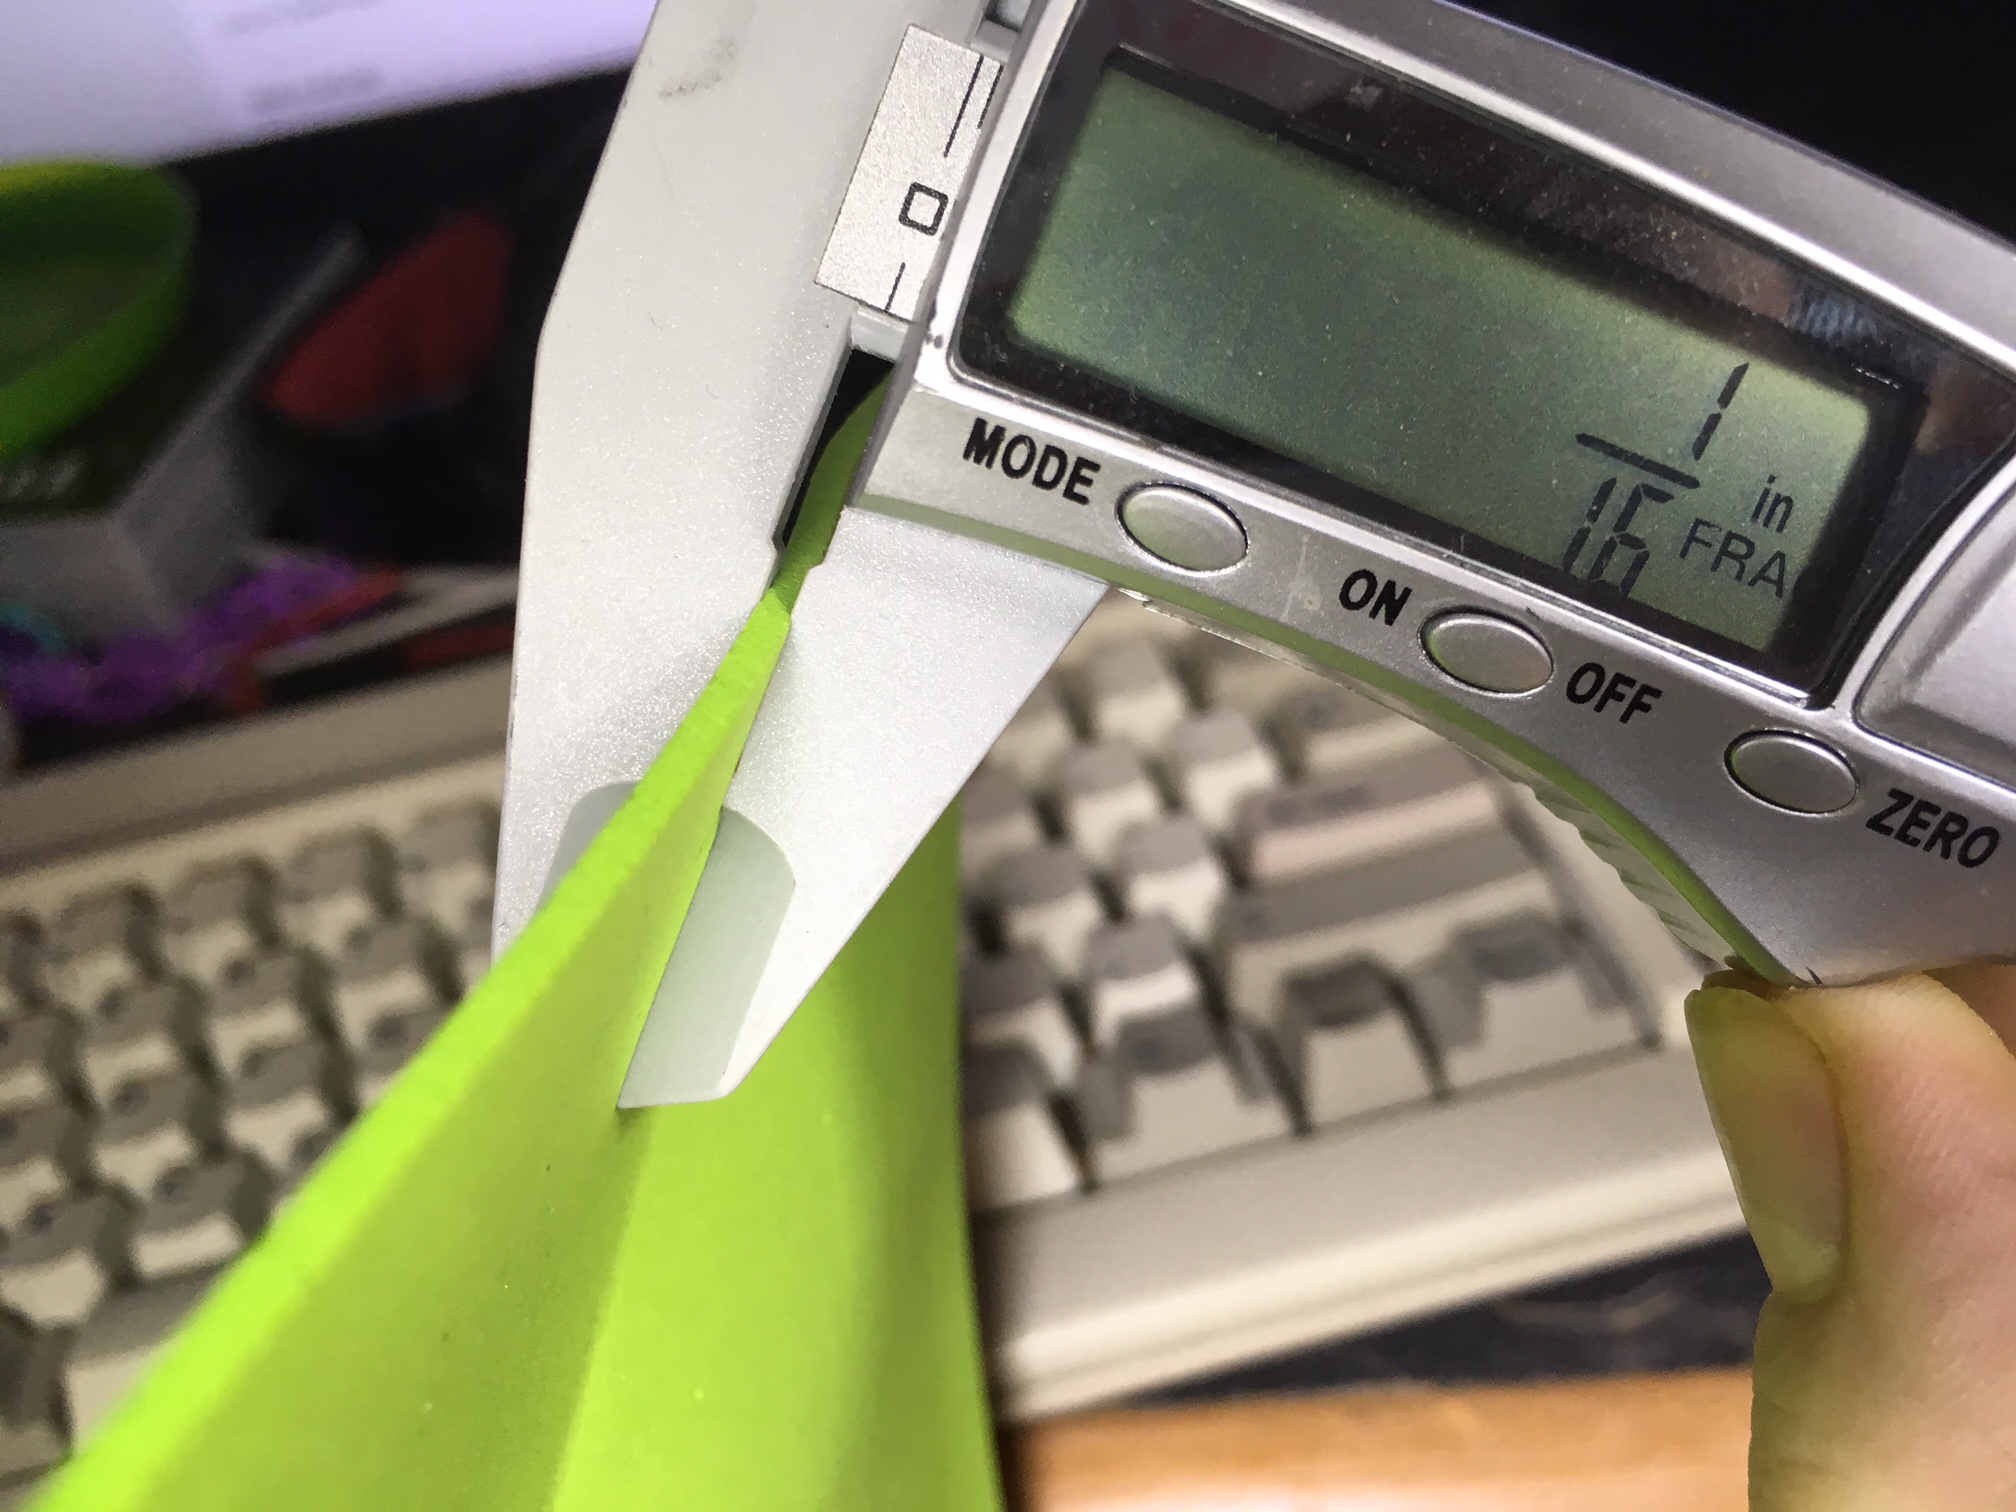
Posted: 27 Feb 2017, 06:11
by just_add_coffee
I think
this is what I'll go with.
Silicone Sheet, 50A Durometer, 0.125" (3.175mm), 36" x 12". The price jump to 40A is huge!
Posted: 27 Feb 2017, 07:26
by __red__
Pretty sure that's going to be too thick and your life will be a misery.
EVA foam is your friend
 http://www.michaels.com/4x6-foam-sheet- ... d|10485644