Page 1 of 1
Case painting
Posted: 21 Jun 2012, 12:53
by Icarium
Posted: 21 Jun 2012, 13:48
by CeeSA
Which paint manufacturer? Do you use a primer?
Spray? Did you clean it after sanding? With alcohol?
It looks like to much color at the "bubblepoints". Or too less sanding.
For me spraying is a very hard. I found this the most difficult part of modding for me.
Posted: 21 Jun 2012, 14:40
by Icarium
I did not use any primer.
I did clean the sanded surface with alcohol.
I doubt that it's too much color. I applied it pretty evenly and the bubbles only occured between blank aluminium and old paint.
It's only one layer of paint as well, the problem occured immediately. I tried again and the pictures are the result of that. The problem just moved to a different area.
Is there any other way to clean off the old paint or prime the surface?
Posted: 21 Jun 2012, 14:45
by Half-Saint
Sandblasting will remove the old paint for sure.
Posted: 21 Jun 2012, 14:52
by kint
I do agree.
To much paint. Or too short distance of the can. Or too short time distance between the layers. Or improper surface. Or everything combined.
Looks too me, like the second/last layer dissolved the underlying layer, which is usually the case when the underlying couldn't evaporate enough. The layers then sort of mix and become to thick and don't dry properly - resulting in bad surface/bubbles.
In the "left" pic it also looks like there's a drip running down the front - also an indication of too much paint applied.
In case its old paint just under the surface of the bubbles - it's most likely that the new paint dissolved the structure of the old paint, which can happen easy, on the other hand industrial paint is in most cases a more aggressive mixture resulting in a higher resistance to chemicals (i.e. common new spray can paint).
evenly sand down with wet paper, around 400-600 grain, then apply new paint in thin layers. Thickness shouldn't be that thick that one layer covers the surface completly, after the first layer the material should still shine through. Two or three layers should cover evenly then.
edit:
Although I haven't really understood where the problem occured. Between the metal and new paint but on old paint it sticked ? Or did the bubbles occur on places where there was old paint over the metal, but on pure metal it sticked ?
could you mark the area in the pic where the old paint was?
Posted: 21 Jun 2012, 15:32
by Icarium
kint wrote:
edit:
Although I haven't really understood where the problem occured. Between the metal and new paint but on old paint it sticked ? Or did the bubbles occur on places where there was old paint over the metal, but on pure metal it sticked ?
could you mark the area in the pic where the old paint was?
Of course!
In the red part the case was still completely black. The green part I have completely sanded, down to the bare aluminium.
In between the color was coming off in flakes but after some sanding seemed to give a decently smooth surface.
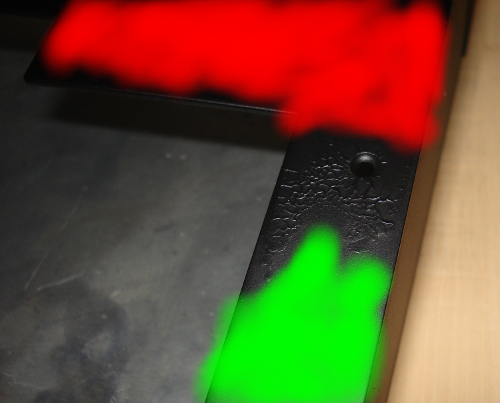
- red: old paint
green: blank aluminium - areas.png (264.38 KiB) Viewed 3457 times
I will take your other advice into account when I try again, thanks!
Posted: 21 Jun 2012, 15:37
by Maarten
Yeah, thats either a reaction like you get with different types of paint re dissolving each-other or if you didn't de-grease properly (always do that before AND after sanding).
Its a metal case you have there right? Heres my advise for the best result;
1) Buy some proper chemical paint stripper (here in the netherlands its called Alabastine), it should be a thick pasty stuff, smear it all over the case and let it sit inside a trash-bag for an hour or so. Do this OUTSIDE this stuff is toxic as hell.
2) Scrape all the gunk off the case with an old credit-card (wear some proper gloves) and hose the case down with a crapload of water, fully clean it with ammonia.
what you have then i a completely bare metal case, this is good for painting but also bad cuz it will rust (depending on metal composition between an hour to months). So dont leave it bare like this too long
3a) Coat the case with a good (pref rust-proofing) primer followed by paint color of choice (follow exact instructions on the paint-type chosen)
3b) Paint with a proper enamel based paint (yacht paints are great, so is rustoleum or alike) as this has rust proofing properties itself.
No sanding whatsoever needed

Posted: 21 Jun 2012, 15:42
by Icarium
Okay, thanks for the advice. Looks like I'll have to brush up on chemistry.

Posted: 21 Jun 2012, 16:10
by kint
Did you sand the red area at all ? In case you just sanded the area between red and green this is the reaction where you did destroy the original paints most resistant point: the top surface, in the end, thats why you sand old paints top surface at all... so new the paints chemicals can penetrate and adhere.
However since you said: at the uncoloured area (nor red/green) the old paint already came off in flakes the reason is obvious:
The old paint already had hairline cracks, causing air and humidity to crawl under the paint, destroying the bonding of the old paint on the metal and it lifted in flakes. Now new paints solvents easily crouched under the old paints remains and lifted what seemed to be a tight and good underground.
Always strip/sand the areas where you don't have an intact paint to the metal generously. If its flaky its all shot and won't provide a good base. No need to completely strip all the case, but don't be too cheap
edit: No need to strip the case now completely to solve what you have either.
In case you sanded the red area, just sand the bubbled part down to the metal generously, smoothen with the other good paint parts ( 400grain) apply 2-3 thin layers to the new bare metal, blending over the already painted parts. Let it dry. Take a high grain wetpaper, like 600 to smothen the whole case another time then just apply an even thin or two layers over the whole case.
Posted: 21 Jun 2012, 16:28
by Half-Saint
Maarten wrote:Its a metal case you have there right? Heres my advise for the best result;
1) Buy some proper chemical paint stripper (here in the netherlands its called Alabastine), it should be a thick pasty stuff, smear it all over the case and let it sit inside a trash-bag for an hour or so. Do this OUTSIDE this stuff is toxic as hell.
2) Scrape all the gunk off the case with an old credit-card (wear some proper gloves) and hose the case down with a crapload of water, fully clean it with ammonia.
I prefer good old sandblasting over toxis chemicals any day. Imagine where that crap's gonna go after you're finished with it.
Posted: 21 Jun 2012, 16:36
by Maarten
Half-Saint wrote:I prefer good old sandblasting over toxis chemicals any day. Imagine where that crap's gonna go after you're finished with it.
Oh yes i fully agree with you there, blasting will always be better.... But you just cannot do that without the proper hardware, paintstipper on the other hand is easy as pie (apply with brush) and i doubt the OP has a blasting-cabin in his garage or else he would not have had this problem
Posted: 21 Jun 2012, 16:37
by Half-Saint
There's always other people that can do it for you in exchange for money
Posted: 21 Jun 2012, 16:48
by Icarium
I will explore both options but assume that sandblasting will be too expensive.
Posted: 21 Jun 2012, 16:58
by Maarten
Half-Saint wrote:There's always other people that can do it for you in exchange for money
Wheres the fun in that?
Posted: 21 Jun 2012, 17:15
by Half-Saint
There is little fun (for me at least) in mucking about with chemicals or sanding by hand for hours.
Posted: 21 Jun 2012, 17:17
by Maarten
Sometimes the end justifies the means... There's only one thing better than having a custom job done on anything and thats a custom job that you completely did yourself!
