Page 1 of 1
Wooden Poker Case
Posted: 13 Feb 2013, 21:02
by TDub
Last weekend I created a first attempt at a wooden Poker case. It's far from perfect, but for a first attempt I think it's not bad. Makes the Poker feel a lot more solid, reduces overall typing noise (the case doesn't sound as hollow as the plastic on) and looks very cool in white combined with my white ds set.
It's based on layers of thin 0.5 cm high 0.6 cm thick planks stacked on a 0.5 cm base plate. Then for pcb support there are planks below the pcb that support the pcb. I don't have a good solution for the screws yet (they are too long and not supported from the bottom) or for feet. Everything is glued.
Here are some images:

Looks pretty good from up top.
What do you guys think?

The sides need improvement for the next iteration. The plan for the next side is to build the layers thicker then needed and then make a clean cut once assembled.

Screw coming out the back a little bc they are too long. Looking for replacements for the next iteration.

Inside of the case, with pcb support and usb hole in the upper right corner. The inside isn't painted very well but then again you don't usually see it so I didn't try very hard.
Painted with a primer by brush twice then with white acryl spray.
Next iteration is probably going to be a couple of weeks since I don't have the required equipment at my apartment.
Posted: 13 Feb 2013, 21:04
by dirge
Make loads of them, you've done a good job, better than I would have DIY. Really nice board mate.
Posted: 14 Feb 2013, 04:20
by sordna
Nice, you would easily sell these cases!
Posted: 14 Feb 2013, 12:03
by TDub
sordna wrote:Nice, you would easily sell these cases!
Mmh maybe, but if I do, it would be very low volume. Like I said, I don't have any of the proper tools at my place. I did this one over the weekend while visiting my parents ( my dads is a genius at working with wood ) so I won't be able to make many of them. But when I do the next one I will take more pictures of the process and do a little tutorial.
Posted: 28 Feb 2013, 23:16
by TDub
So I made some more cases last weekend, but since I am really busy this week I don't really have time to post all the pictures before the weekend. However here is a little teaser:

Posted: 28 Feb 2013, 23:17
by 7bit
Would look much better without the paint.
Posted: 01 Mar 2013, 00:19
by TDub
The new ones are without paint, the first one had paint because it was made from the super ugly pressed wood (Holzpressplatten).
The one in the new pictures just got a clear coat, so it looks almost the same as in the picture above.
Posted: 01 Mar 2013, 16:44
by byFd
looks good!
Posted: 01 Mar 2013, 16:54
by tlt
Nice looking case! Post some pictures of the parts and process that could be helpful to others.
Re: Wooden Poker Case
Posted: 02 Mar 2013, 05:16
by fydo
Looks pretty nice! What kind of wood are you using for those newer cases?
Posted: 02 Mar 2013, 12:21
by TDub
fydo wrote:Looks pretty nice! What kind of wood are you using for those newer cases?
I think it used to be a bed frame or a closet my dad made

I think he said its birch, but I am not 100% sure.
So lets get started with the pictures of the process ( I really intended to take more pictures, but I got so caught up in it

):

This is one of the sides for the new case. It has a small ledge at the bottom for the base plate. Each piece is 2,5cm high and I think they were initially 2 cm wide (they get cut again once the case is glued together).

Here you can see the pieces of the case stacked around one of The_Beasts plates.

This is the material of the baseplate, i looked it up and the correct translation for it is particle board. Very ugly, which is why I painted the back of the case white, but it makes a strong base plate.

Gluing the case together. The yellow corner pieces are pulled together with the string and the clamp presses the base plate into the ledge.

With one of the two cases we didn't measure accurately enough

Luckily we figured out a way to fix it though.

A picture of the pcb support. Small strips of the particle board glue to the base plate.
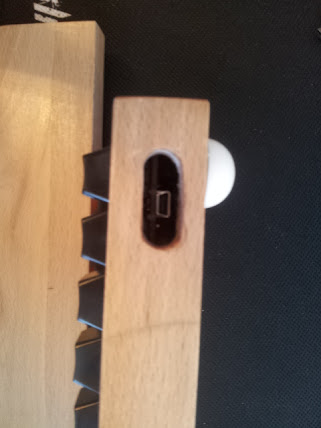
For the USB port we tried a different approach this time, we drilled it. Which initially didn't work out that well bc we drilled to far to the left, but with some tinkering, it looks alright.

Painting of the base plate. It is first painted by brush with a primer then spray painted.
The rest of the case was painted with 2 layers of clear coat. After the final sanding it feels very nice.
Now a few shots of the finished product (including the wrist wrest):


Lastly a picture of the feet I attached (both types are just what was available in my local hardware shop):

The backside I feel could still be improved, there is a small gap between the side of the base plate and the nice wood part, which doesn't look that great up close and the usb hole still needs a better more consistent method. Since this post is already way to long, I'll talk a little more about what tools you need and future plans in the next one

The feel of the case is awesome. The pcb has no room to bend and the case does not sound hollow like the original plastic one. Right now the keyboard is still a little noisy because of the clear springs which sorta ping a little. But I have some Krytox here which fixes it on the few keys I already lubed. The rest should follow this weekend and then, finally, I think I will be as happy as I can be with my poker
Posted: 02 Mar 2013, 22:13
by fydo
Wow, looks good and you have some excellent photos of the process!
I have a poker PCB and other parts coming to me in the mail and I've been thinking of doing something similar, maybe with finger joints for the corners. I'll need to do some more thinking on what I want to do.
My last woodworking project was making a joystick for playing arcade games a few years ago (photos here if you're curious:
https://dl.dropbox.com/u/1588537/joystick/joystick.html ) and since then I've been itching to do more woodworking.
Your post is quite inspiring, so thank you for sharing!
Posted: 02 Mar 2013, 22:39
by Findecanor
I don't know much about woodworking.. How did you do the ledge? Router?
Posted: 02 Mar 2013, 23:42
by TDub
fydo wrote:Wow, looks good and you have some excellent photos of the process!
I have a poker PCB and other parts coming to me in the mail and I've been thinking of doing something similar, maybe with finger joints for the corners. I'll need to do some more thinking on what I want to do.
My last woodworking project was making a joystick for playing arcade games a few years ago (photos here if you're curious:
https://dl.dropbox.com/u/1588537/joystick/joystick.html ) and since then I've been itching to do more woodworking.
Your post is quite inspiring, so thank you for sharing!
Wow that joystick is amazing work!
Findecanor wrote:I don't know much about woodworking.. How did you do the ledge? Router?
No, we used the circular saw, but as a result, the ledge was not as precise as we wanted, which is why there is now a small gap between the base plate and the wall pieces at the bottom. If you look very closely, it doesn't look very nice. But since it is at the bottom of the case, I can live with it. I do plan on making more cases, with more different ways of doing them
Re: Wooden Poker Case
Posted: 25 Apr 2013, 09:29
by TDub
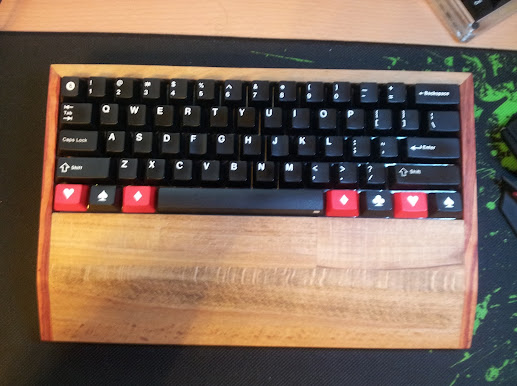
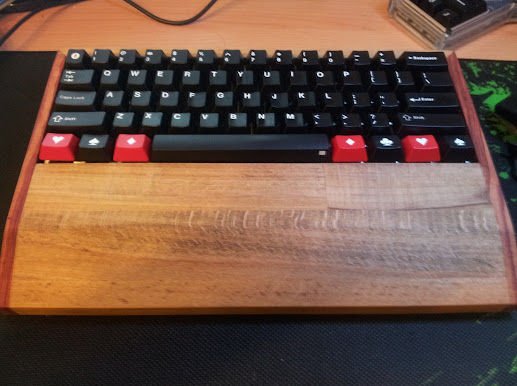
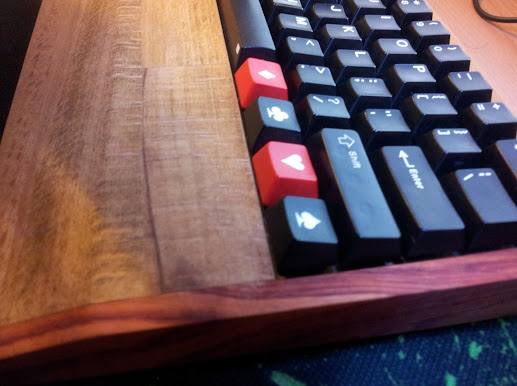
Made some new cases last weekend with integrated wristwrest. They are not quite finished yet, I will post them tomorrow or over the weekend when I finished them. I think they came out even better then previous ones with some very nice "rosewood" ( I hope that's the right translation).
Posted: 25 Apr 2013, 14:05
by Muirium
Superb! Birch and oak are great looking woods too. And of course if you could lay your hands on some dark hardwood, it would lacquer up a real treat.
I'm really thinking about the
Ducky 60%. It's a Poker Pro variant customised by Ducky Nordic for European layouts. A wood case for that little wonder would be fantastic.
Posted: 25 Apr 2013, 22:40
by TDub
Here are some pictures of the new cases. They are still not finished (the PCB support and mounting is still missing), but hopefully I will have time to finish them this weekend. I think these could fit a Ducky 60% as long as you customize the PCB support and mounting for them. And the USB Hole of course.


Posted: 01 May 2013, 21:51
by TDub
Posted: 02 May 2013, 10:36
by Muirium
Sure do.
There's something very right about retro wood around a keyboard whose theme is poker. It's like another timeline where computers had sprung out of the wild west instead of plastic California.
Integrated wrist rest is too big for my workspace – I like to type standing up as often as not, and for me that means keyboard as close to desk's edge as possible – but you've made some impressive cases, that's for sure.
Posted: 19 Dec 2013, 16:51
by fart_toast
Very nice, inspired to give this a go myself!