Hi everyone,
I'm new to these forums so forgive my noobness. I have been reading many of the posts here about building custom keyboards from the ground up. And they have a lot of good information. what I don't see though is specs on things like how to cut the mounting plate for the keys, what shape the holes should be, how far apart they should be, stuff like that.
Is there a wiki page that I missed with this data?
Thanks a bunch.
ground up keyboard help
-
Muirium

- µ
- Location: Edinburgh, Scotland
- Main keyboard: HHKB Type-S with Bluetooth by Hasu
- Main mouse: Apple Magic Mouse
- Favorite switch: Gotta Try 'Em All
- DT Pro Member: µ
Good question. Cherry has some data here:
http://www.cherrycorp.com/english/switches/key/mx.htm
I think the holes are 14.5 mm squares. The .dwg file we used for laser cutting our last group build is on the opening post here:
http://deskthority.net/marketplace-f11/ ... are%20hole
And if you want to join in, we're at it again over here:
http://deskthority.net/workshop-f7/grou ... up%20build
-
scottc

- ☃
- Location: Remote locations in Europe
- Main keyboard: GH60-HASRO 62g Nixies, HHKB Pro1 HS, Novatouch
- Main mouse: Steelseries Rival 300
- Favorite switch: Nixdorf 'Soft Touch' MX Black
- DT Pro Member: -
Muirium, thank you! I have been so lost while trying to design my own plate. I had no idea that all of the schematics were posted in that thread. There's even a plate that's similar to mine except in ISO instead of ANSI so I'll just have to hack around for a while to fix it!
-
suka

- frobiac
- Location: Germany
- Main keyboard: custom split ergonomic "RedTilt"
- Main mouse: IBM trackpoint
- Favorite switch: MX red
- DT Pro Member: 0046
Since I just recently looked it up: the Cherry spec on cutout is 14+/-0.05 mm and 0.3mm max corner radius - I usually go as low as 13.85mm on my plastic plates since it is easier to take a little off later on 
-
shelbydz
- Main keyboard: Dad Silent Cherry Blue
- Main mouse: Logitech Wireless M325
- Favorite switch: MX blue
- DT Pro Member: -
Muirium,
My plan is a game pad. Something like an extended 10 key. My super rough sketch looks like this:

Ignore the legends, they're just there for my mapping. I thought about ordering the switches and some caps, mounting them in a cardboard 'plate' to test the layout before i get serious
thx!!
My plan is a game pad. Something like an extended 10 key. My super rough sketch looks like this:
Ignore the legends, they're just there for my mapping. I thought about ordering the switches and some caps, mounting them in a cardboard 'plate' to test the layout before i get serious
thx!!
-
Muirium
- µ
- Location: Edinburgh, Scotland
- Main keyboard: HHKB Type-S with Bluetooth by Hasu
- Main mouse: Apple Magic Mouse
- Favorite switch: Gotta Try 'Em All
- DT Pro Member: µ
Right: ortholinear, or a "matrix" layout, like a regular numpad but bigger. Your 2x1 unit keys will need stablisers:
http://deskthority.net/wiki/Stabiliser
The common kinds are Costar and Cherry. Well, unless you're up to something cunning like a Tipro, where those caps sit on two switches instead:

Matrix keyboards like Tipros are actually a good place to prototype such layouts, as they are programmable and have double and even quad sized caps available to fit. I got my Tipro (sneakily pictured above) used for less than 20 quid.
http://deskthority.net/wiki/Stabiliser
The common kinds are Costar and Cherry. Well, unless you're up to something cunning like a Tipro, where those caps sit on two switches instead:
Matrix keyboards like Tipros are actually a good place to prototype such layouts, as they are programmable and have double and even quad sized caps available to fit. I got my Tipro (sneakily pictured above) used for less than 20 quid.
-
shelbydz
- Main keyboard: Dad Silent Cherry Blue
- Main mouse: Logitech Wireless M325
- Favorite switch: MX blue
- DT Pro Member: -
awesome. thanks.
yeah i was planning on Cherry switches. I have two Mx Blue key boards and LOVE them. I might get some other types just to get a feel for them and see how i like them.
i am still undecided on keycaps though. i would like backlight. don't necessarily need legends on them, probably just a homing key where the '4' is now. Is there somewhere I can order single caps? Like, this layout basically needs 5 '+' keys. I couldn't find anywhere that sold them separated.
thx

-
Muirium
- µ
- Location: Edinburgh, Scotland
- Main keyboard: HHKB Type-S with Bluetooth by Hasu
- Main mouse: Apple Magic Mouse
- Favorite switch: Gotta Try 'Em All
- DT Pro Member: µ
Well, step one is to forget about backlights! You'll see why.shelbydz wrote:i am still undecided on keycaps though. i would like backlight. don't necessarily need legends on them, probably just a homing key where the '4' is now. Is there somewhere I can order single caps? Like, this layout basically needs 5 '+' keys. I couldn't find anywhere that sold them separated.
Then, if you like the look of these:
Try searching through all this:
http://deskthority.net/wiki/Round_5
The immense Round 5 group buy closes Friday.
Otherwise, WASD might do individual caps like you want, or you could try one of the many GBs around here, or even Signature Plastics inventory.
-
Muirium
- µ
- Location: Edinburgh, Scotland
- Main keyboard: HHKB Type-S with Bluetooth by Hasu
- Main mouse: Apple Magic Mouse
- Favorite switch: Gotta Try 'Em All
- DT Pro Member: µ
They are spare French caps from a set I bought (for their ISO RETURN and SHIFT keys) from Round 4. They're Signature Plastics SA profile tall spherical doubleshots. And they are so thick that they do this to backlights:

That's why I suggest against lighting. It forces you to use thin, lower quality caps, with legends crammed in the right place to sit over their LED. Without backlights, the whole world of MX caps is yours.
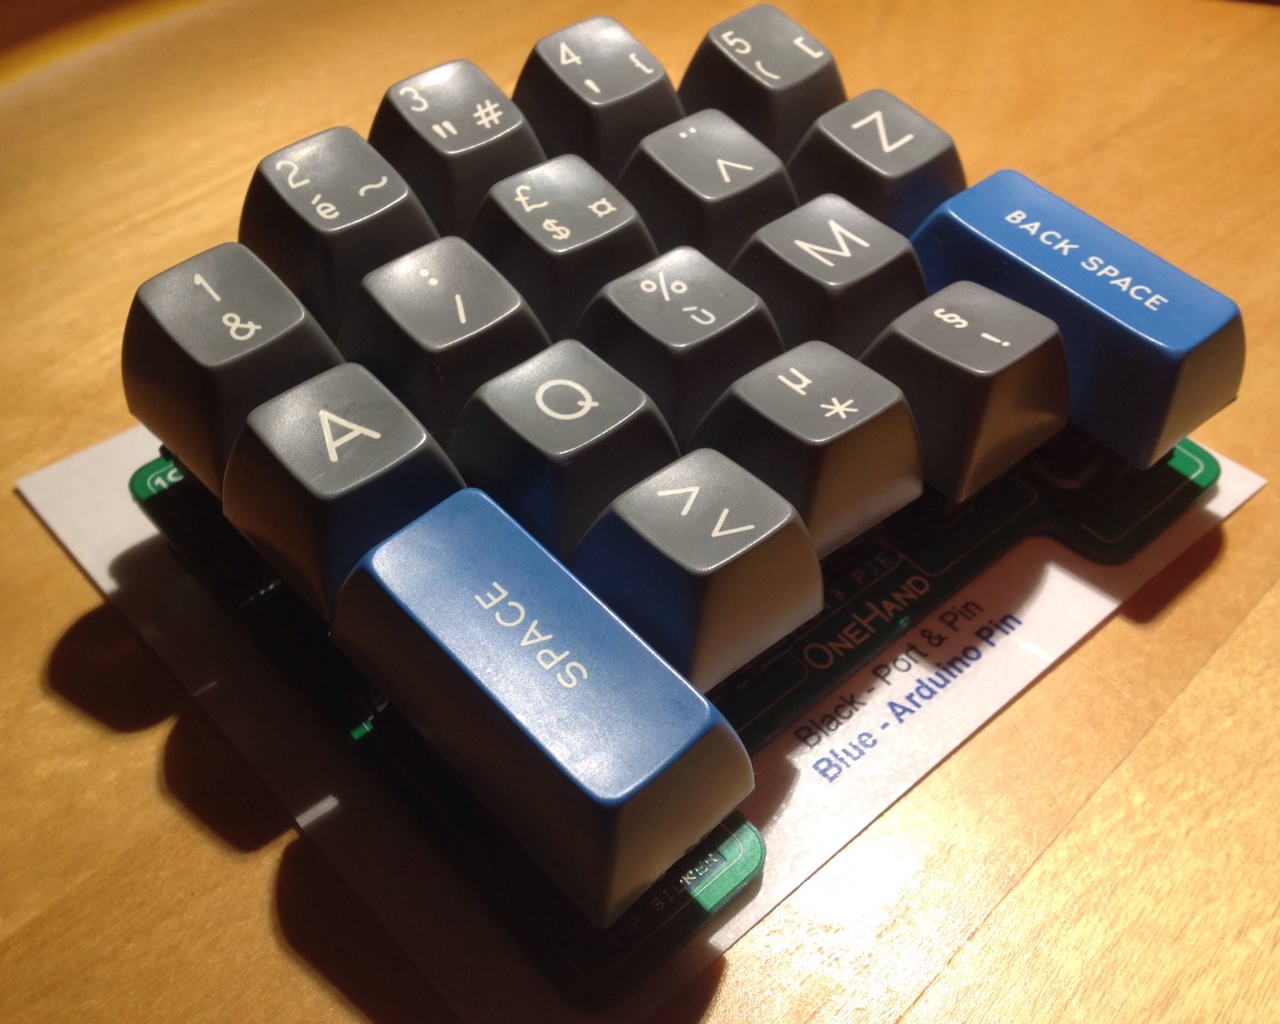
As for rows: these SA caps are entirely row dependent. The (row 1) numeric keys on the top of my OneHand are much taller than the (row 3) Q and M in the middle. In fact, this is the same keyboard with caps from the same row 3 profile across every switch:

Rows are definitely something you have to plan for with SA. But there is an all-flat spherical profile called DSA that's popular here too. We have a few open group buys for it at the moment, too. But again, not generally backlight friendly.
That's why I suggest against lighting. It forces you to use thin, lower quality caps, with legends crammed in the right place to sit over their LED. Without backlights, the whole world of MX caps is yours.
As for rows: these SA caps are entirely row dependent. The (row 1) numeric keys on the top of my OneHand are much taller than the (row 3) Q and M in the middle. In fact, this is the same keyboard with caps from the same row 3 profile across every switch:
Rows are definitely something you have to plan for with SA. But there is an all-flat spherical profile called DSA that's popular here too. We have a few open group buys for it at the moment, too. But again, not generally backlight friendly.
-
shelbydz
- Main keyboard: Dad Silent Cherry Blue
- Main mouse: Logitech Wireless M325
- Favorite switch: MX blue
- DT Pro Member: -
i like the look of that. i'll keep that in mind.
i have seen the DSA caps before. maybe i'll order one or two of them and see how they feel.
thanks a bunch for all the input. i'll post some pictures and whatnot as i get started
Oooh. last question. What diode type do I need? I couldn't find that either.
i have seen the DSA caps before. maybe i'll order one or two of them and see how they feel.
thanks a bunch for all the input. i'll post some pictures and whatnot as i get started
Oooh. last question. What diode type do I need? I couldn't find that either.
-
Muirium
- µ
- Location: Edinburgh, Scotland
- Main keyboard: HHKB Type-S with Bluetooth by Hasu
- Main mouse: Apple Magic Mouse
- Favorite switch: Gotta Try 'Em All
- DT Pro Member: µ
Good old 1N4148, which are dirt cheap and available everywhere. Wee red things.
http://www.dribin.org/dave/keyboard/one_html/
http://www.dribin.org/dave/keyboard/one_html/
-
Findecanor
- Location: Stockholm, Sweden
- DT Pro Member: 0011
Yep. If it is cut with a laser, then you may have to adjust for the width of the beam.suka wrote:Since I just recently looked it up: the Cherry spec on cutout is 14+/-0.05 mm and 0.3mm max corner radius - I usually go as low as 13.85mm on my plastic plates since it is easier to take a little off later on
I noticed yesterday that on a set of laser-cut acrylic plates that I had made, the holes for my Cherry-stabilisers had been made too wide; The stabilisers did not snap to the plate as they should have, and I had to use glue.
I had copied the stabiliser shapes from the cad drawings of Phantom plates. The switch holes were fine, though.