IBM 3279 Beamspring Restoration
-
green-squid
- Location: --
- Main keyboard: --
- Main mouse: --
- Favorite switch: --
- DT Pro Member: -
Yes, I did see his Beamsprings, and they did look like ass.
If he goes with a classy color, it will not look like ass.
Or he could go with the 'Stones method..
I see a white beamer and I want it painted black
No colors anymore I want them to turn black

If he goes with a classy color, it will not look like ass.
Or he could go with the 'Stones method..
I see a white beamer and I want it painted black
No colors anymore I want them to turn black
-
JP!

- Location: United States
- Main keyboard: Currently a Model M
- Main mouse: Steel Series Sensei
- Favorite switch: Beam Spring
- DT Pro Member: 0194
- Contact:
Lol, good one. I like the silver color but black might look good. I've never seen one that color before so it's hard for me to picture how it would look in person. I shared that link mainly because of the metal door Kuato had fabricated. With all metal this could be powder coated. Another option worth looking into might be Cerakote.
Last edited by JP! on 08 Apr 2018, 15:59, edited 1 time in total.
-
green-squid
- Location: --
- Main keyboard: --
- Main mouse: --
- Favorite switch: --
- DT Pro Member: -
-
JP!
- Location: United States
- Main keyboard: Currently a Model M
- Main mouse: Steel Series Sensei
- Favorite switch: Beam Spring
- DT Pro Member: 0194
- Contact:
-
green-squid
- Location: --
- Main keyboard: --
- Main mouse: --
- Favorite switch: --
- DT Pro Member: -
-
depletedvespene

- Location: Chile
- Main keyboard: IBM Model F122
- Main mouse: Logitech G700s
- Favorite switch: buckling spring
- DT Pro Member: 0224
- Contact:
-
Aer Fixus

- DT Pro Member: -
I have seen that thread and is what inspired me to think about the metal door in the first place.JP! wrote: @Aer Fixus This thread may be of interest to you.
photos-f62/ibm-3278-restoration-t9365.html
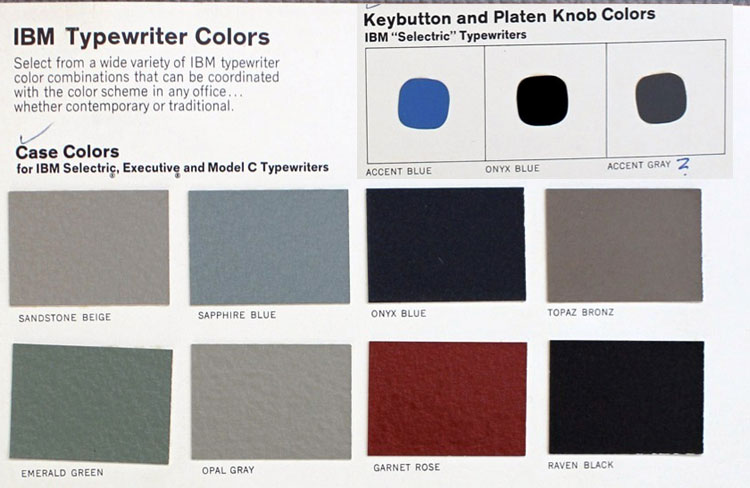
Neat. So, my "Deep Blue" keycaps IBM officially termed as "Onyx Blue." Good to know. I'll likely see if I can find an onyx blue reference color and try to match it. I doubt that I'd be able to match the texture, but if I go to a professional shop I'll see what they can do.
I agree. Especially when it comes to restoration or parting things out. And I firmly believe that any modifications to rare items must be reversible. So, since the original paint is damaged and I'll need to repaint it anyway, I don't consider painting it black instead of beige a big deal. It also helps that acquiring decent condition [correct] keycaps to replace the damaged ones would require a donor board or a new production run. One breaks the parting out rule, the other likely just won't happen. In the future, if I or someone else wishes to restore it to original, it would be possible since after all, it is just paint.
Also note that my white keycaps that went to another DT user will be used in the restoration of their beamspring board.
And I do acknowledge that some poor beamspring board had to be sacrificed in order to save this one. It's a bit of a catch 22 that maybe some day won't be necessary.
I've never seen a black beamspring either. I think it would look good and I'm surprised given the other colors we have seen (regardless of my opinions on them) that there hasn't yet been a black one.JP! wrote: Lol, good one. I like the silver color but black might look good. I've never seen one that color before so it's hard for me to picture how it would look in person. I shared that link mainly because of the metal door Kuato had fabricated. With all metal this could be powder coated. Another option worth looking into might be Cerakote.
Spraypaint can look quite nice when done right. This was very distinctly not done right. High winds and temps just above freezing don't make for a good paint job. I did let it cure inside, though. I might redo the plate later anyway. I'm expecting to put off the case paint job until it gets warmer anyway, so that will give me time to source other shops. And if it looks like trash, no damage will have been done. I'll just have to go to a professional shop anyway.
Unless you meant brushing it on. In which case, yes. That would be quite hard to get a good finish
-
JP!
- Location: United States
- Main keyboard: Currently a Model M
- Main mouse: Steel Series Sensei
- Favorite switch: Beam Spring
- DT Pro Member: 0194
- Contact:
You'd be surprised. I've seen the results of a car that was painted with a paint brush. You would never know in fact. Apply paint with brush, wet sand, and spray some clear coat and know one is the wiser unless that someone is a nosey little s%*t
-
Aer Fixus
- DT Pro Member: -
I have seen cars painted with a brush at classic car shows by folks without spray equipment*. And boy was I surprised. You can't tell until you look at it really closely (and even then, only after the guy tells you that it was hand painted). You can also use additives which make paints self leveling/smoothing.
Quite hard, but not impossible.
*to clarify, all the instances I've seen are usually someone's father who did it back in the 70's when the cars weren't worth all that much or sought after and they keep it that way for sentimental reasons, not because they wanted the job done wrong.
But with spray paint. Prep. Prep is everything. Thin coats. And keep your distance. It can look very, very good if the color you want comes in a spray can.
-
PlacaFromHell

- Location: Argentina
- Main keyboard: IBM 3101
- Main mouse: Optical piece of shit
- Favorite switch: Beamspring
- DT Pro Member: -
There aren't too much references when you want to paint a beamer, but original Selectric colors are the safest option if you don't want to take the risk. Also look at this.
It has the original texture but I doubt that you could keep yours.
Spoiler:


-
pansku

- Member of the Beam Spring cult
- Location: Finland
- Main keyboard: IBM 5251
- Main mouse: Mionix Castor
- Favorite switch: Beam spring
- DT Pro Member: 0197
Personally I had my beamers bottom plate painted by a professional. With proper equipment he was able to replicate the color and also the texture.
-
Aer Fixus
- DT Pro Member: -
That's quite nice. So that's painted over the original texture? The color is quite a good match to the light grey caps on the board.
I think I'll eventually end up going the professional route. I've got a Selectric sitting around that I can give for texture reference if I do destroy the texture before I end up bringing it to a shop. I'd prefer to get an Onyx Blue Selectric, or a physical copy of that color selection card and get the exact right color, but I doubt that will happen. The one I got the caps off of was definitely Raven Black.
If anyone reading does have an Onyx Blue Selectric and can give a RAL or other reference color code, I'd be very grateful.
I do have the caps to match the color on, however, but since they are plastic, they reflect light differently and basing a color on them won't come out like IBM would have intended.
-
JP!
- Location: United States
- Main keyboard: Currently a Model M
- Main mouse: Steel Series Sensei
- Favorite switch: Beam Spring
- DT Pro Member: 0194
- Contact:
I kind of like how you left the bottom metal piece original as a reminder of it's past history. Soon this phoenix will rise from the ashes. I wonder if you might try and have someone make a new spacebar key based from the original?
-
PlacaFromHell
- Location: Argentina
- Main keyboard: IBM 3101
- Main mouse: Optical piece of shit
- Favorite switch: Beamspring
- DT Pro Member: -
Yeah, just putted on a soaked cloth with bleach and let it in the sun for 30 minutes, then washed the two pieces with cold water and painted. Rust-Oleum has really good mate colors. I still have a lot of paint, 1 can is sufficent.
-
Aer Fixus
- DT Pro Member: -
I don't think the spacebar is causing the binding issue on it's own. I think it's wear on the sliders. I'm going to lube the spacebar sliders as I decided not to lube the switches in the end. I seems like it's binding when I release it slowly because I'm causing it to lift unevenly and there's a little bit of friction in the sliders when you release them off center. The other switches don't seem to have this problem, even the long ones, when pressed and released off center. I'm also playing with different springs I pulled off of a Brother typewriter and seeing how light I can get it. It doesn't bind nearly as much with the stock springs, it's just too stiff. I think the later and more conventional design of a center placed switch with stabilizer would solve my current issues of having to rely on two separate switches.
The issue could be that the spacebar has changed length due to the damage, the switches are slightly rotated from each other, or that there is just some wear on the sliders that needs to be lubed to solve. They are using the replacement housings from Orihalcon, but original sliders, BTW.
If I do need to replace the spacebar, I've got the Selectric ones (in both Dark Grey (Accent Grey) and Onyx Blue) which are thinner but should work if I make stabilizer mounts for them.
Edit: Pushing a key off center does not cause it to bind on most switches. However, intentionally putting a somewhat substantial amount of horizontal pressure on a switch will cause it to bind on the way back up with some switches also binding on the way down. The switches are not gritty or rough by any means under normal typing, however if I intentionally use one finger to push the slider against the housing, I can feel it get a little rough. This is likely what's happening with the spacebar. The stabilizer is causing one or both of the two switches to get pushed somewhat firmly against the housing and causing it to bind. I may have to disassemble and lube everything after all.
-
depletedvespene
- Location: Chile
- Main keyboard: IBM Model F122
- Main mouse: Logitech G700s
- Favorite switch: buckling spring
- DT Pro Member: 0224
- Contact:
Not that I mean to complain or demand what I'm no position to demand, but... how about we see a video of the beamspring being typed on? I'd like to see it in action in its current state (and, of course, again when the restoration has been completed).
-
depletedvespene
- Location: Chile
- Main keyboard: IBM Model F122
- Main mouse: Logitech G700s
- Favorite switch: buckling spring
- DT Pro Member: 0224
- Contact:
-
Aer Fixus
- DT Pro Member: -
I've got video of most of the restoration process with roommates making noise in the background. I'll edit that together at some point and upload it. So many hours of video to edit...* I can make video of the keyboard typing as it sits right now. And I'll get to uploading it in the next few days as time allows. One thing I know is that I'm super slow at typing on it compared to a Model F and make all sorts of typos due to the different weighting and spherical keycaps.
[*edit: 10.5 hours of video. And I didn't even record all of it...]
Last edited by Aer Fixus on 09 Apr 2018, 02:18, edited 1 time in total.
-
depletedvespene
- Location: Chile
- Main keyboard: IBM Model F122
- Main mouse: Logitech G700s
- Favorite switch: buckling spring
- DT Pro Member: 0224
- Contact:
All right, then. I'll (we'll, presumably) wait for the video.
-
Aer Fixus
- DT Pro Member: -
After letting it sit for a day or so, the first few times pressing "H" did not register. The "7' key has some notable resistance going down. And apparently, I swap off which finger I incorrectly type the spacebar with. Today, it's my right index finger...
Anyway, here's the video. The more I type on it the more comfortable I get with it, but that still doesn't get me to type properly
Left block is set up like an XT or an AT board with function keys. They continue on the top of the right block. Arrow keys are as they appear. Escape is replacing tilde/grave in the upper left. I've made the left shit kind of ANSI by just mapping the key next to it as also left shift (and giving it a corresponding color and a fun non-alphanumeric keycap). The same with the key to the right of "'" and it's mapped to Return. I'm messing around with putting Control on the Capslock key, Alt on the lower left "Reset" key. The "alt" key is meta/windows and "Enter" is right control. I'm also likely going to put SpaceFN onto it since that's what I'm used to on my Kishsaver.
As an aside, it's reasonably difficult to find an [inexpensive, non-boutique] braided mini USB cable.
Anyway, here's the video. The more I type on it the more comfortable I get with it, but that still doesn't get me to type properly
As an aside, it's reasonably difficult to find an [inexpensive, non-boutique] braided mini USB cable.
-
depletedvespene
- Location: Chile
- Main keyboard: IBM Model F122
- Main mouse: Logitech G700s
- Favorite switch: buckling spring
- DT Pro Member: 0224
- Contact:
Excellent, thank you. I look forward to see the restoration complete.
-
purdobol

- Location: Poland
- Main keyboard: Custom
- Main mouse: MS WMO 1.1A
- Favorite switch: Marquardt Butterfly
- DT Pro Member: -
Maybe I'm in minority here. But I do prefer to make my own cables for most aplications. Not only because most of the time it's cheaper (there are exceptions of course). But also qc sucks when it comes to cables. For most aplications cable manufacturers do not have to follow any reasonable specifications. It's completely unregulated. Hard to be sure what it is you buying really.
Braiding is not an issue since all that is needed is a piece of paracord and patiencie.
-
Aer Fixus
- DT Pro Member: -
I suppose I generally agree with this, but I was looking for a quick fix.purdobol wrote:Maybe I'm in minority here. But I do prefer to make my own cables for most aplications. Not only because most of the time it's cheaper (there are exceptions of course). But also qc sucks when it comes to cables. For most aplications cable manufacturers do not have to follow any reasonable specifications. It's completely unregulated. Hard to be sure what it is you buying really.
Braiding is not an issue since all that is needed is a piece of paracord and patiencie.
It takes me tons of time for that sort of thing (research, materials sourcing, price comparing, assembly) and I just needed any old Mini USB to do the job and didn't have any on hand. Not a one. I'd have spent tens of $ on materials and hundreds worth of my own time. But I figured that if I were buying one, I'd at least try to get a half-way decent one.
On that, I was legitimately surprised by the feel of this cable. I can't comment on the build quality since I haven't given it any accidental tugs yet, but it feels like it would be reasonably sturdy. And the braided part is smooth, not rough like all my friends' gamer branded gear with braided cables that I've handled over the years.Prof. Oak wrote:"There's a time and place for everything..."
And my next PC build is going to be made with entirely custom cables. I'm tired of way-too-long, way-too-short, and much-too-stiff cables (not to mention mismatched colors and horrifically terribly textured sheaths that collect dust like nobody's business).
-
Aer Fixus
- DT Pro Member: -
No photos this update.
The "7" key was a bit sticky and I've mostly remedied that. It's still got a bit more pre-load than the others, but not so much that I miss the keypress. The "S" and "D" keys were sticking to the PCB and not clicking because some gunk had dripped onto the PCB. Cleaning it solved "S" but I forgot to clean the flippers and "D" still sticks for the first couple keypresses after sitting for a few hours.
The spacebar is its own problem entirely. I just need to move switches around to get ones with lower friction. I thought maybe the back of the spacebar was rubbing on the other keys due to meltage, nope. I also thought it was bending too much when I pressed it since it's got a nicely sized hole in it. Not the problem with the return stroke, but still an issue, so I reinforced it with a metal wire on the bottom edge. Hopefully it won't be visible once it's in the case. Even if it is, it's not that bad (and it's certainly required to prevent any future damage from fatigue from flexing. There is already a hairline crack that's formed next to the hole and I'd like to not get any larger).
And lube didn't seem to be beneficial in the slightest. I used a thin silicone lube and it didn't make things any better or any worse. On the one flakey switch I used it on, it may have reconstituted the sticky bits, making them soft and gooey again instead of hard and brittle. No matter the amount I used (varying from "oops, now it's dripping in the stuff" to "I think I got most of it off" as well as a few steps in between). I'll be cleaning that up the next time I'm inside. Good thing I only used it on three or four switches.
Also, when I opened it up, I noticed a bunch of dust that had flaked off from the powdery modules. I'll have to see if that stops at some point or if they are just going to waste away to nothing. Looks like I'll be searching for some more module housing replacements after all. I don't want to pull the from another board. That would be both blasphemous and horrifically expensive. 3D printing would likely work, but might be quite expensive to do an entire board.

-
Aer Fixus
- DT Pro Member: -
So! This is the first post written with the keyboard! Aside from the "it lives" post, I suppose. Now that I'm actually typing on it for real, it feels incredible. I've overcome the slight learning curve of swapping from cylindrical keycaps to spherical ones and they are no longer a hindrance. The 7 key has proved to be quite stubborn, but S and D seem to have been cured of their ails for the time being. 7 is still quite stiff when pushed on the top edge. If hit on the bottom edge, it feels just like any other key with negligibly more friction.
Now, the important part. The Spacebar. Now what could the problem possibly be? Well, after swapping the switch that bound when being pushed quite heavily off-axis with another that had substantially less friction when pushed at the same pressure... It still didn't work. As an aside, and I promise it's on topic, I used rubber cement to secure the wire rod that ensures a longer life for the scarred spacebar. This turned out to be the right decision, at least for now. When checking to see if it was solid, I found out that it was not in fact perfectly solid. I could change the gap (the one that's not normally supposed to be there mind you) size by fractions of a millimeter and it would not flex back completely due to being slightly stretchy (and maybe note entirely dry yet). Playing around, I found that if I widened the gap, it seemed to bind less. I stretched it out a bit more and voila! It works fine! No matter how slowly I release the keypress, the key always resets! And, I can push the spacebar at any point and it pushes just as a stabilized spacebar should!
Now what was happening, exactly? Well, due to the missing plastic in the spacebar, and assumably having been warped during the incident it was torquing the switches and causing them to bind. It wasn't horizontal force that I had to worry about. It was rotational! Neat!
I'll likely re-glue the metal bar in with a more solid glue, but before I do that I have to make absolutely sure that i get the right gap width so my permanent fix doesn't become a permanent impairment. The easiest solution would be of course to get a new spacebar, but where's the fun in that?
And because I was not able to find info on this anywhere else, I'll share my findings here. Selectric spacebars are a little taller than this beamspring's spacebar. They are also a thinner plastic than the original beamspring spacebar. The mounting holes are also recessed just a little too far to even mount on the stems of the beamspring, but they are spaced the correct distance apart. If one were to sand it down, it would likely fit, but would sit lower down than the original spacebar should. If one were to try to attempt to mount a Selectric spacebar to a beamspring, I'd recommend 3D printing mounting adapters and affixing them to the Selectric spacebar as you will need to find an appropriate mounting solution for the stabilizer anyway of which 3D printing is likely your best bet.
Last edited by Aer Fixus on 17 Apr 2018, 14:38, edited 1 time in total.
-
green-squid
- Location: --
- Main keyboard: --
- Main mouse: --
- Favorite switch: --
- DT Pro Member: -
Uber awesome!!! You should keep the spacebar. It looks cool being all melted like that!