Recreating the Lisp keyboard (10 years later)
-
zrrion

- Location: United States
- Main keyboard: F122
- Main mouse: Microsoft IntelliMouse
- Favorite switch: ALPS SKCC Cream
- DT Pro Member: -
- Contact:
those sound so good! very lovely look and sound both
-
lispnick

- Location: Czechia
- Main keyboard: Keymacs A620N-88 Rev. A
- Main mouse: Kensington SlimBlade Trackball
- Favorite switch: Alps SKCM Orange
- Contact:
I have finished building the board on Blue Alps. I think this is a nice opportunity to compare the sound of the switches with Matias Clicks in the same case. Here is the result:
There is a slight difference in spacebar stabilization. The Matias board uses a dummy switch—a Matias switch with the contacts and spring removed. This was my initial solution to spacebar stabilization, however, I experienced some issues with material shrinkage during the keycap molding and, as a result, spacebars stabilized this way were sometimes stuck on a keypress. The Alps board uses my rail system. In this case I put a tiny drop of dampening grease on the rails, eliminating the spacebar rattle.
There is a slight difference in spacebar stabilization. The Matias board uses a dummy switch—a Matias switch with the contacts and spring removed. This was my initial solution to spacebar stabilization, however, I experienced some issues with material shrinkage during the keycap molding and, as a result, spacebars stabilized this way were sometimes stuck on a keypress. The Alps board uses my rail system. In this case I put a tiny drop of dampening grease on the rails, eliminating the spacebar rattle.
-
Go-Kart

- Location: England
- Main keyboard: HHKB & AnyKey
- Main mouse: Orochi v2
- Favorite switch: Topre 45 g & MaxiSwitch D/S
Music to my ears. What a great sounding board.lispnick wrote: 21 Feb 2021, 18:03 Hi guys! I have made a quick sound comparison to give you an idea of the difference between my keycaps and the more traditional Alps-mount keycaps. I have used a subset of trapezoidal PBT keycaps that came from the IBM PC Convertible. The demo shows the results on a board that has NeKtar-lubed green alps under the hood.
-
zoo
- Main keyboard: Baby Wampus
- Favorite switch: C3 Tangerine
While the Blue Alps are really good, especially the spacebar; I'm surprised by how good the Matias Click switches sound as well (I can barely notice the click, so sounds more like tactiles to me)!lispnick wrote: 16 Mar 2021, 14:47 I have finished building the board on Blue Alps. I think this is a nice opportunity to compare the sound of the switches with Matias Clicks in the same case. Here is the result:
-
TheInverseKey

- Location: Great White North
- Main mouse: M570
- Favorite switch: Hi-Tek 725 Linear
- DT Pro Member: 0216
- Contact:
Spoiler:
Those SKCM Blues with those caps sounds so deep and buttery. Great job on acoustics and overall design. It sounds amazing and looks great!
-
lispnick
- Location: Czechia
- Main keyboard: Keymacs A620N-88 Rev. A
- Main mouse: Kensington SlimBlade Trackball
- Favorite switch: Alps SKCM Orange
- Contact:
Yes, the Matiases are much louder and in my opinion sound better in the combination of all-metal case and these thick keycaps.zoo wrote: 16 Mar 2021, 19:18While the Blue Alps are really good, especially the spacebar; I'm surprised by how good the Matias Click switches sound as well (I can barely notice the click, so sounds more like tactiles to me)!lispnick wrote: 16 Mar 2021, 14:47 I have finished building the board on Blue Alps. I think this is a nice opportunity to compare the sound of the switches with Matias Clicks in the same case. Here is the result:
-
XMIT

- [ XMIT ]
- Location: Austin, TX area
- Main keyboard: XMIT Hall Effect
- Main mouse: CST L-Trac Trackball
- Favorite switch: XMIT 60g Tactile Hall Effect
- DT Pro Member: 0093
lispnick, this is one of the most exciting developments I've seen in a very long time. Kudos to you. If we have Deskthority Awards (which we had damn well better this year) you have my vote!
My funds are going toward the elecplus warehouse cleanout, I hope to be able one of your kits in due time.
My funds are going toward the elecplus warehouse cleanout, I hope to be able one of your kits in due time.
-
MMcM
- Location: San Francisco
- Main keyboard: Das Keyboard
- Main mouse: Logitech
- Favorite switch: MicroSwitch Hall Effect
- DT Pro Member: 0240
Ooh, I'm pretty sure that Blue Alps one is headed this way; very excited.
It remains to be seen whether I remember where are all the function keys are without legends.
It remains to be seen whether I remember where are all the function keys are without legends.
-
lispnick
- Location: Czechia
- Main keyboard: Keymacs A620N-88 Rev. A
- Main mouse: Kensington SlimBlade Trackball
- Favorite switch: Alps SKCM Orange
- Contact:
I am humbled! Of course, none of this would have been possible without many of you guys and the resources on Deskthority. Thanks!XMIT wrote: 16 Mar 2021, 21:11 lispnick, this is one of the most exciting developments I've seen in a very long time. Kudos to you. If we have Deskthority Awards (which we had damn well better this year) you have my vote!
My funds are going toward the elecplus warehouse cleanout, I hope to be able one of your kits in due time.
-
lispnick
- Location: Czechia
- Main keyboard: Keymacs A620N-88 Rev. A
- Main mouse: Kensington SlimBlade Trackball
- Favorite switch: Alps SKCM Orange
- Contact:
This was one of the biggest dilemmas during the development—custom legends on the grey keys.MMcM wrote: 17 Mar 2021, 00:12 Ooh, I'm pretty sure that Blue Alps one is headed this way; very excited.
It remains to be seen whether I remember where are all the function keys are without legends.
I have been asked by some of you about the possibility of custom legends. With this technological process, it takes about 3 full days to make the tooling for a single legend, not to mention the fact that the silicone forms have a cure time 24 hours and you need to make at least 4 for a single key. So, clearly, this is not the way to go (I cannot even imagine the price tag for such a job).
One way to go is to make a collection of possible double-shot legends for each key and let the user choose the legend during the checkout. After the initial lengthy process of mold making, this can actually work.
Another option I have considered is custom CNC engraved front legends filled with a suitable material. Technically, it just suffices to make a jig for the CNC to hold the keycaps while engraving. Since the engraving would be on the front where you do not touch the key, the filler can be almost anything, including a cheap white wax or any soft material. If anybody has suggestions for a good filler material, let me know.
Third option: Both methods combined.
-
MMcM
- Location: San Francisco
- Main keyboard: Das Keyboard
- Main mouse: Logitech
- Favorite switch: MicroSwitch Hall Effect
- DT Pro Member: 0240
Got it out of customs. Here it is with a senior relation.
It's interesting; there is a bit of scuffing on the L key. Probably not visible in the photo. I'm not bothered by it, but now I'm curious what happens after the key caps get used for a while. What have you found?
- A620N-364000.jpg (546.89 KiB) Viewed 23530 times
-
lispnick
- Location: Czechia
- Main keyboard: Keymacs A620N-88 Rev. A
- Main mouse: Kensington SlimBlade Trackball
- Favorite switch: Alps SKCM Orange
- Contact:
The material has Shore hardness 70D, so it is a bit softer than ABS. It can be scratched but I did not experience that during a standard use (I use mine about a year as the main keyboard).MMcM wrote: 01 Apr 2021, 18:31 Got it out of customs. Here it is with a senior relation.
A620N-364000.jpg
It's interesting; there is a bit of scuffing on the L key. Probably not visible in the photo. I'm not bothered by it, but now I'm curious what happens after the key caps get used for a while. What have you found?
-
lispnick
- Location: Czechia
- Main keyboard: Keymacs A620N-88 Rev. A
- Main mouse: Kensington SlimBlade Trackball
- Favorite switch: Alps SKCM Orange
- Contact:
I have found some of my early prototypes in my attic. Originally I wanted to post these on the first of April but actually these were not meant as a joke.  My very first board, I called it Keymacs Mk. I:
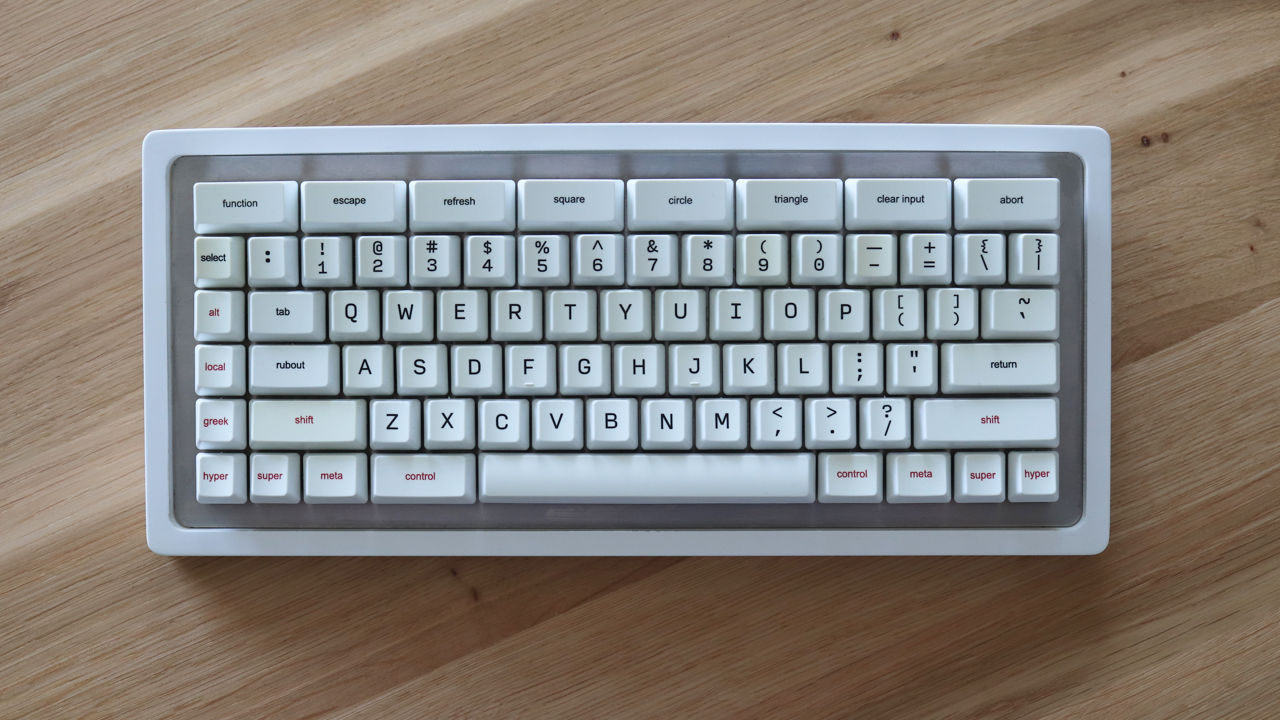
This was my first attempt to create a keyboard with a Symbolics-style layout. I wanted to capture the basic ergonomy of the layout by putting the 2U keys in the top row and a big control key next to the spacebar. The case is 3d-printed on a 120 micron SLS printer with additional surface paint. The keycaps are cherry-compatible custom pad-printed and, obviously, I was limited to what was available on a standard 104-key layout.
One of the remarkable features: The mount plate is free-floating in the case. I guess I just wanted an easy access to the wiring. You can open it as the hood of your favourite car:
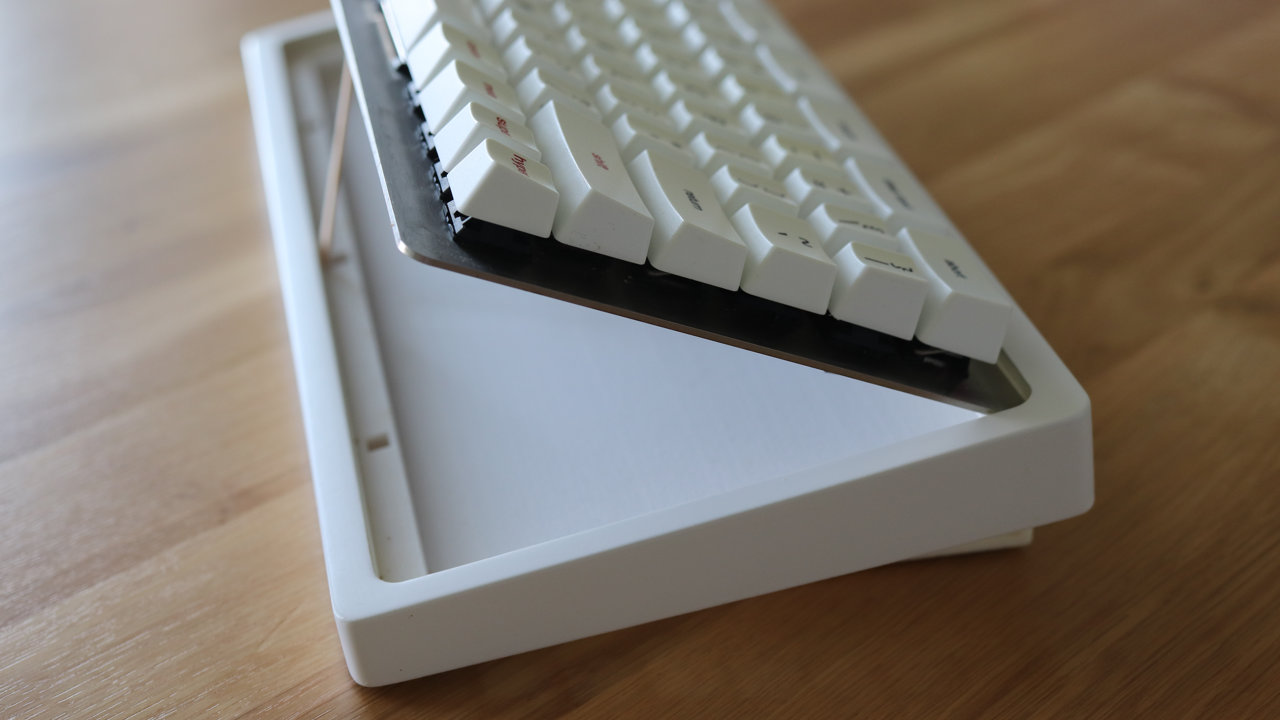
Front view:
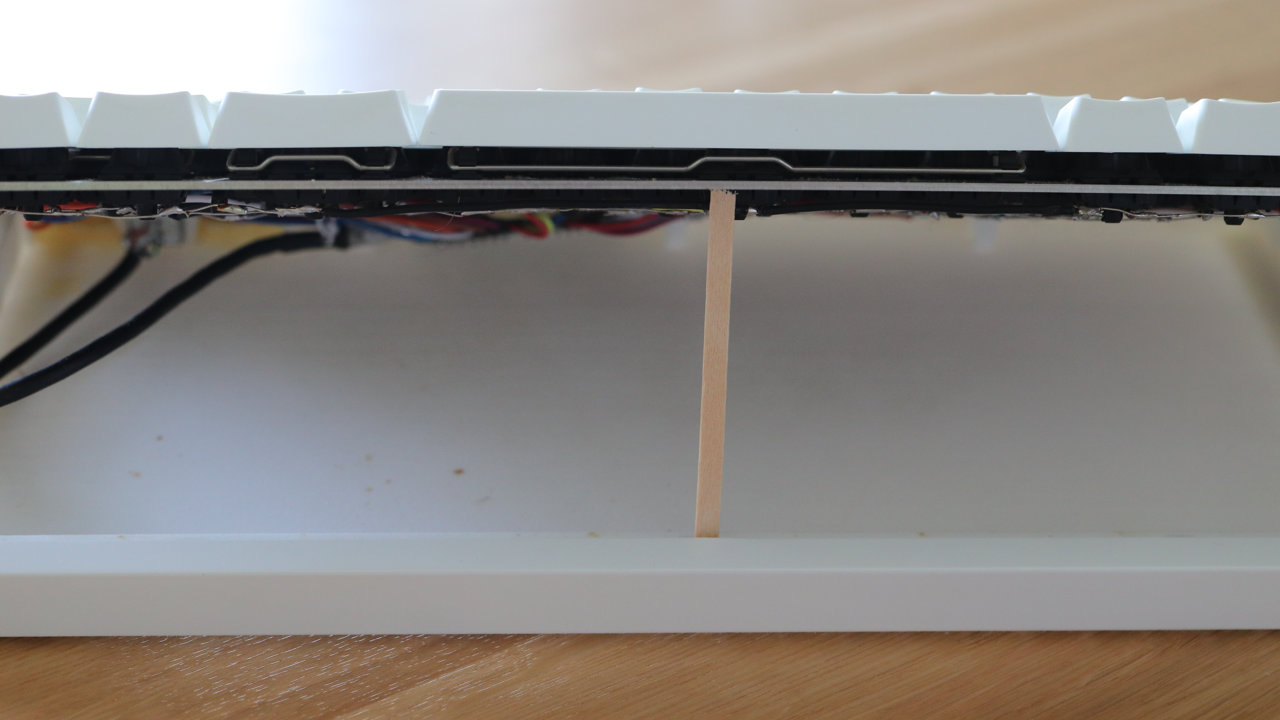
The keyboard was hand-wired …
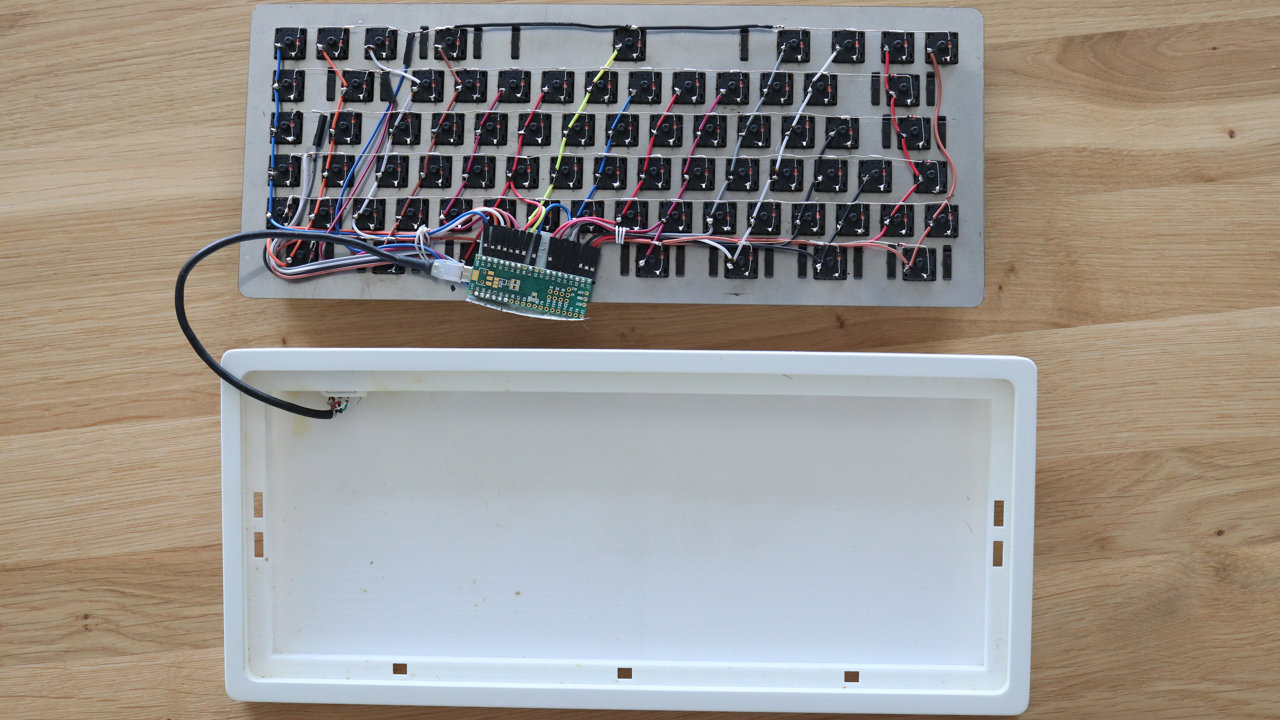
… and powered by Teensy++.
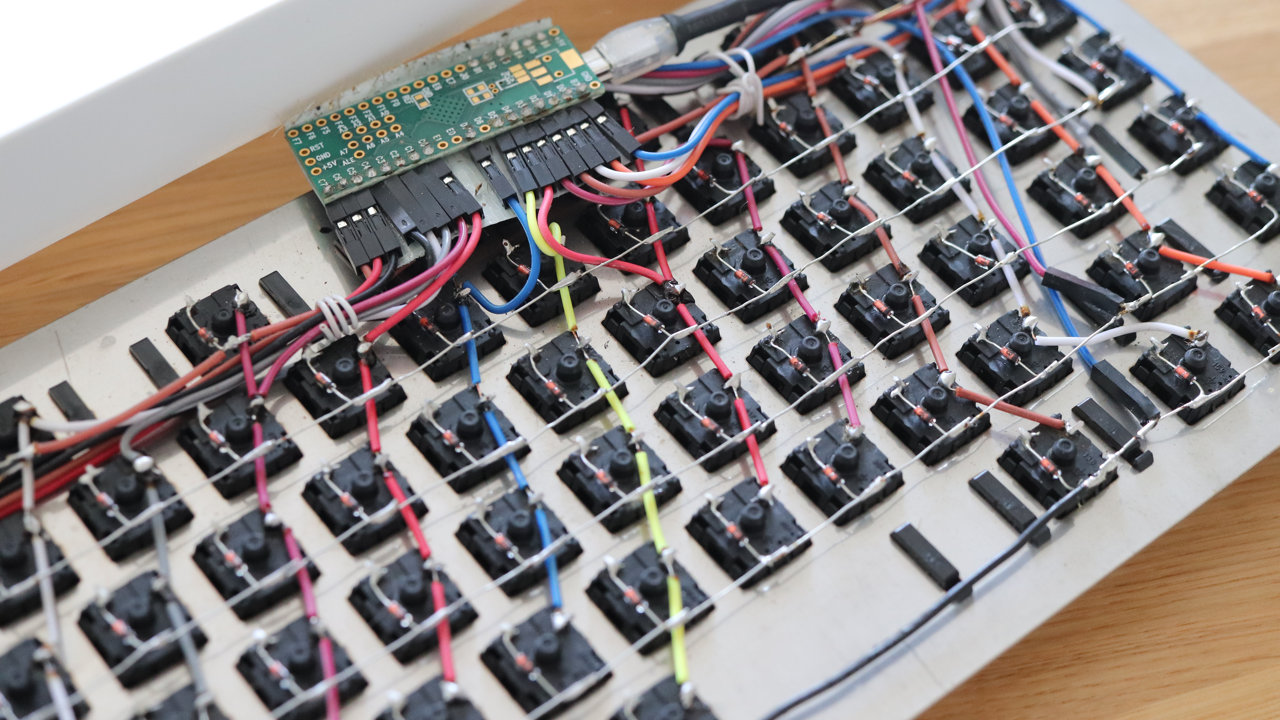
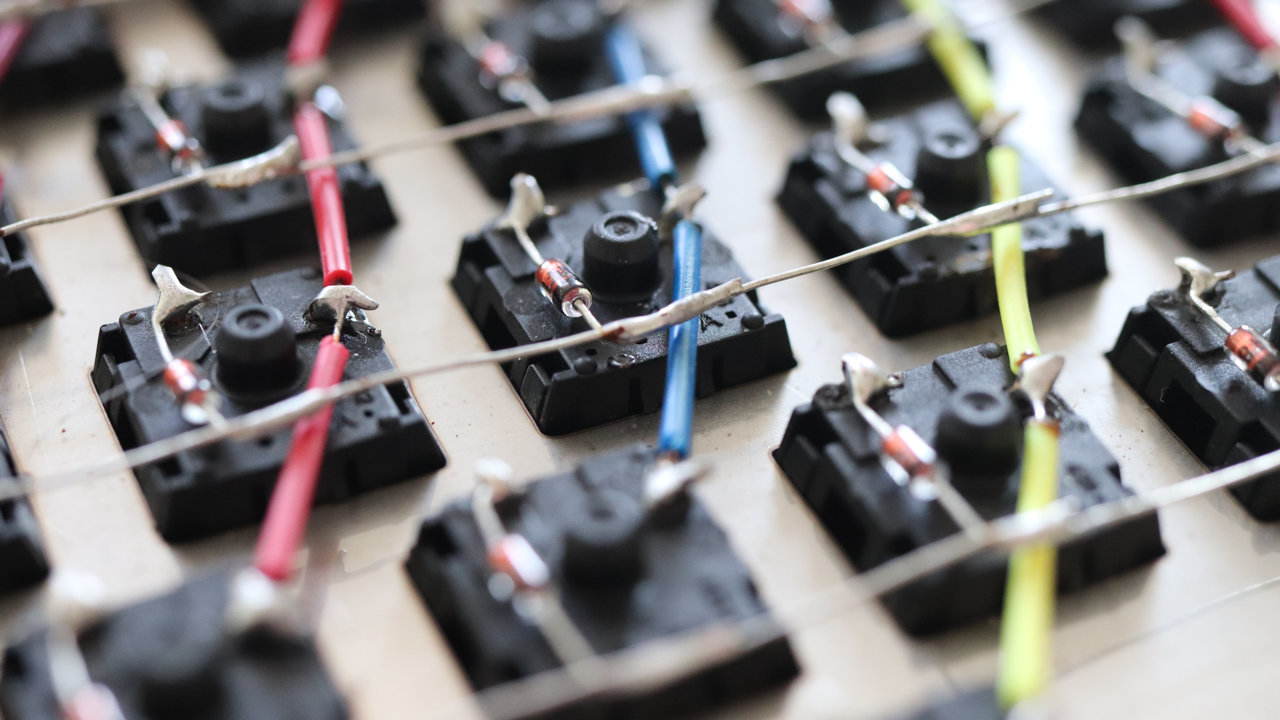
Detail of the wiring:
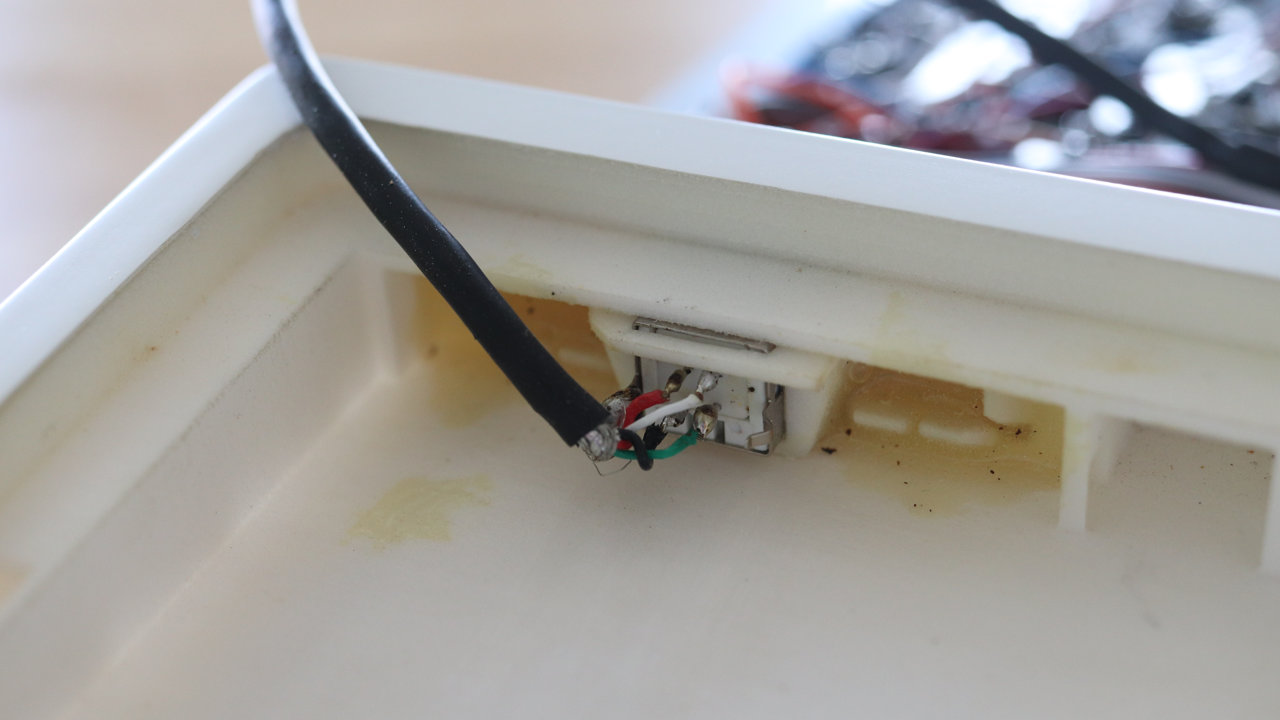
The USB B connector is placed on the rear-left side. The case has been painted by several layers of matte polyurethane paint and hand-brushed during the process.
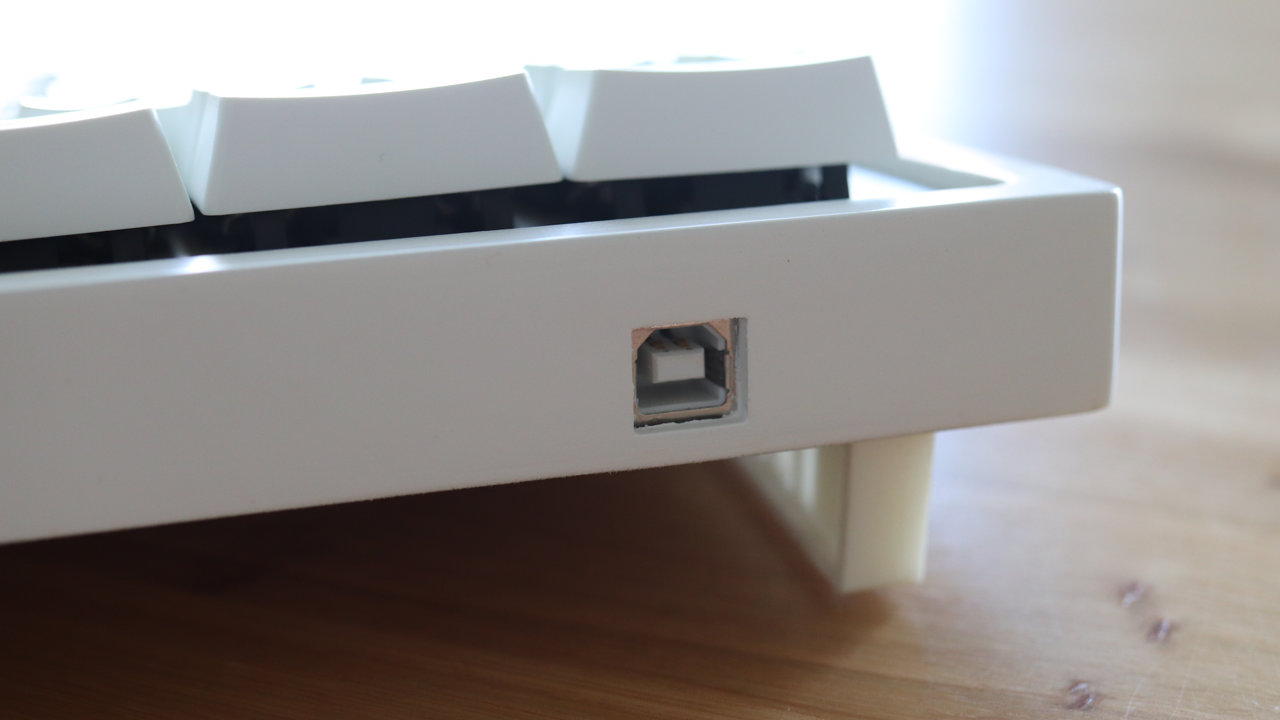
The connector is glued to the case with a 2-component epoxy and is placed in a fairly complex housing:
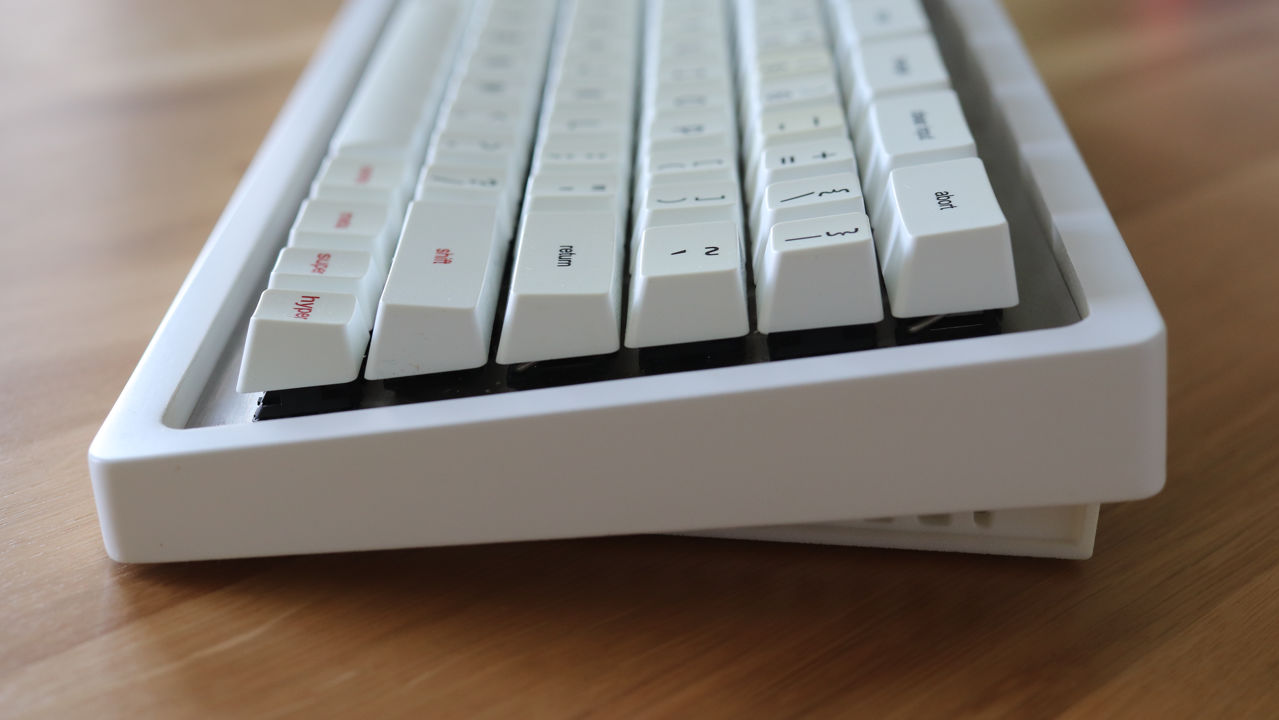
The original case was flat but it did not feel right. I added SLS-printed feet later. Here you can see the difference between the painted finish on the top side and the rough printed polyamide on the bottom side of the case.
The bottom side has a lot of cavities to lower the printing cost. I do not believe I did all this in SketchUp.
The position of the modifier keys is similar to the Symbolics layout, however, I was not satisfied with the short spacebar. Also, I developed a habit of pressing the left control with my thumb which, after its extensive use, lead to some discomfort. It was time to design a new keyboard with the proper layout and a 9U spacebar!
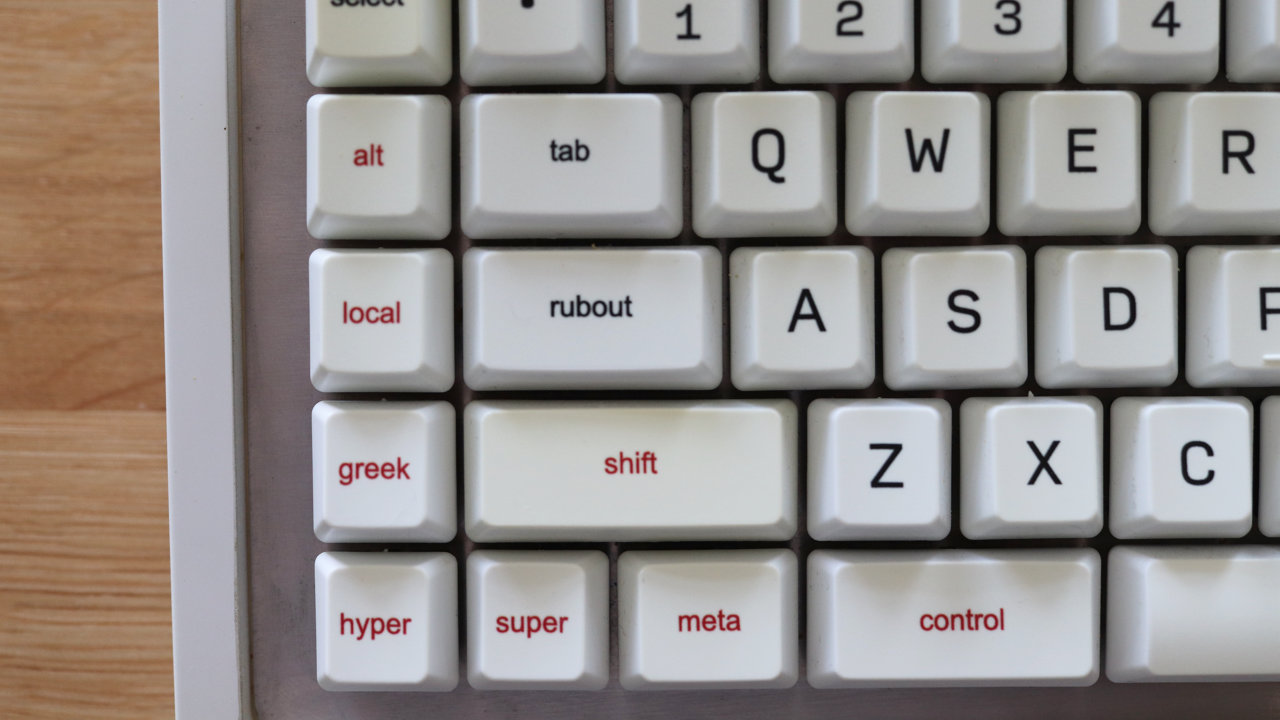
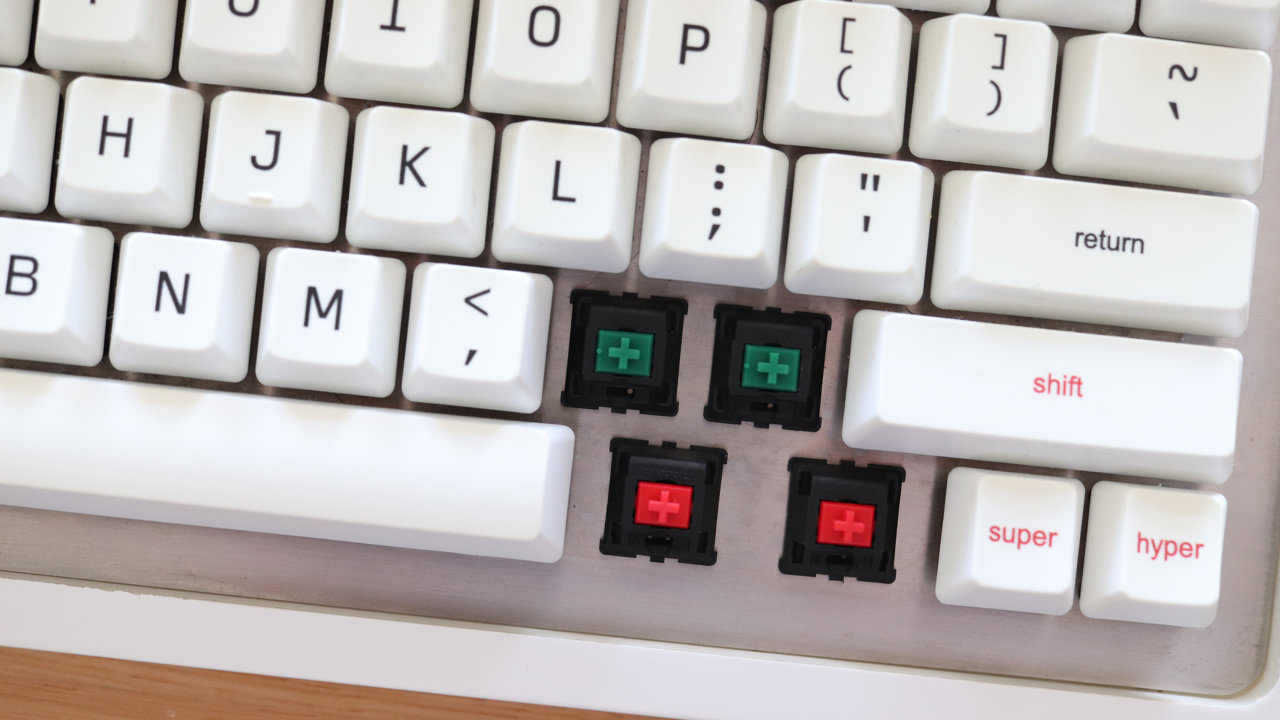
The choice of switches is also amusing: MX greens for the alphanumerical keys and reds for the modifiers. Back then, my experience with switches was limited to my old Cherry MY board, so MX greens and reds were a huge improvement.
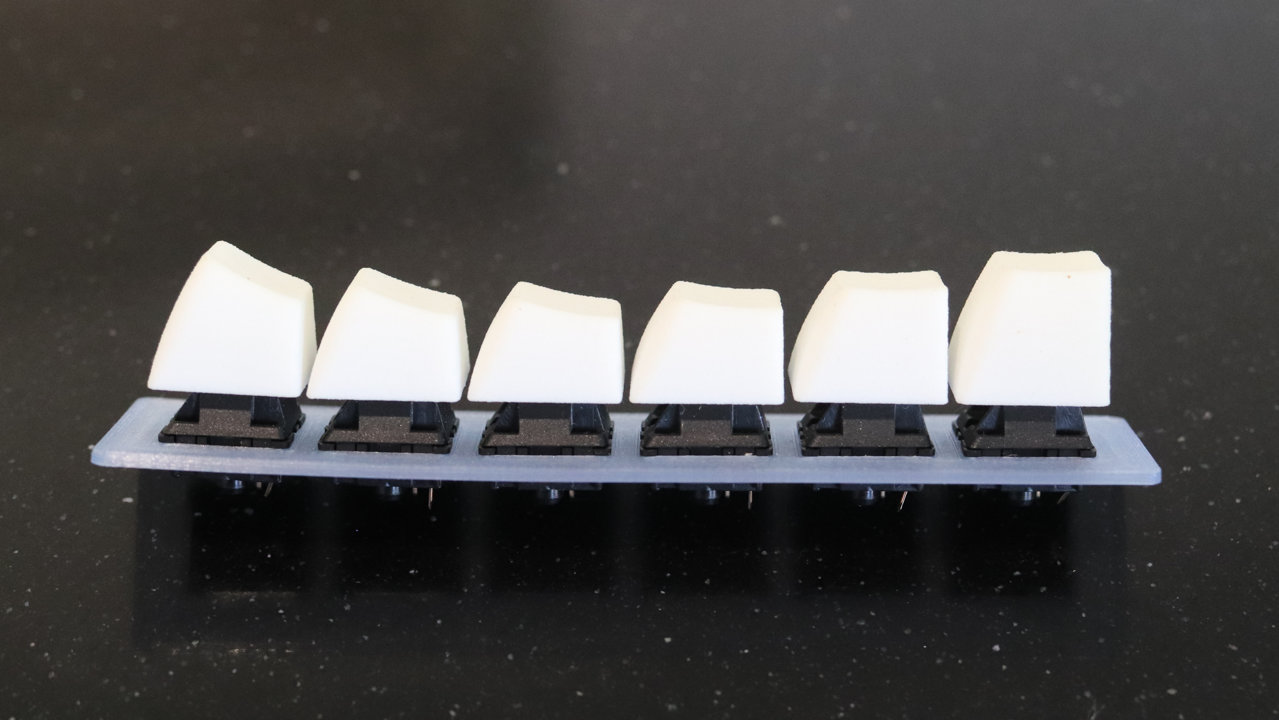
It became clear to me that for the next keyboard I need to design my own keycap profile. Also, I ditched SketchUp and learned Fusion 360. This was all done before I got the original Symbolics keyboard in my hands, so I was just, shall we say, creative. This is one of the most crazy profiles (look at the curvature in the spacebar row):
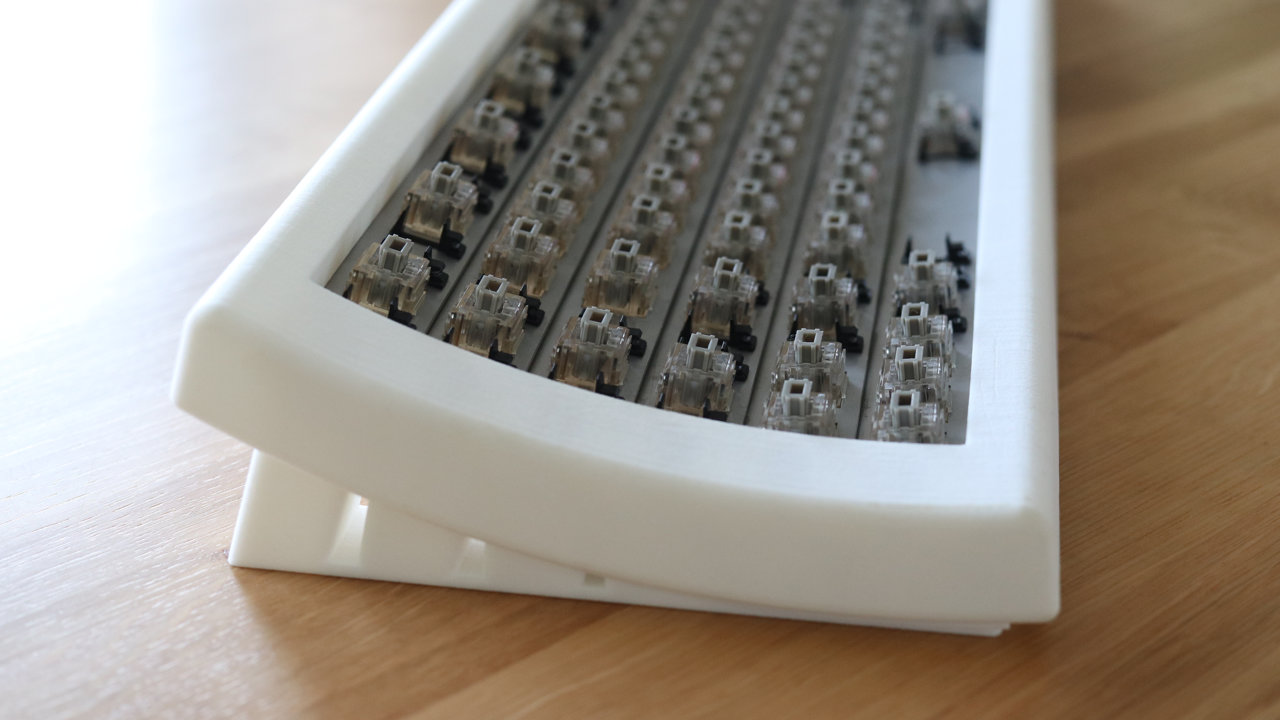
After purchasing some of the classic vintage boards, I decided to build the next keyboard on Alps or their clones. Thus, Keymacs Mk. II was born:
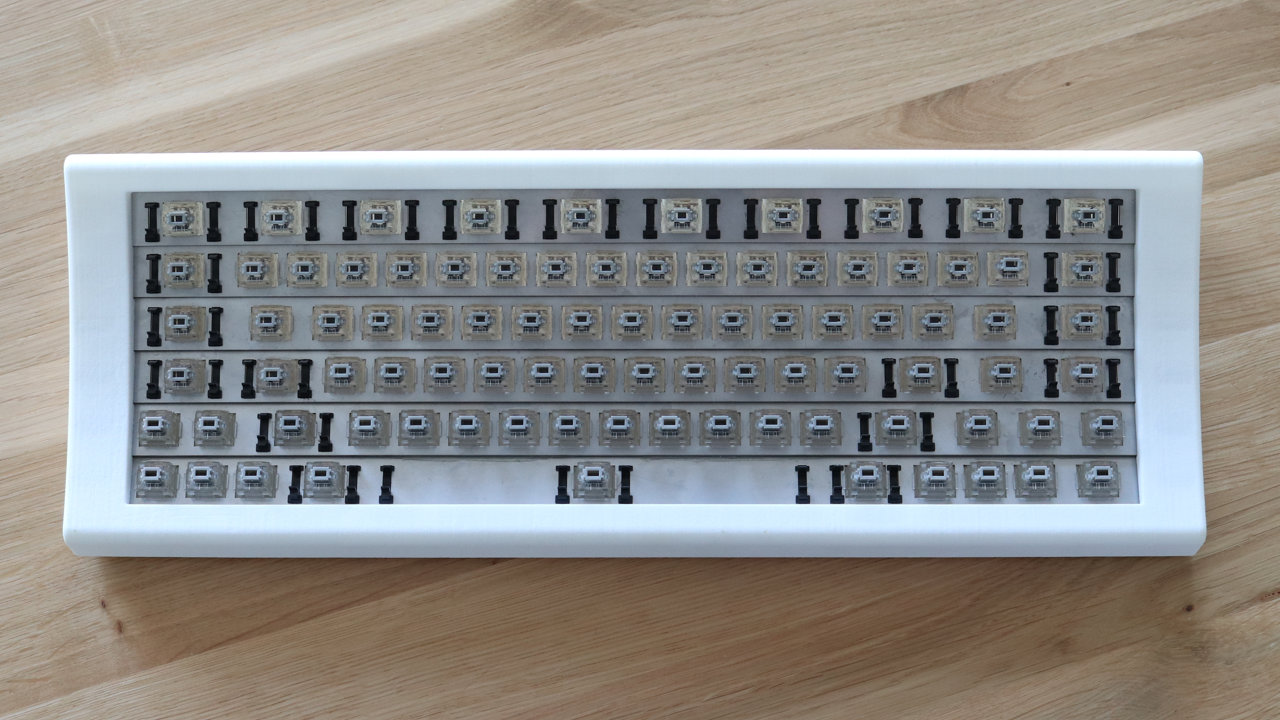
Yes, stepped mount plates, Matias switches, and Costar-style stabilizers!
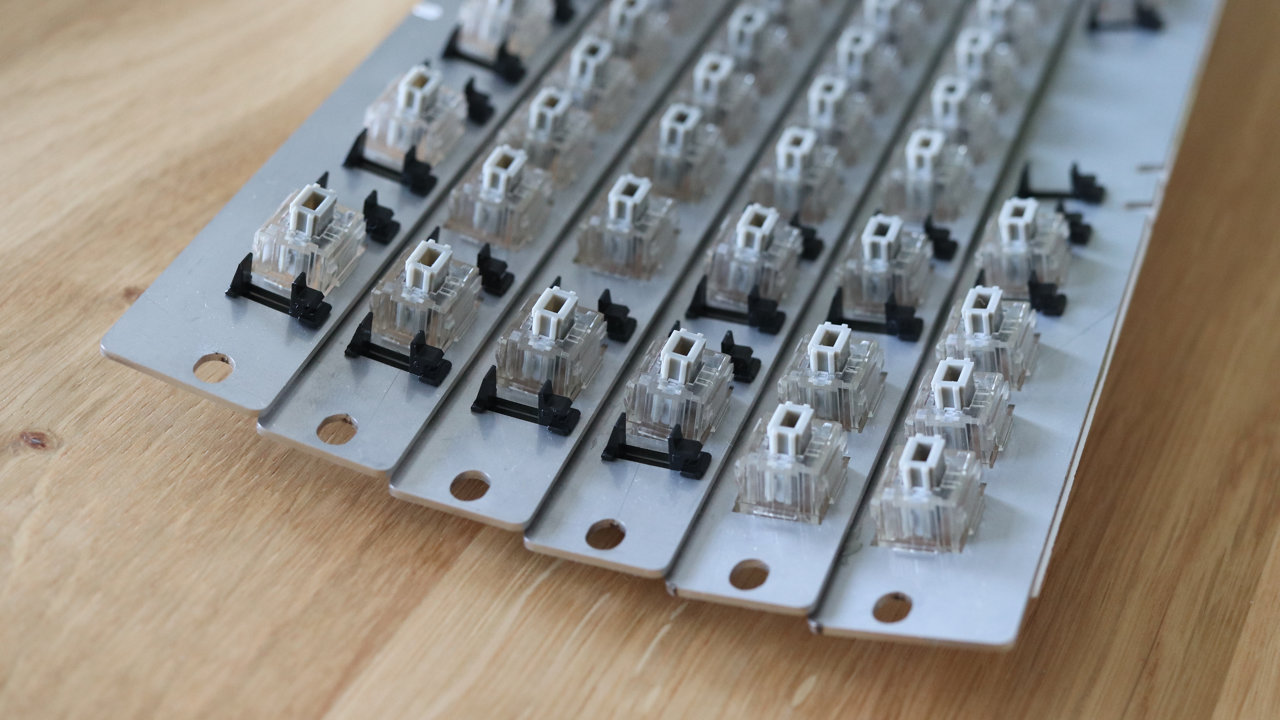
After realizing that the plates can easily be bent, I reinforced the plates by a 3d-printed polyamide skeleton that is glued to the plates by a generous amount of epoxy:
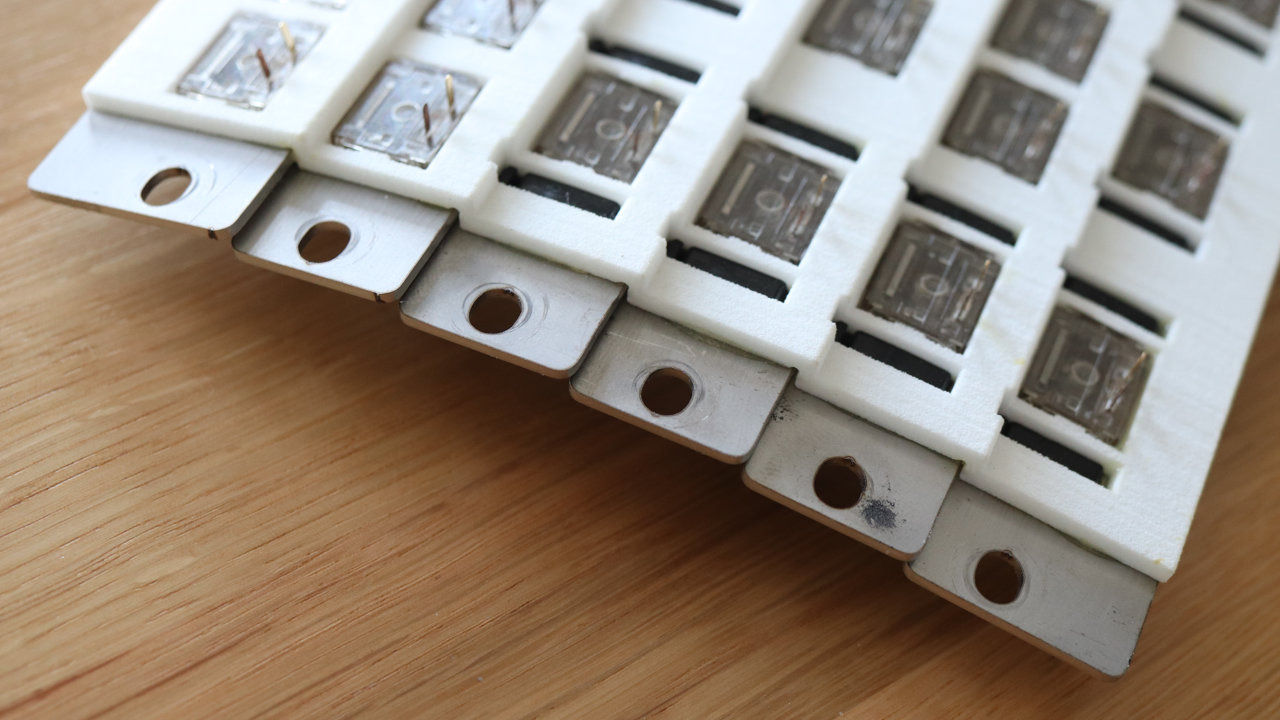
Detail of the switch assembly mounted on a special soldering stand with M5 bolts:
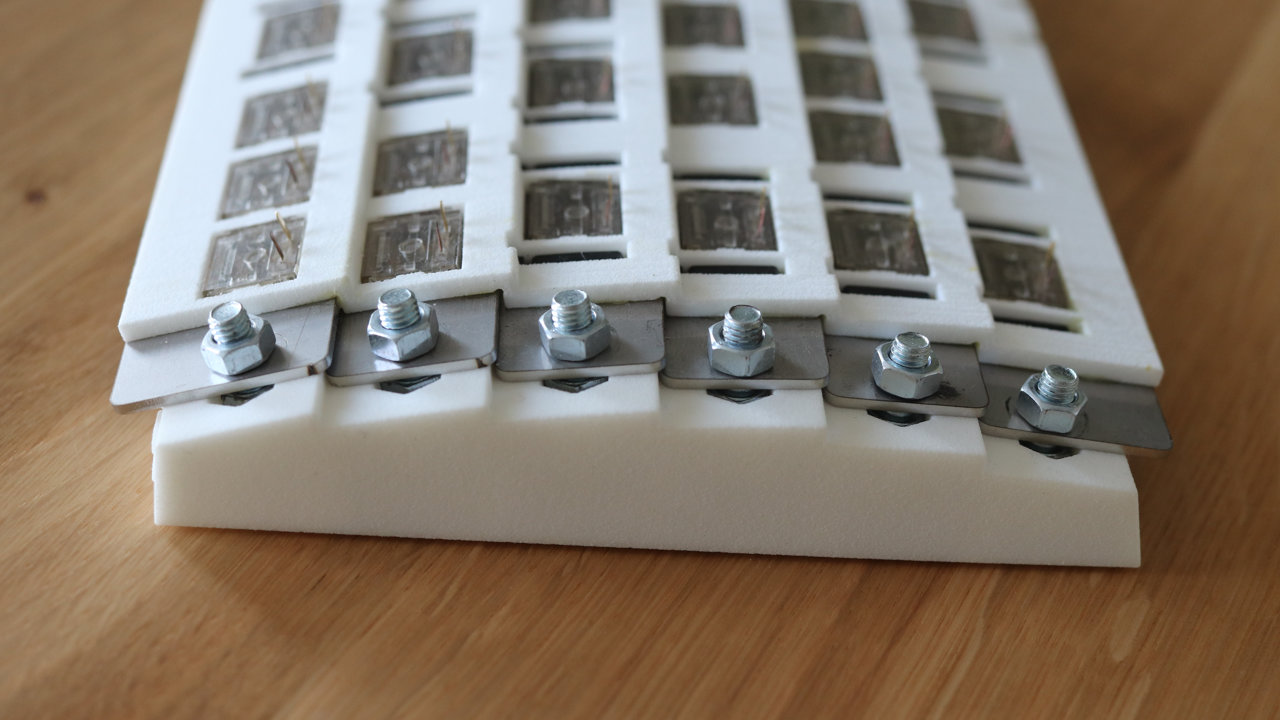
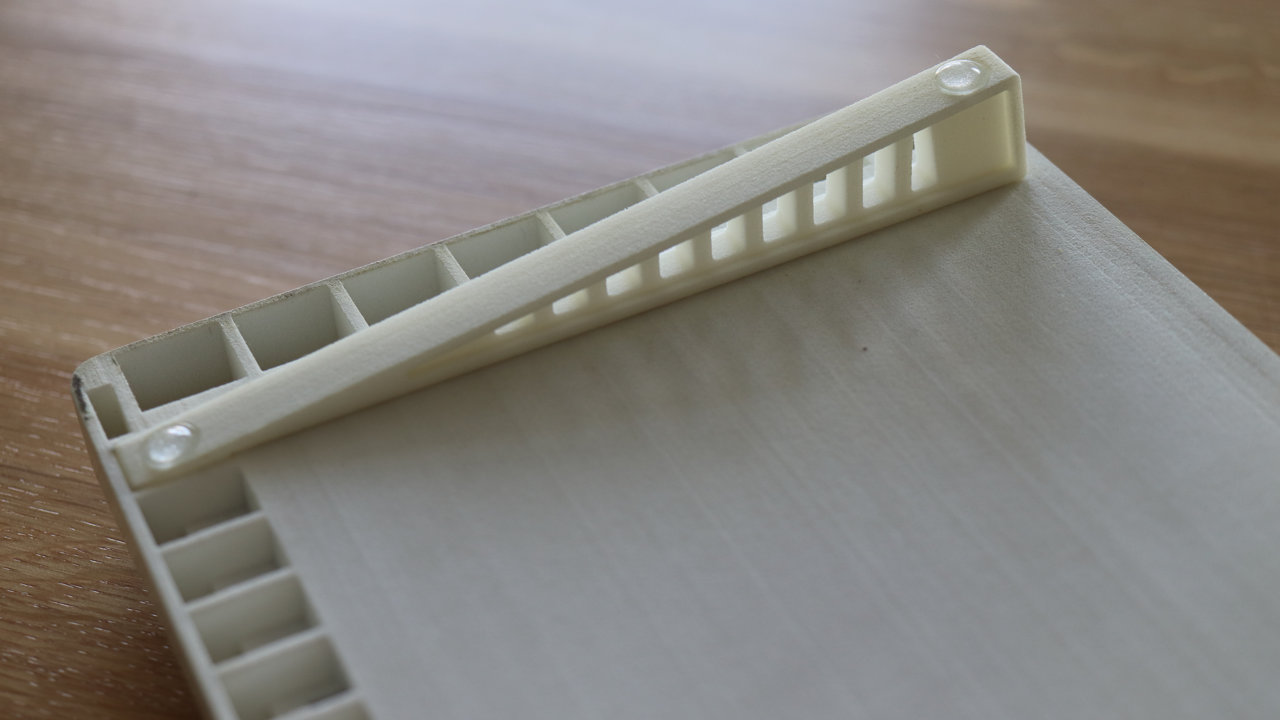
The idea was to clamp the switch assembly between the top and bottom parts of the case and secure it with M5 bolts in a similar way as in the previous picture. This is a cut of the case showing the top and bottom parts:
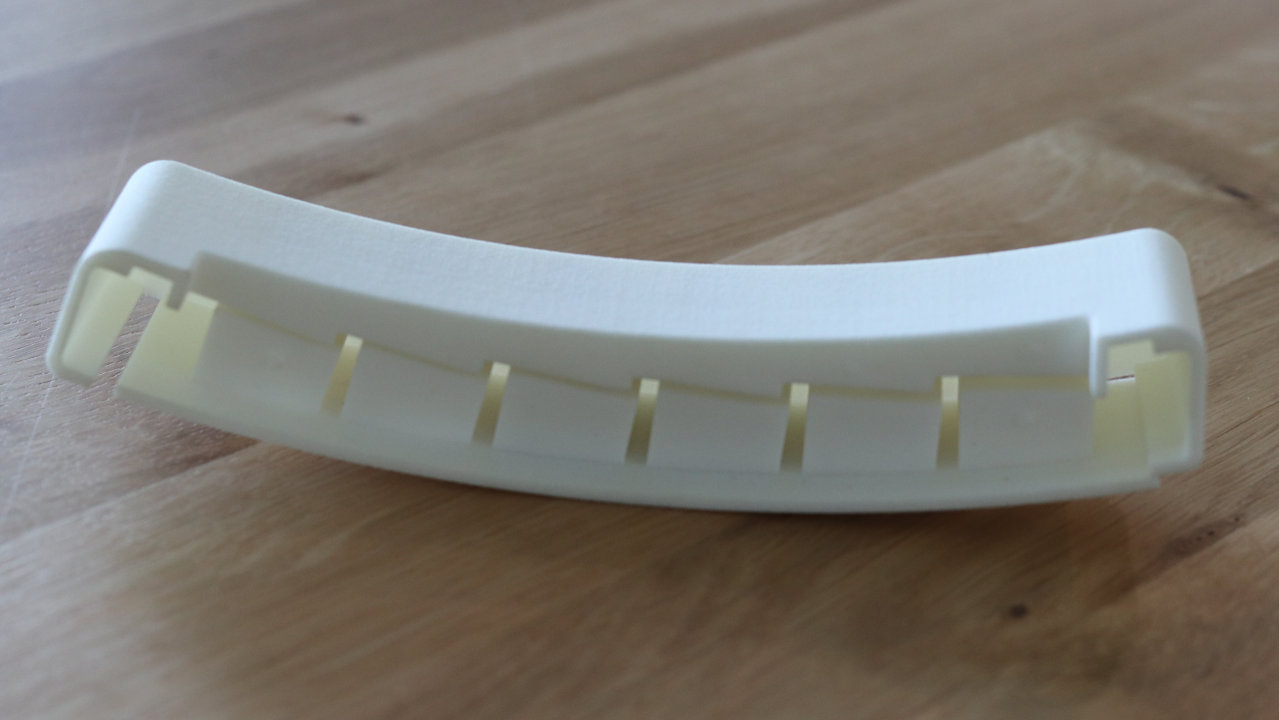
Details of the top and bottom parts:
Side view of the case. The feet are hollow to allow access to the M5 bolts.
A view from the other side:

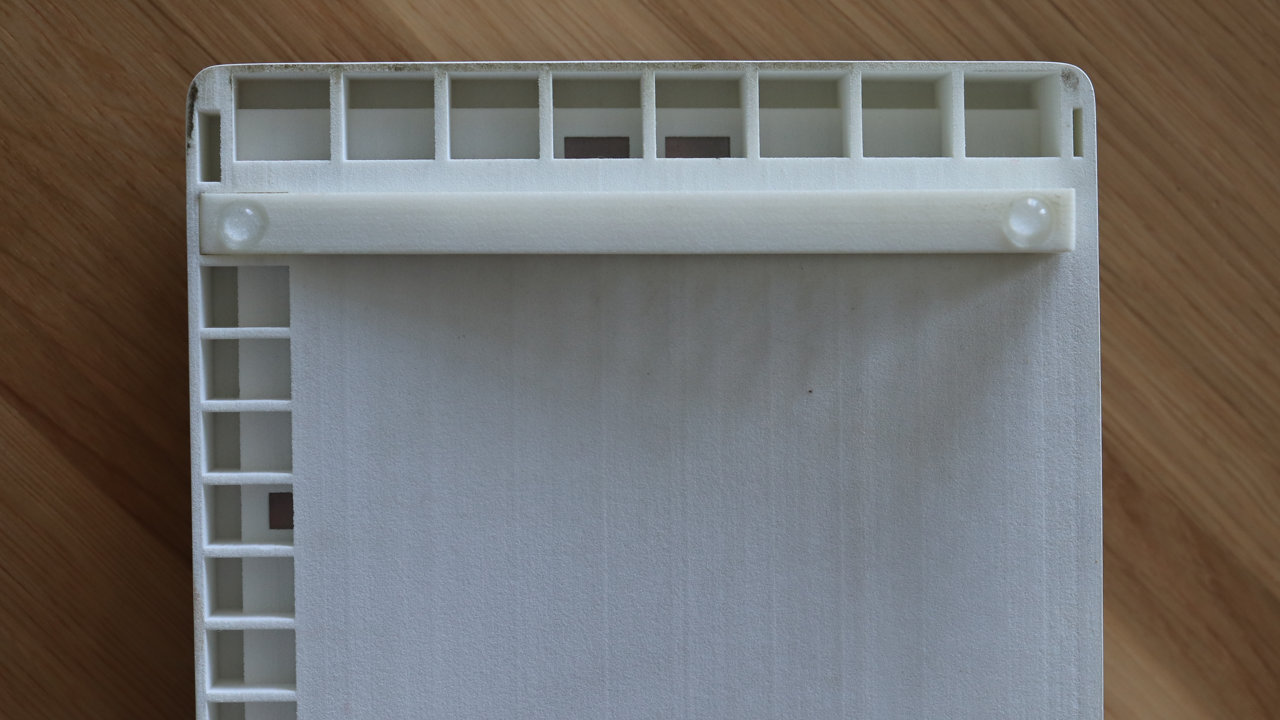
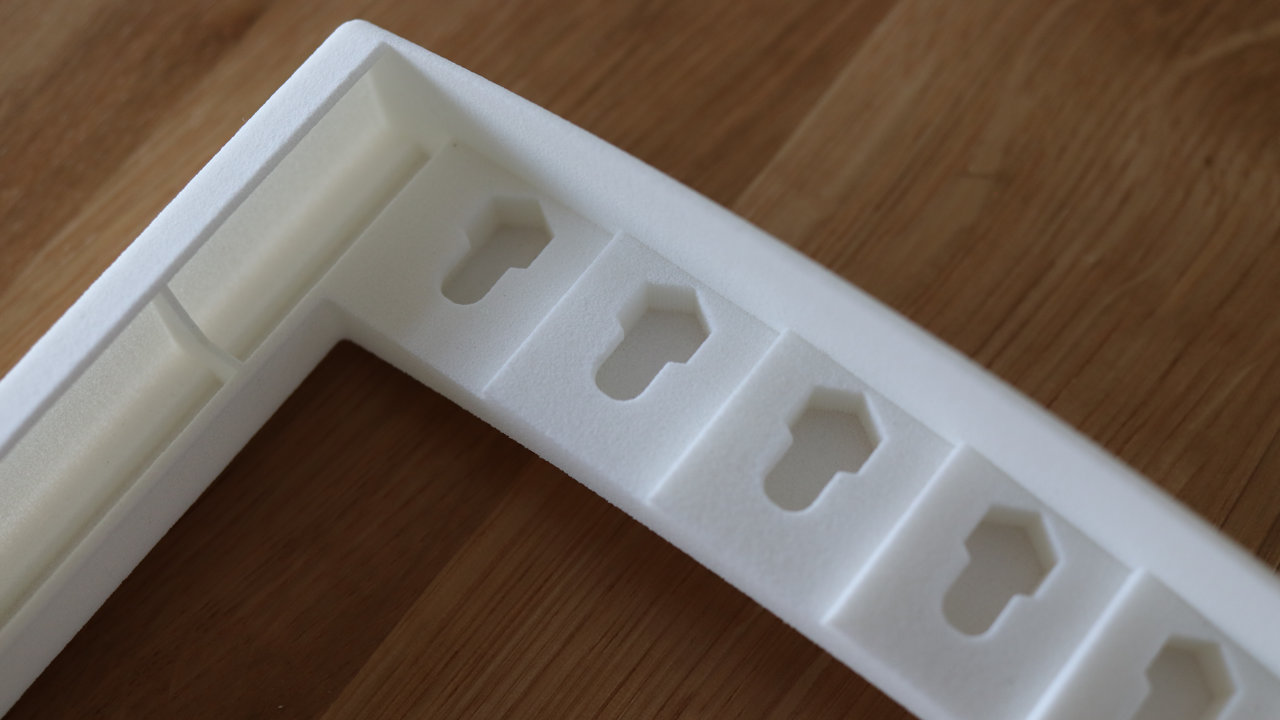
Case top viewed from the inside:
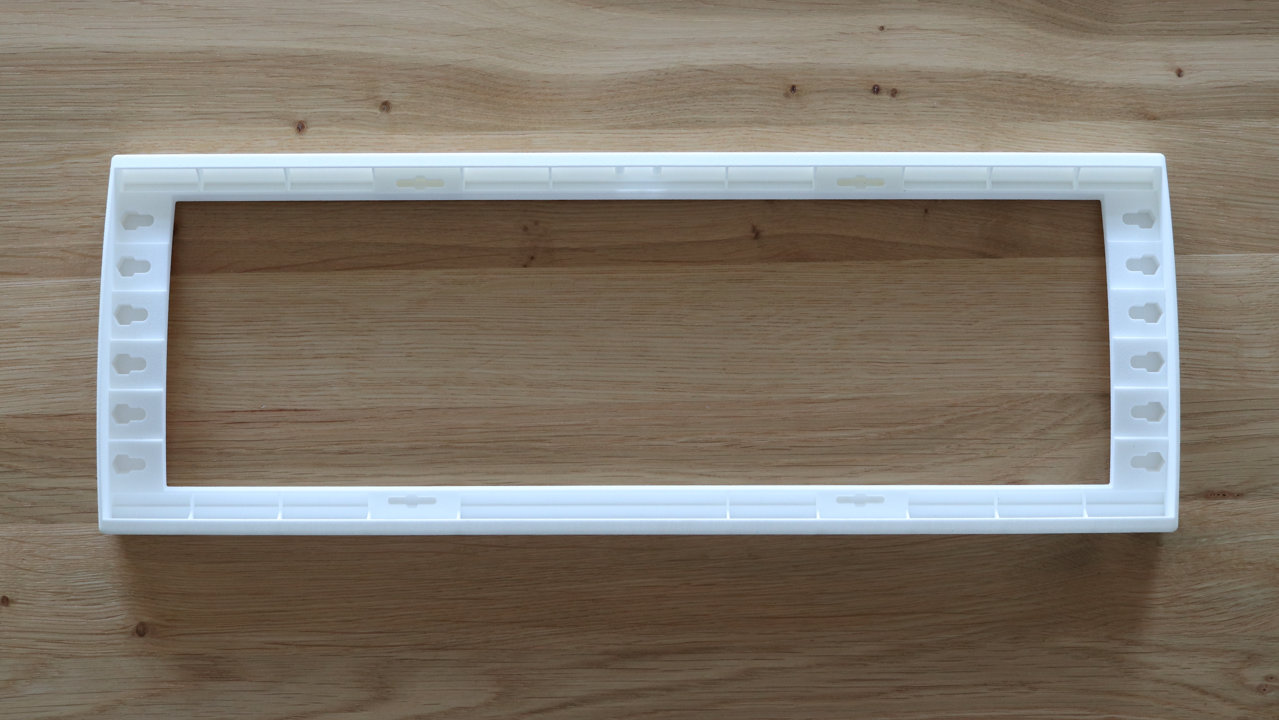
The pockets were designed to hold hex M5 bolts:
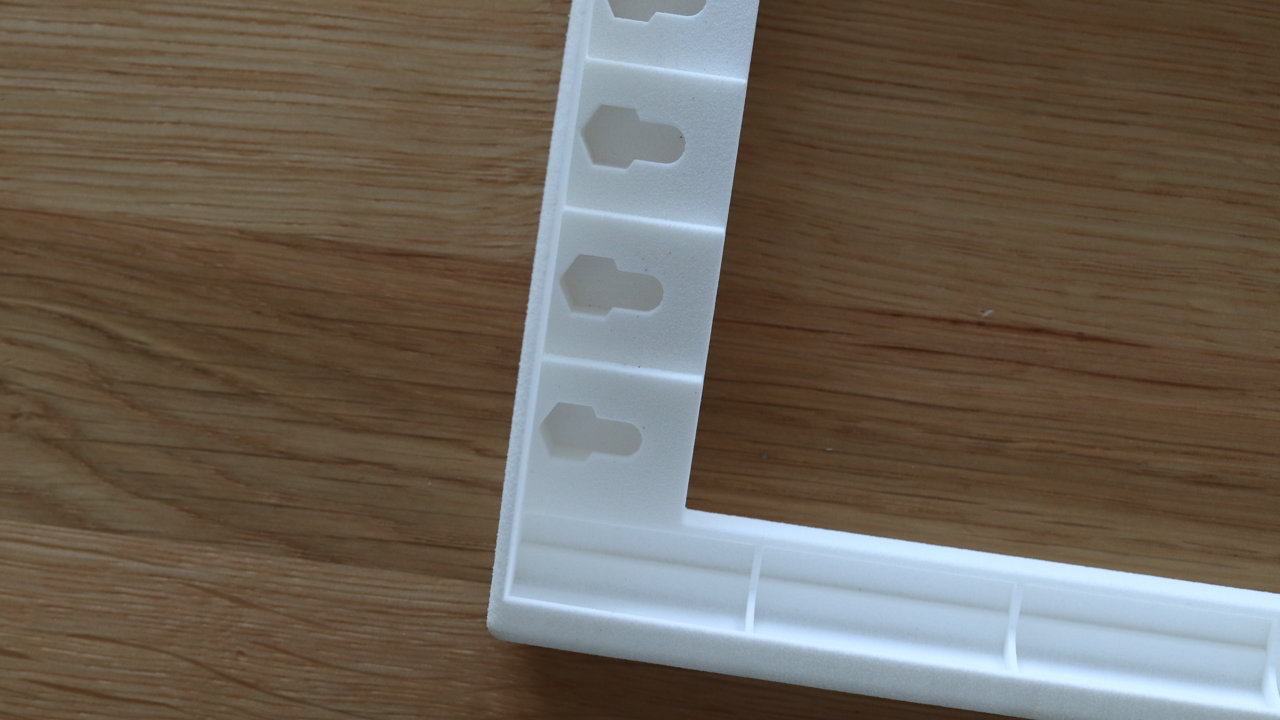
More details …
Case bottom viewed from the inside:
Hollow feet:
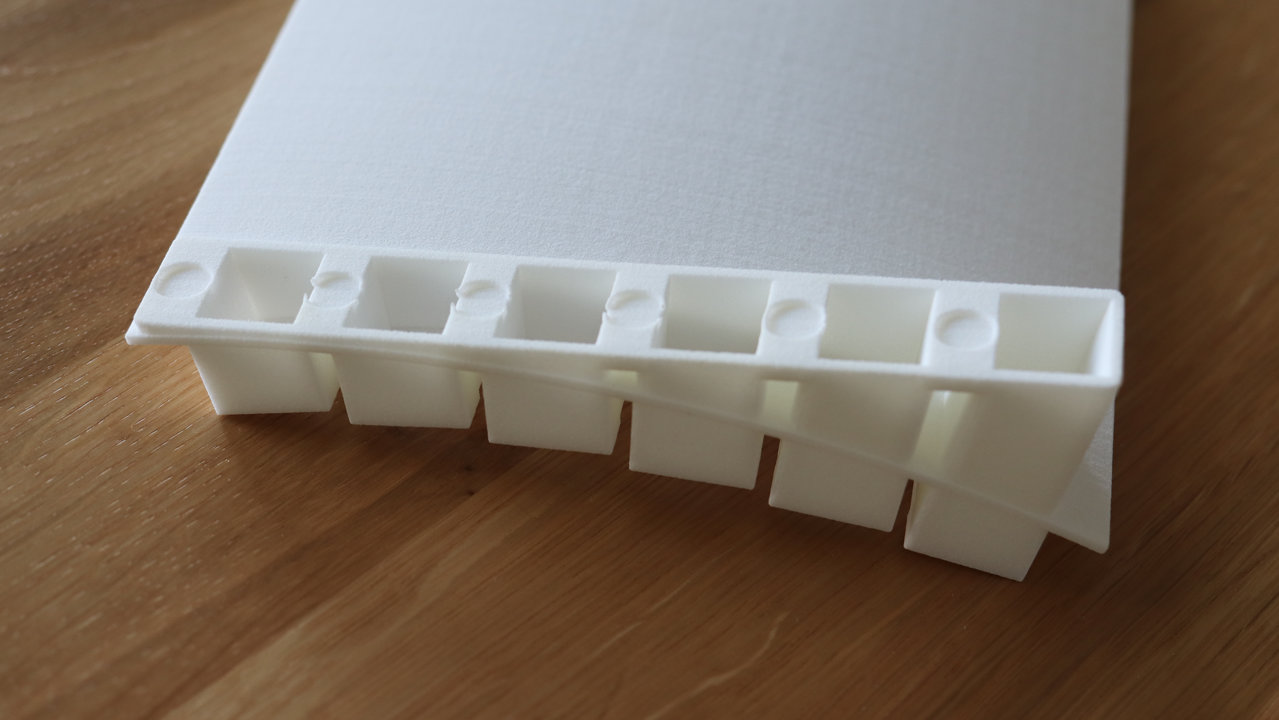
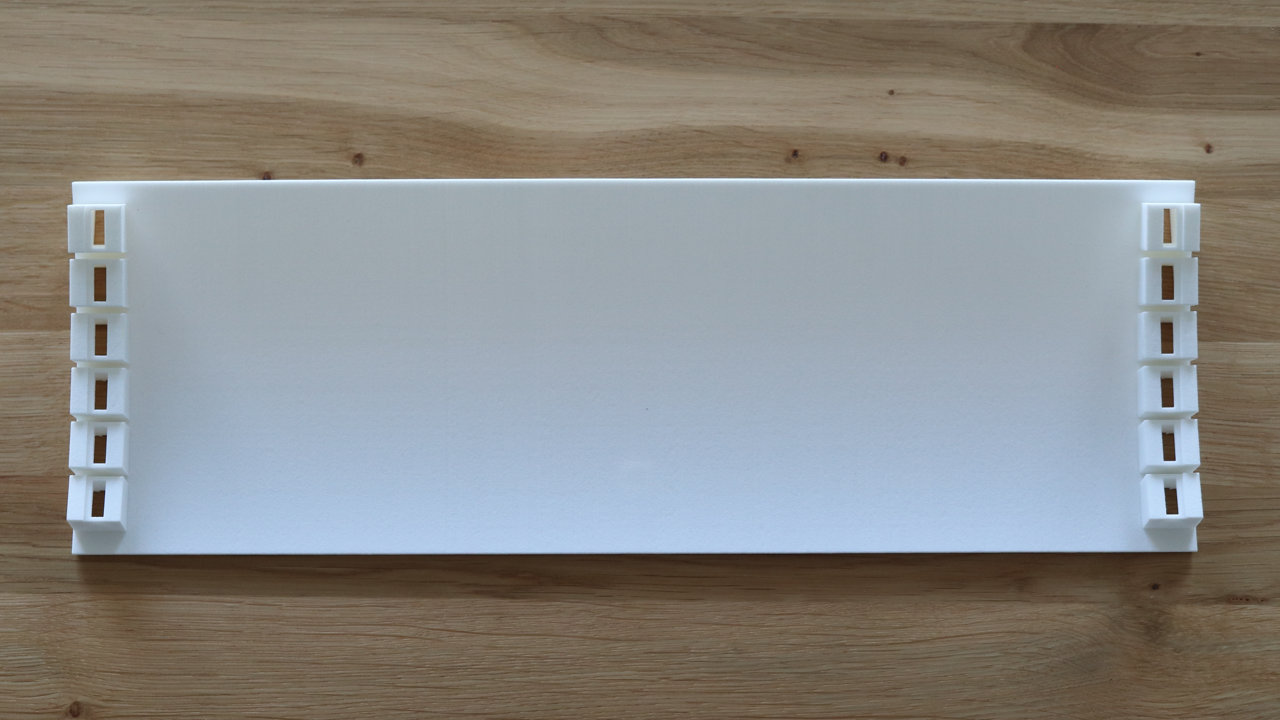
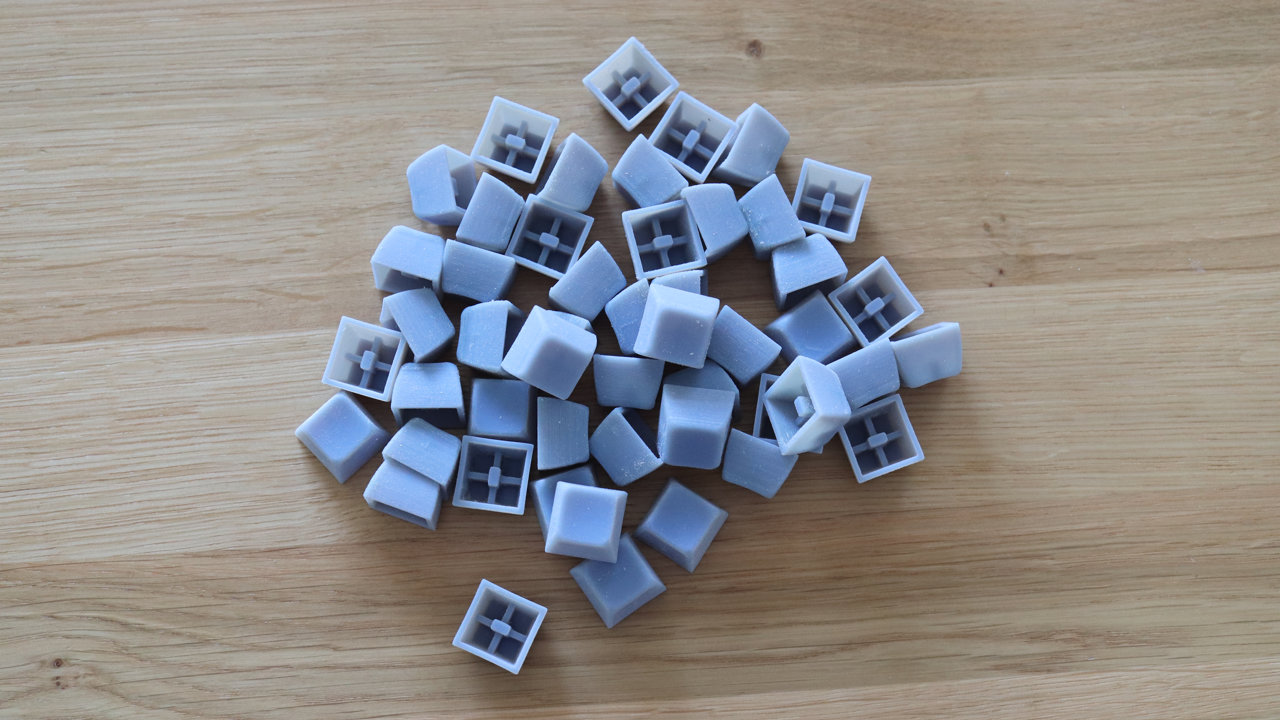
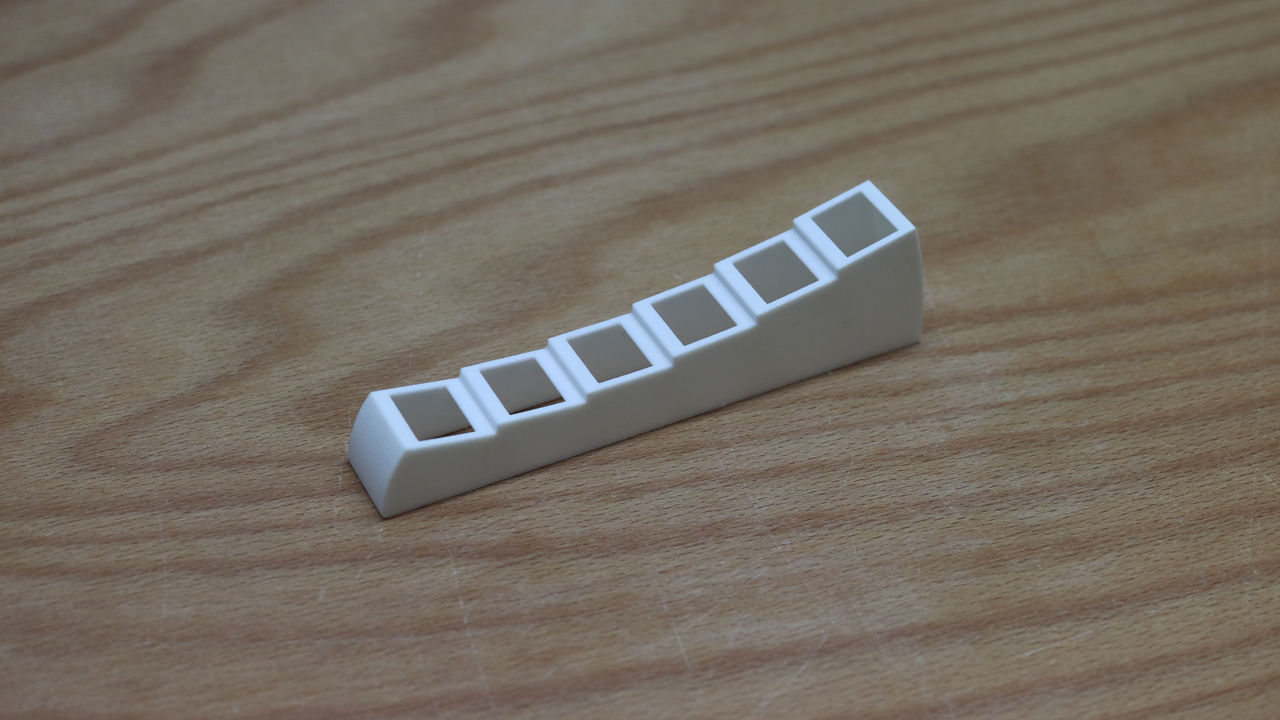
I have made a set of keycaps printed on a 60 micron SLS printer:
One benefit of printing the keycaps is that it is easy to make stabilizers an integral part of the keycaps.
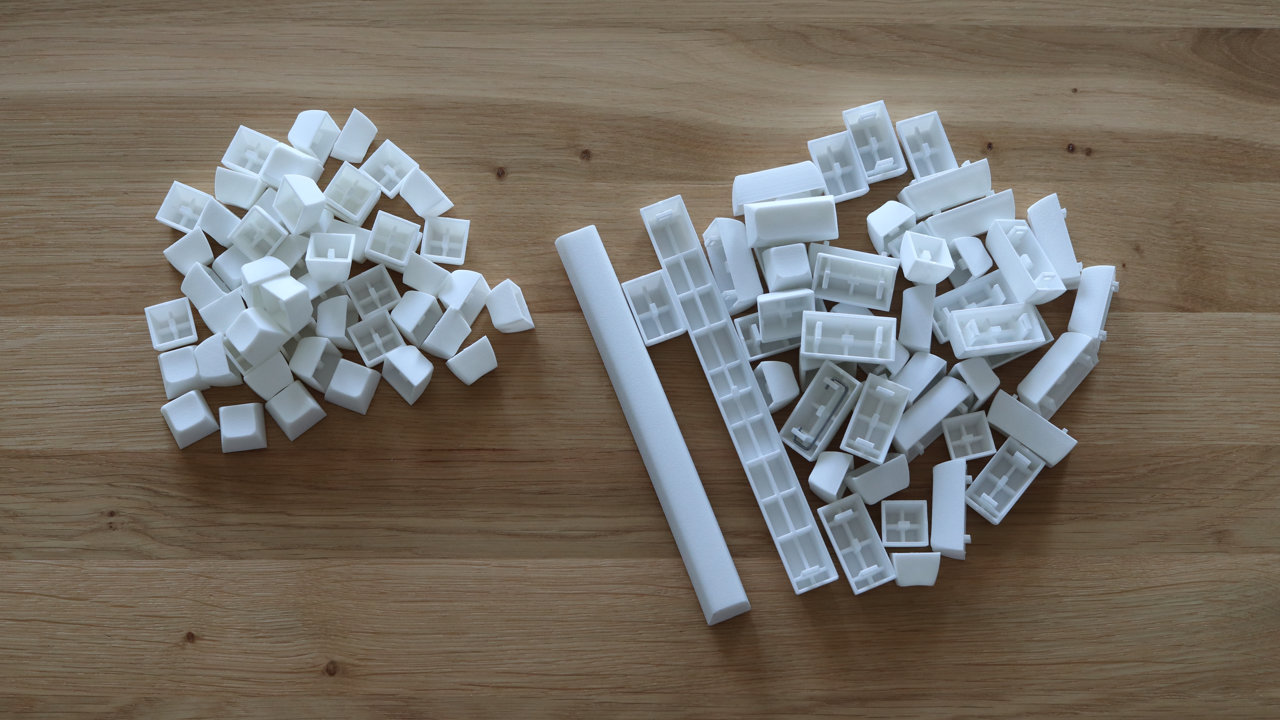
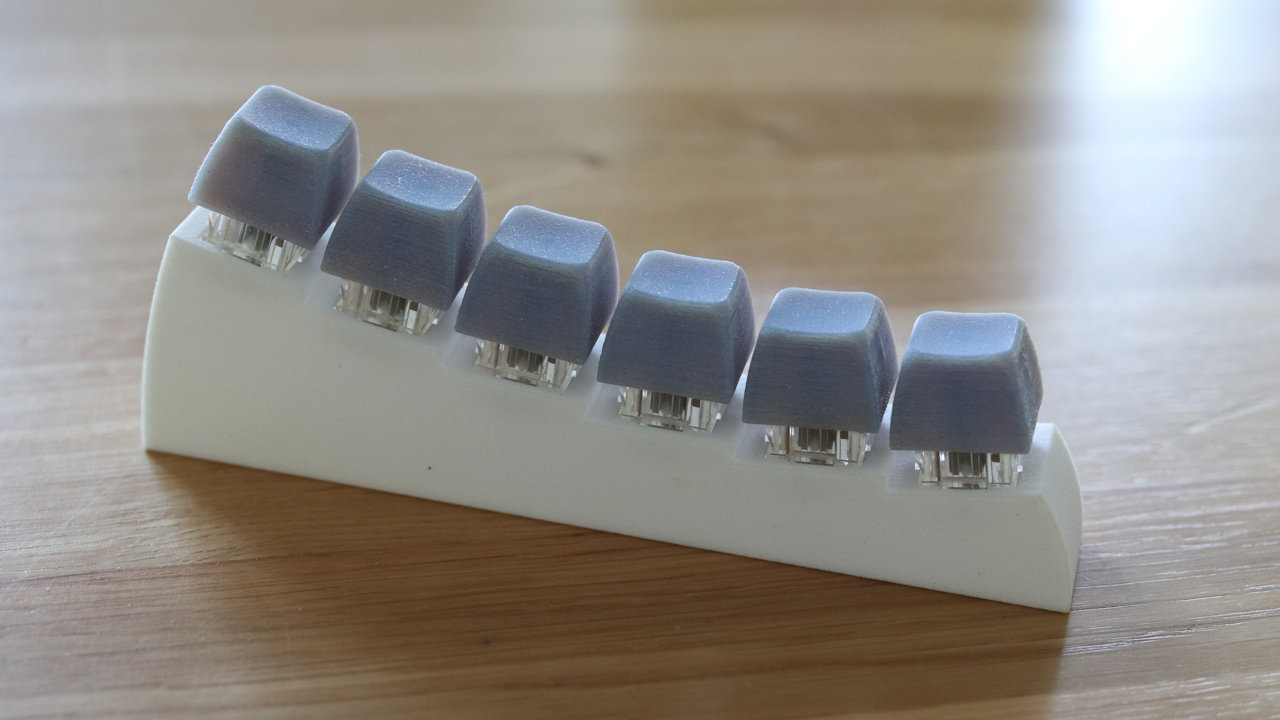
I have experimented with other materials. These were I believe resin-printed:
This is an initial model of the stepped plate with keycaps mounted …
… and a spray-painted variant:
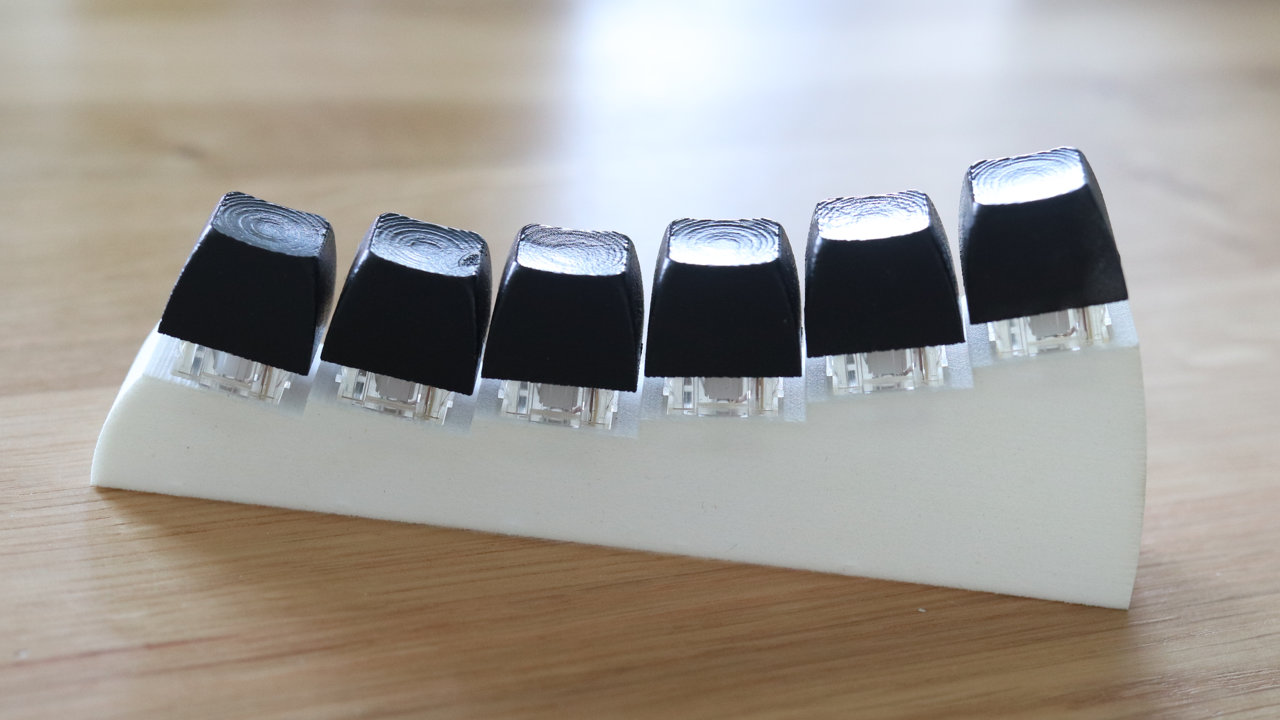
I planned to individually brush and paint each key and later make the legend somehow. I made a few samples …
… and the process was interrupted by acquiring my first original Symbolics keyboard. I am afraid that Mk II. will never be finished and remains in a box in my attic.
This was my first attempt to create a keyboard with a Symbolics-style layout. I wanted to capture the basic ergonomy of the layout by putting the 2U keys in the top row and a big control key next to the spacebar. The case is 3d-printed on a 120 micron SLS printer with additional surface paint. The keycaps are cherry-compatible custom pad-printed and, obviously, I was limited to what was available on a standard 104-key layout.
One of the remarkable features: The mount plate is free-floating in the case. I guess I just wanted an easy access to the wiring. You can open it as the hood of your favourite car:
Front view:
The keyboard was hand-wired …
… and powered by Teensy++.
Detail of the wiring:
The USB B connector is placed on the rear-left side. The case has been painted by several layers of matte polyurethane paint and hand-brushed during the process.
The connector is glued to the case with a 2-component epoxy and is placed in a fairly complex housing:
The original case was flat but it did not feel right. I added SLS-printed feet later. Here you can see the difference between the painted finish on the top side and the rough printed polyamide on the bottom side of the case.
The bottom side has a lot of cavities to lower the printing cost. I do not believe I did all this in SketchUp.
The position of the modifier keys is similar to the Symbolics layout, however, I was not satisfied with the short spacebar. Also, I developed a habit of pressing the left control with my thumb which, after its extensive use, lead to some discomfort. It was time to design a new keyboard with the proper layout and a 9U spacebar!
The choice of switches is also amusing: MX greens for the alphanumerical keys and reds for the modifiers. Back then, my experience with switches was limited to my old Cherry MY board, so MX greens and reds were a huge improvement.
It became clear to me that for the next keyboard I need to design my own keycap profile. Also, I ditched SketchUp and learned Fusion 360. This was all done before I got the original Symbolics keyboard in my hands, so I was just, shall we say, creative. This is one of the most crazy profiles (look at the curvature in the spacebar row):
After purchasing some of the classic vintage boards, I decided to build the next keyboard on Alps or their clones. Thus, Keymacs Mk. II was born:
Yes, stepped mount plates, Matias switches, and Costar-style stabilizers!
After realizing that the plates can easily be bent, I reinforced the plates by a 3d-printed polyamide skeleton that is glued to the plates by a generous amount of epoxy:
Detail of the switch assembly mounted on a special soldering stand with M5 bolts:
The idea was to clamp the switch assembly between the top and bottom parts of the case and secure it with M5 bolts in a similar way as in the previous picture. This is a cut of the case showing the top and bottom parts:
Details of the top and bottom parts:
Side view of the case. The feet are hollow to allow access to the M5 bolts.
A view from the other side:
Case top viewed from the inside:
The pockets were designed to hold hex M5 bolts:
More details …
Case bottom viewed from the inside:
Hollow feet:
I have made a set of keycaps printed on a 60 micron SLS printer:
One benefit of printing the keycaps is that it is easy to make stabilizers an integral part of the keycaps.
I have experimented with other materials. These were I believe resin-printed:
This is an initial model of the stepped plate with keycaps mounted …
… and a spray-painted variant:
I planned to individually brush and paint each key and later make the legend somehow. I made a few samples …
… and the process was interrupted by acquiring my first original Symbolics keyboard. I am afraid that Mk II. will never be finished and remains in a box in my attic.
-
CaptPickguard
- Location: Canada
- Main keyboard: IBM Model F XT
- Main mouse: Logitech G502
- Favorite switch: Orange Alps
This is full-on insanity! We'll see how my judgement is in a few weeks. 

-
runninghack
- Location: United States
- Main keyboard: Leaf 60
- Main mouse: Logitech M570
- Favorite switch: ALPS SKCM/SKCL Linear
- DT Pro Member: -
I learnt Lisp (Scheme and Common Lisp) many years ago. Thought it was not beneficial to my current work, I really enjoyed the time I learn it. I've always been invested in the Lisp machine keyboards since then.
-
runninghack
- Location: United States
- Main keyboard: Leaf 60
- Main mouse: Logitech M570
- Favorite switch: ALPS SKCM/SKCL Linear
- DT Pro Member: -

also want to share this pic here about the custom legends.
The caps in the pic were laser engraved and filled with resin-like materials.
-
Rayndalf
- Location: Texas
- Main keyboard: Kinesis Model 130
- Main mouse: Logitech M-S48, Razer Viper
- Favorite switch: MX Browns
- DT Pro Member: -
That curved plate is genius (and gloriously overengineered).
How did you model the plate step + curve in Fusion360? I tried something similar and I really just eyeballed it after a point.
How did you model the plate step + curve in Fusion360? I tried something similar and I really just eyeballed it after a point.
-
lispnick
- Location: Czechia
- Main keyboard: Keymacs A620N-88 Rev. A
- Main mouse: Kensington SlimBlade Trackball
- Favorite switch: Alps SKCM Orange
- Contact:
Interesting! Do you know the exact depth of the engraving?runninghack wrote: 15 Apr 2021, 20:26
also want to share this pic here about the custom legends.
The caps in the pic were laser engraved and filled with resin-like materials.
-
lispnick
- Location: Czechia
- Main keyboard: Keymacs A620N-88 Rev. A
- Main mouse: Kensington SlimBlade Trackball
- Favorite switch: Alps SKCM Orange
- Contact:
I started with making this model:Rayndalf wrote: 16 Apr 2021, 01:41 That curved plate is genius (and gloriously overengineered).
How did you model the plate step + curve in Fusion360? I tried something similar and I really just eyeballed it after a point.
I put the angle between two consecutive rows as a constraint (I think it was 5º). The step is always perpendicular to the lower row. In order to make the case, I just interpolated the steps with a spline, made an offset on both sides and added some overhang in the front and the rear.
-
runninghack
- Location: United States
- Main keyboard: Leaf 60
- Main mouse: Logitech M570
- Favorite switch: ALPS SKCM/SKCL Linear
- DT Pro Member: -
Just asked the manufacturer about it. They said the depth is around 0.5mm.lispnick wrote: 19 Apr 2021, 00:42Interesting! Do you know the exact depth of the engraving?runninghack wrote: 15 Apr 2021, 20:26
also want to share this pic here about the custom legends.
The caps in the pic were laser engraved and filled with resin-like materials.
-
runninghack
- Location: United States
- Main keyboard: Leaf 60
- Main mouse: Logitech M570
- Favorite switch: ALPS SKCM/SKCL Linear
- DT Pro Member: -
The stepped mount plate is a great idea. I wonder why you want to use the 3d-printed skeleton though. Right now most of the custom keyboard designers and users lean to use soft plates (PC plate/half plate) and mounting methods enable soft bottom out (gasket/PORON+leaf-spring).
Your solution by its nature is superior than all of the existing approaches as the plates (and the PCBs if there are six PCBs I assume) are totally separated.
Of course it's a matter of preference and some people like sturdy plates. Just want to bring it up as no one has discussed it so far.
Your solution by its nature is superior than all of the existing approaches as the plates (and the PCBs if there are six PCBs I assume) are totally separated.
Of course it's a matter of preference and some people like sturdy plates. Just want to bring it up as no one has discussed it so far.
-
Rayndalf
- Location: Texas
- Main keyboard: Kinesis Model 130
- Main mouse: Logitech M-S48, Razer Viper
- Favorite switch: MX Browns
- DT Pro Member: -
Handwiring + individual plates for each row would be extremely flexible, especially if each plate "strip" was mounted to the upperside of the case with gaskets.runninghack wrote: 19 Apr 2021, 03:51 The stepped mount plate is a great idea. I wonder why you want to use the 3d-printed skeleton though. Right now most of the custom keyboard designers and users lean to use soft plates (PC plate/half plate) and mounting methods enable soft bottom out (gasket/PORON+leaf-spring).
Your solution by its nature is superior than all of the existing approaches as the plates (and the PCBs if there are six PCBs I assume) are totally separated.
Of course it's a matter of preference and some people like sturdy plates. Just want to bring it up as no one has discussed it so far.
The curve/ stepping also makes monoprofile keycaps comfortably contoured (similar to buckling spring boards with a curved backplate).
Lots of innovations here.
-
lispnick
- Location: Czechia
- Main keyboard: Keymacs A620N-88 Rev. A
- Main mouse: Kensington SlimBlade Trackball
- Favorite switch: Alps SKCM Orange
- Contact:
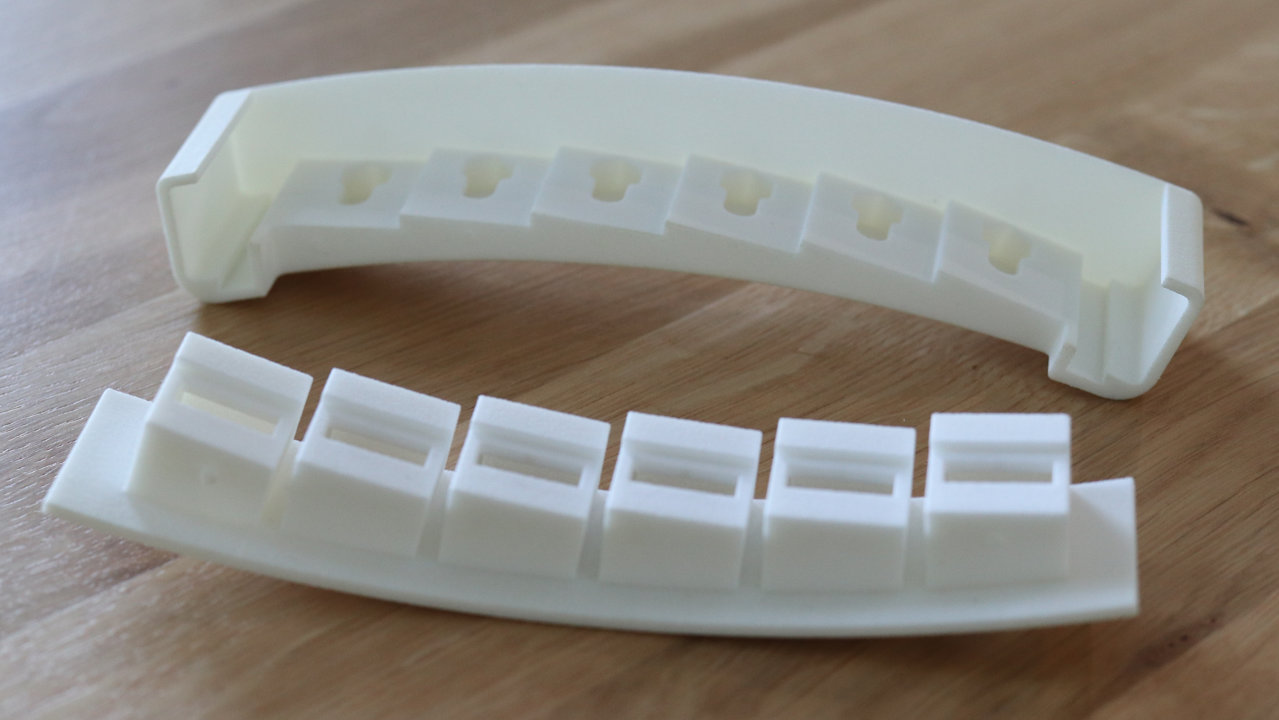
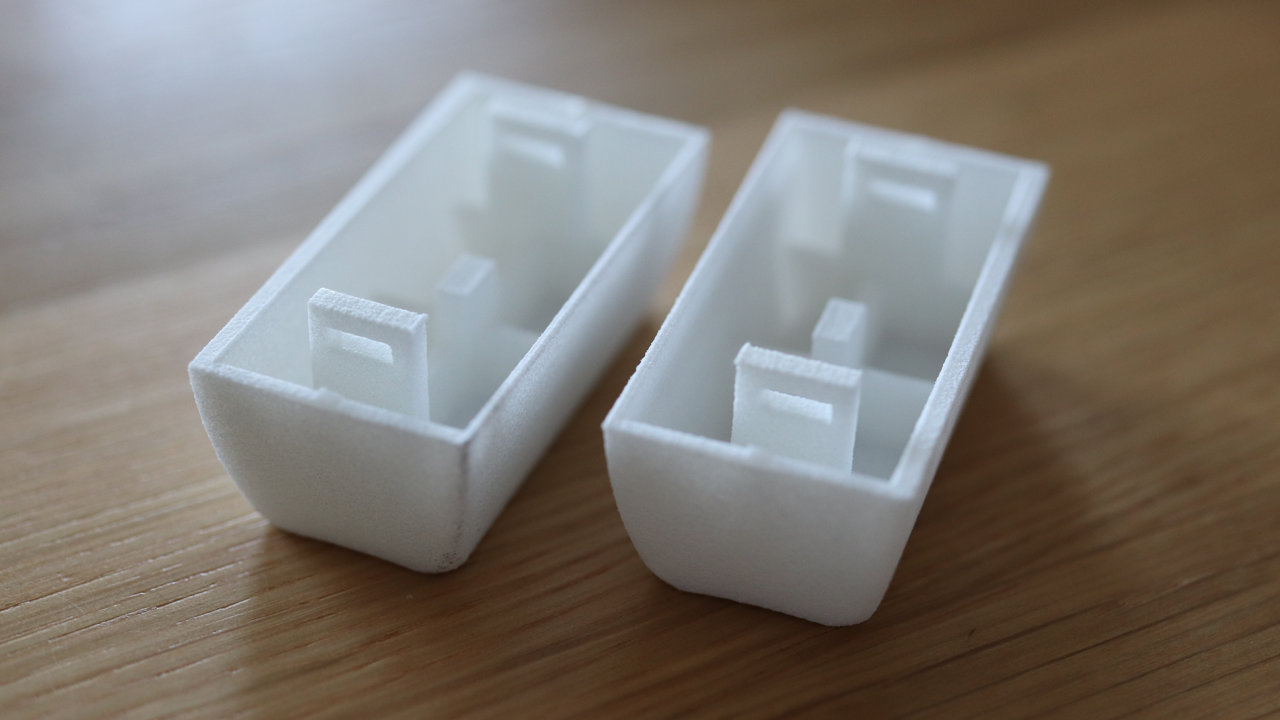
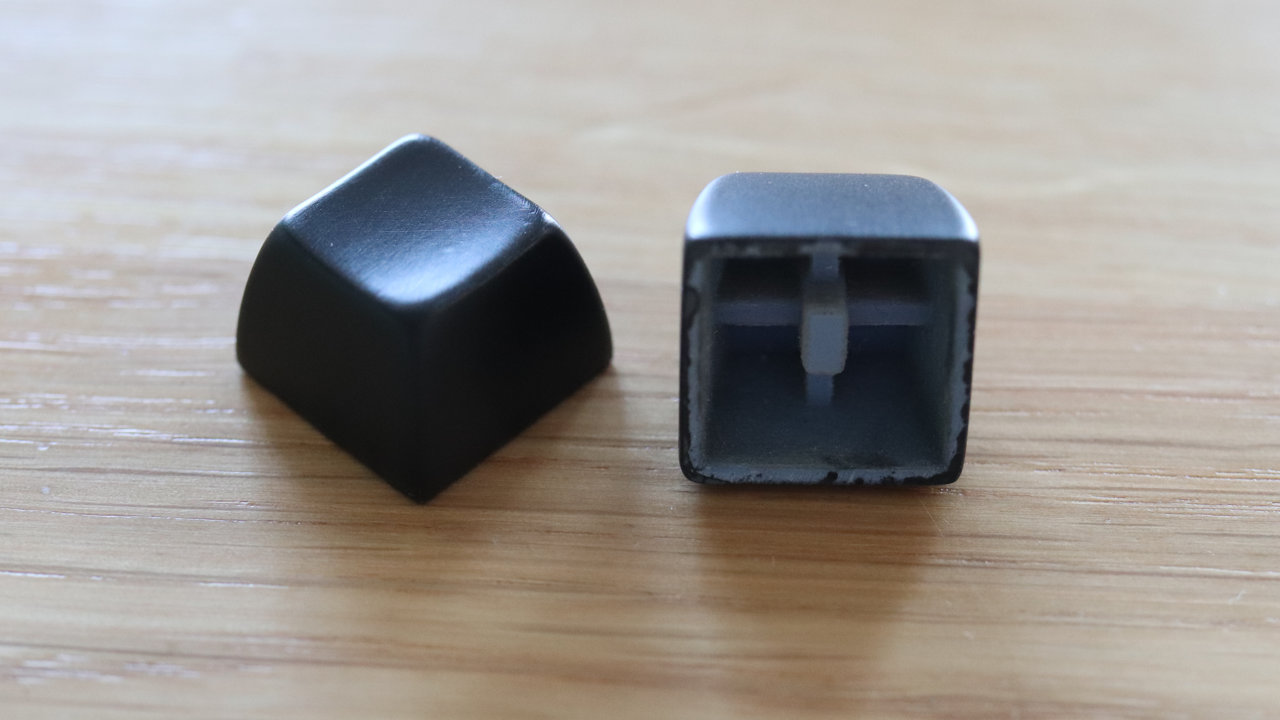
I took one of the keycaps and split it on my band saw to give you an idea how it looks inside:
Two parts separated …
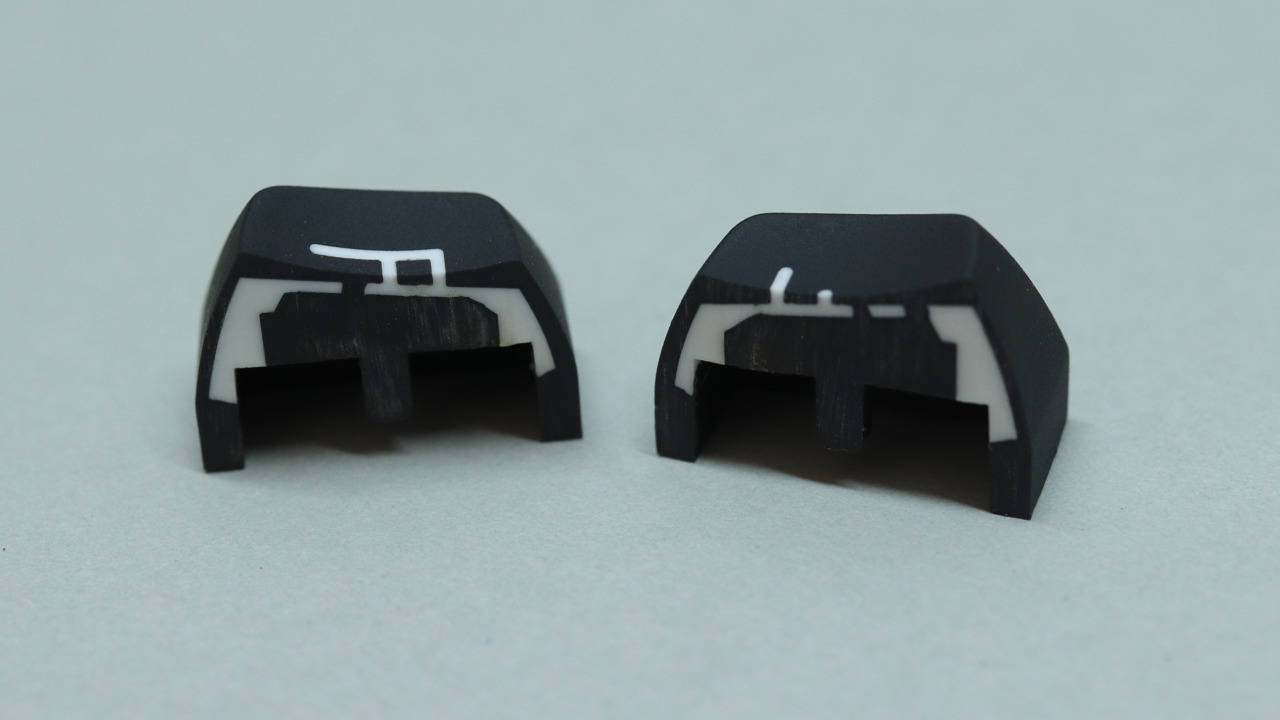
… and a detail:
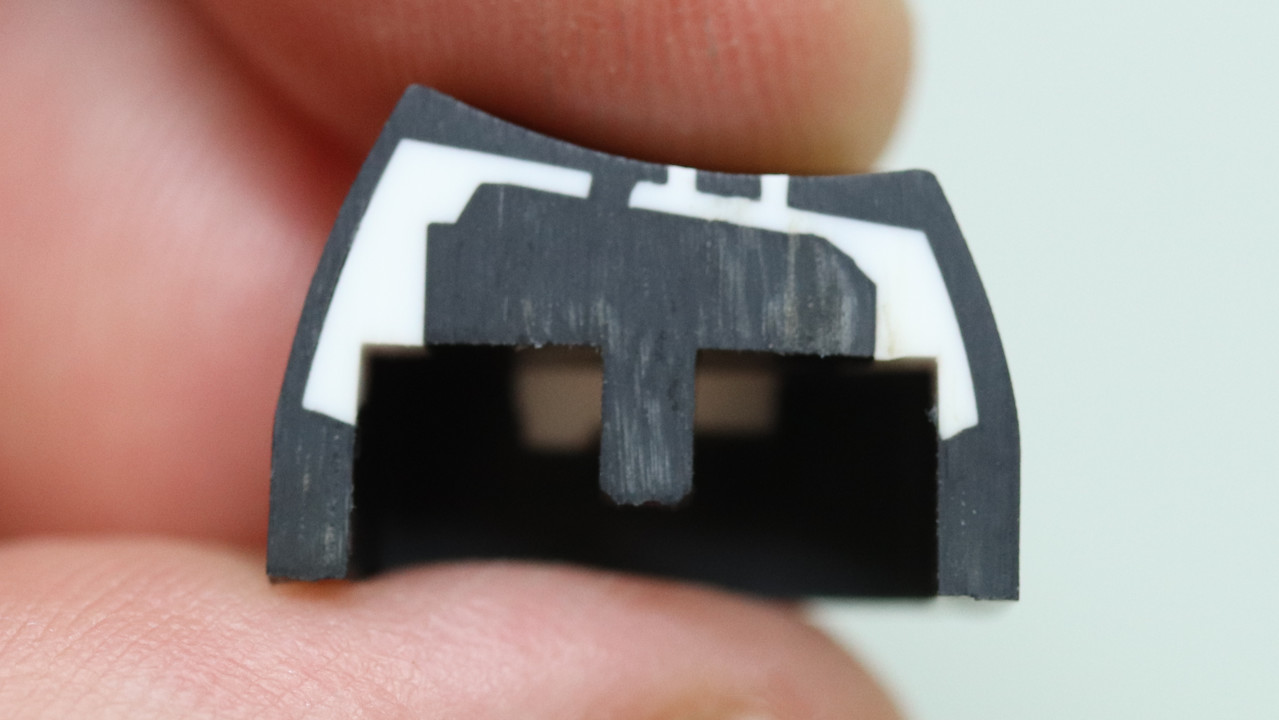
Two parts separated …
… and a detail:

-
lispnick
- Location: Czechia
- Main keyboard: Keymacs A620N-88 Rev. A
- Main mouse: Kensington SlimBlade Trackball
- Favorite switch: Alps SKCM Orange
- Contact:
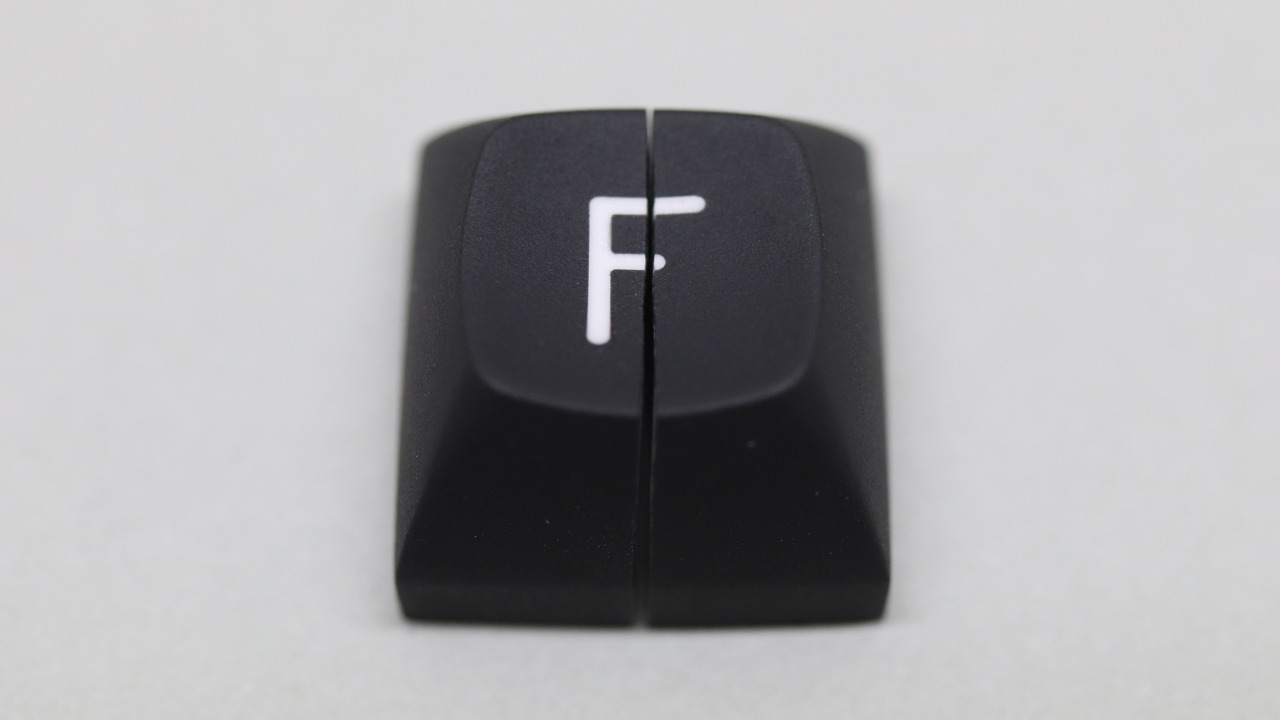
Finally, I got the time to make video on making a keycap! I have been asked to make a custom ESC key based on an SVG graphics. I took this as an opportunity to make video of the whole process. Here it is:
Also, I have made a new mix featuring all different types of switches used so far:
Also, I have made a new mix featuring all different types of switches used so far: